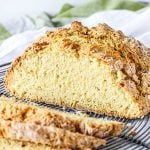
Simple Irish Soda Bread (4 ingredients)
This might be the easiest no-yeast homemade bread you’ll ever make—and so tasty! It’s ready in an hour, and you can cut it warm and it won’t get all pasty like regular bread. Eat it almost straight from the oven, toasted with a slab of butter, and to accompany soups and stews. There's a short video below to guide you.
Servings 1 round loaf
Ingredients
- 4 cups all-purpose flour
- 1 ½ teaspoons salt
- 1 ¼ teaspoons baking soda
- 2 cups buttermilk see Notes below for making it at home
Instructions
- Preheat the oven at 425°F (220°C).
- Have ready a baking sheet dusted with flour.
- Stir together 4 cups all-purpose flour, 1 ½ teaspoons salt and 1 ¼ teaspoons baking soda in a large bowl.
- Add 2 cups buttermilk and stir with a wooden spoon or fork until it's all moistened. This is quick; several strokes and that's it. We don't want to overwork the dough.
- Flour lightly the counter and dump this shaggy mass.
- Sprinkle the top lightly with flour and bring it all together, folding it quickly onto itself, and forming it into a loose, flabby ball. It's sticky and wet but you don't need to knead it. If you add too much flour it will be tougher after it's baked, especially the crust. So don't be tempted to make it into a smooth ball, it's meant to be rustic.
- Place it in the prepared pan (I find it easier with the help of a spatula or dough scraper).
- Slash the top making a cross pattern, cutting it about half-inch deep, and immediately place the baking sheet in the oven. Baking soda starts acting when you add liquid, so you want to start baking the bread as soon as possible.
- Bake for 10 minutes and turn the oven temperature down to 375°F (190°C).
- Continue baking for 35 to 40 more minutes, until it's golden and firm to the touch. You can open it slightly, carefully lifting the top with a fork, and make sure it's completely baked inside because it turns golden after 20-30 minutes but, usually, the crumb inside is still raw, so make sure. You can cover the top with a piece of aluminum paper if it's browning too quickly but you need to bake it longer. Also, turn the bread over and tap with your knuckles, it should make a hollow sound when fully baked.
- Let cool on a wire rack for 15 minutes before slicing.
- Eat warm or at room temperature. It's best eaten the same day it's baked (first few hours preferably).
Video
Notes
Homemade buttermilk: put 2 tablespoons of white vinegar or lemon juice in a measuring cup and add milk until you reach the 2 cup mark. Let stand a minute or two, until it curdles and thickens, and use it in the recipe.
Ingredients. Don't substitute them, as they are all necessary to get the best results.
Don't overwork the dough. This is an important part as it doesn't need to be kneaded, simply formed into a loose ball.
Eat that day. I strongly recommend eating it the same day it's baked. It hardens quickly. If you want to freeze it do so while still barely warm and wrap well in plastic first and then foil. Sliced is the best way so you can have individual toast any time you want.
Flavorings: you can add herbs or spices, caraway seeds, or even some grated cheese, depending on what you’re using it for.