Italian Pasta Frolla (pie crust for crostata and galette)
This is the sweet pastry dough known as pasta frolla, a classic dessert pie crust from Italy, perfect for crostatas and galettes. It's a basic recipe, simple and rich. It can be made ahead as it freezes wonderfully!
Servings 1 9-inch pie
Ingredients
For the dough:
- 2 ¼ cups all-purpose flour
- ½ teaspoon baking powder
- ½ cup sugar
- pinch of salt
- ¾ cup unsalted butter cold and in pieces
- 1 egg
- 1 egg yolk
Instructions
For the dough:
- If using a food processor, pulse the dry ingredients: 2 ¼ cups all-purpose flour, ½ teaspoon baking powder, ½ cup sugar and a pinch of salt, a few times to mix. Scatter ¾ cup unsalted butter, cold and in small pieces on top, and mix until you have butter the size of peas.
- If making it by hand, stir to mix 2 ¼ cups all-purpose flour, ½ teaspoon baking powder, ½ cup sugar and pinch of salt in a large bowl. Scatter ¾ cup unsalted butter, cold and in small pieces on top and mix until you have butter the size of peas.
- For both methods, add 1 egg and 1 egg yolk and process using quick on/off pulses, or stir with a fork, until it all starts to come together. If processing it, don’t let it form a ball. If you take a little and squeeze it with your hand or pinch it with your fingers, it should come together.
- Turn the rough pastry dough onto the counter and gather it together several times, pressing it to form a rather smooth dough ball. Don't overwork it, or the crust will be tough when you bake it. The butter must remain cold. I put it inside a plastic bag and aid myself with the bag while pressing my knuckles until it comes together. That way, I don’t touch the dough unnecessarily.
- Press the dough into a flat disk. Cover with plastic wrap and refrigerate for 1 hour and up to 3 days. wrap it well. Make sure no part of the dough is left unwrapped, or it will dry out. I wrap it in double plastic or in freezer sheets, and then in a Ziploc bag.
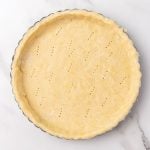
- When ready to use, roll the cold dough with a rolling pin until it's thin and larger than the pie or tart pan you're using. Prick the bottom with a fork and place it in the fridge to chill for 1 hour before baking it. Always fill it cold; don't bake or use it at room temperature. Follow blind baking instructions if the recipe calls for it.
Notes
It's essential to use cold, unsalted butter pieces. I like to cut it and place it in the freezer for 10 minutes before using it.
Don't overwork the dough after adding the flour. This is a critical step if you want a tender, light dough. If the butter starts to soften (due to warm hands, usually), wrap the dough and return it to the fridge for 20-30 minutes or the freezer for 10-15 minutes, and then continue.
Always let it rest in the fridge before rolling it. This step is absolutely essential for the dough to relax, or it will be difficult to roll as it will be too elastic, which will make it shrink as it bakes and be tough.
Freezing: follow the same wrapping procedure as for the refrigerator. Make sure you label and date it. It can be frozen for about two months.
Flavor it by using some lemon or orange zest, a dash of spice, drops of vanilla extract or others like anise or almond.
