Ingredients
Units
- 1 1/4 cups (190g) all-purpose flour
- 2 tablespoons (15g) unsweetened cocoa powder
- Pinch of salt
- 1/3 cup (50g) powdered sugar
- 1/2 cup (115g) unsalted butter, cold and in small pieces
- 1 egg yolk
- 1/2 teaspoon vanilla extract
- Ice water if needed (see Notes below)
Instructions
In the food processor:
- Put dry ingredients in the bowl of the processor. Mix to combine.
- Add butter cubes and pulse a few times to mix. The butter should be the size of peas, roughly.
- Add the egg yolk and vanilla if using, and pulse a few times until it moistens the mixture but be careful not to start making a ball.
By hand:
- Put dry ingredients in a large bowl. Mix to combine.
- Scatter butter cubes on top. Use your hands or a pastry cutter to incorporate the butter into the flour until it's the size of peas.
- Add egg yolk and vanilla if using, and mix with a fork until it is moistened. The dough will be irregular, as it's harder to incorporate it evenly by hand.
For both methods:
- Dump the shaggy mass onto a counter or working surface.
- Start bringing it together with your hands. At first, it will appear to never bind or come together properly. But it will.
- Keep turning it onto itself until you have a solid dough.
- Wrap it in a plastic or freezer bag and refrigerate for at least 1 hour. This is a crucial step for getting tender and flaky dough.
Rolling the dough:
- When ready to roll, take the dough from the fridge and let barely soften at room temperature. The dough must still be cold. Simply wait until you can start to roll it, but not until it is very soft. This is important to ensure a tender dough.
- On a lightly floured counter, start rolling the dough disc, making sure you do quarter turns (I do them to the left) often to ensure the dough is not sticking and adding more flour to the counter if it is sticking.
- Once you have the dough rolled a few inches larger than the pan, fold it in half and place the fold in the middle of the pan.
- Open the dough and line the pan, careful not to stretch the dough. Use your hands to lower the dough and reach the union between the bottom and sides of the pie pan.
- Go over the rim of the pan with the rolling pin to remove excess dough.
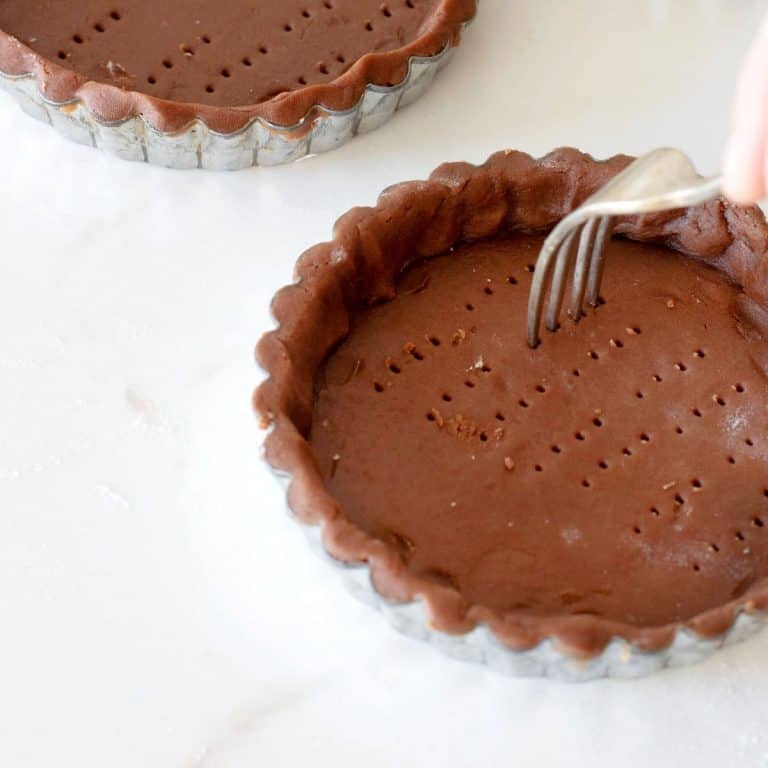
- Prick the bottom with a fork, freeze for 20 minutes, or put it in the refrigerator for 1 hour. At this point, you can leave the dough frozen in the pan for up to a month, wrapped in plastic.
- Or you can blind-bake it or bake it completely, depending on what you’re making. (Every pie or tart recipe in this blog has the steps to bake the pie crust. This post is about how to make and store the pastry).
Baking this dough:
- Preheat the oven to 350°F/180°C.
- How to prepare a pie crust for blind baking: take the cold dough from the fridge or freezer.
- Cut a piece of aluminum paper that is larger than the tart pan. Line the inside of the pan by covering the cold dough with it and adjusting it so that it takes the shape of the dough. You can also use parchment paper, but it's usually coarser and more difficult to make it take the shape of the pan and cover the dough well.
- Add weight. I use round ceramic weights that you can buy online, but you can add any raw grains and legumes such as beans, lentils, rice or even flour (simply fill the aluminum paper with flour or rice or whatever you're using until you have added a layer of weight that will be enough to keep the paper down during baking.
- Bake for 15 minutes. It might be a few minutes more or less, depending on the type of pie crust, but the idea is to let the dough bake and dry out enough so that we can lift the aluminum paper without it attaching to the raw dough. The paper should lift easily, and the dough below will be half-baked, very lightly golden. Fill and bake further following instructions in the recipe for the tart or pie you're making.
- To completely bake the chocolate crust: first, follow the steps to blind bake it, above.
- After removing the paper and weight, return the pan to the oven and bake for another 10-15 minutes. The crust should be dry. Let cool on a wire rack.
- If fully baked it will keep for a few days in a metal tin or at room temperature if the place is dry and cool. But I suggest you bake it the day you’re filling it.
Notes
- Cocoa powder: always use unsweetened. I like Hershey's unsweetened cocoa powder, Ghirardelli Premium baking cocoa, and Scharffen Berger natural cocoa powder. And, in my experience, the dark ones are the best (this does not apply to the super dark used for making homemade oreo cookies known as dark cocoa powder).
- Powdered sugar: also called confectioners' sugar or icing sugar, it acts very differently than regular sugar making the crust smoother so don't substitute it.
- Flour: I use cake or all-purpose and have great results with both. Each country tends to have its own definition of what each one should or shouldn't contain, so use the one you always do.
- Salt: I like to use kosher salt when baking. But regular table salt works just fine.
- Vanilla: I use pure vanilla extract or pure vanilla paste when available, but a good vanilla essence (artificially flavored) also works.
- Resting and rolling: make sure the dough is rested before rolling. And that the pie dough is softened enough to be rolled but still cold, as cold as possible.
- Ice water: this recipe doesn't use liquid and though it might seem like the dough will never come together into a ball, it does. BUT if you make it by hand it might be harder to form into a ball as the butter distributes differently than when using the food processor. You can add ice water by teaspoons at a time (put some ice cubes in a glass, cover with water, and use the cold water) that will help everything bind together. Don't add too much that you end up with a wet dough.
- Prep Time: 20 minutes
- Resting time: 60 minutes
- Cook Time: 20 minutes
- Category: Pies & Tarts
- Method: Mixing
- Cuisine: International
Nutrition
- Serving Size: 1/8
- Calories: 203
- Sugar: 5 g
- Sodium: 76 mg
- Fat: 12.4 g
- Carbohydrates: 20.8 g
- Fiber: 0.9 g
- Protein: 2.7 g
- Cholesterol: 53.6 mg