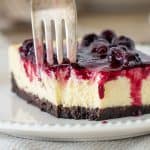
Chocolate Crust Cheesecake (baked)
The easiest, creamiest and best baked cheesecake I ever tried! And I've tried many. You can customize the crust and the topping, make it round and tall or rectangular and short for cheesecake bars. It's always a crowd pleaser, everybody's favorite. And it freezes beautifully so you can make it ahead.
Servings 12 squares
Ingredients
For the cookie base:
- 2 cups ground chocolate wafers
- ½ cup unsalted butter melted
For the cream cheese filling:
- 32 ounces cream cheese at room temperature
- 1 ¼ cups sugar
- 5 eggs at room temperature
- 1 teaspoon vanilla extract or ¾ teaspoon vanilla paste
- ¼ cup sour cream at room temperature
- ¼ cup heavy cream at room temperature
For the berry topping:
- 1 ½ cups mixed berries fresh or frozen
- 3 tablespoons brown sugar
- 1 tablespoon lemon juice
- 3 tablespoons raspberry jam for other topping options see the Notes below.
Instructions
For the chocolate crust:
- Preheat the oven to 350°F (180°C).
- Spray or butter an 8x11 inches (20x27cm) rectangular pan or a 9-inch round cake pan with a removable bottom. If you want to line the pans: for the rectangular one, line with a piece of parchment paper that covers the bottom and up the two long sides of the pan. You will have two short sides without paper. For the round pan, release the sides and cover the bottom part with a large piece of aluminum foil. Press so it covers the bottom and sides, making sure it doesn't tear. Put the round part on top, over the foil, and close it. It will compress the foil. Grab the excess paper and bring it up so it sticks to the sides. Both of these methods make it easier to remove the cheesecakes when they are cold; you lift the paper and take out the cheesecake.
- Stir 2 cups ground chocolate wafers with ½ cup unsalted butteruntil the mixture looks like wet sand. If grinding the cookies in a food processor, add the melted butter directly and pulse to mix.
- Press the mixture firmly onto the bottom of the prepared pan.
- Bake for 10 minutes. Let cool on a wire rack while making the filling. Don't turn the oven off.
For the cheese filling:
- Mix 32 ounces cream cheese in a large bowl until very smooth. You can use a handheld mixer or wire whisk. If the cheese is at room temperature, mixing them by hand should not be a problem. If using a handheld electric mixer, use it only for this part and at the lowest temperature. We don't want to incorporate air into the batter.
- Gradually add 1 ¼ cups sugar and beat until it's very well incorporated.
- Add 5 eggs in 2 additions, mixing until incorporated and scraping down the sides of the bowl after each addition. Be patient and don't be tempted to beat much.
- Add 1 teaspoon vanilla extract, ¼ cup sour cream and ¼ cup heavy cream, stirring to incorporate. Don't beat.
- Pour the batter into the prepared pan of choice.
- For the rectangular pan: bake cheesecake for 10 minutes at 325°F/165°C, turn the oven down to 275ºF/140°C and bake for another 35-40 minutes. At this point, the cheesecake should jiggle quite a lot in the center. This can vary depending on your oven. Don't be tempted to bake it longer. It will solidify as it cools. For the round pan: bake the cheesecake for 10 minutes at 325°F (165°C), turn the oven down to 300ºF (150°C) and bake for another 50-55 minutes. At this point, the cheesecake should jiggle quite a lot in the center. This can vary depending on your oven and it can take even longer. Don't be tempted to bake it longer. It will solidify as it cools.
- Turn the oven off and, without opening the door, let the cheesecake inside for 1 hour.
- Remove from the oven and carefully run a smooth-bladed knife around the top of the sides of the springform pan or rectangular pan to loosen up any batter that might've stuck. If it's too tender, let cool more. This helps with not developing cracks as it cools and shrinks.
- Cool completely to room temperature in the pan on a wire rack, cover in plastic wrap (still in the pan), and refrigerate for at least 8 hours. I highly recommend 1 or 2 days of refrigeration for the creamiest consistency before removing from the pan and eating it.
For the topping:
- Put 1 ½ cups mixed berries, 3 tablespoons brown sugar and 1 tablespoon lemon juice in a small saucepan. Cook over low heat until the juices bubble and are beginning to look syrupy about 5 minutes.
- Remove the pan from the heat and add 3 tablespoons raspberry jam. Mix well.
To assemble:
- Take the cheesecake from the refrigerator. Lift it aiding yourself with the pieces of parchment paper that overhang from the sides of the rectangular pan. For the round pan, bring down the foil that is sticking to the pan, open the side circle and remove it. Lift the foil carefully and place your hand, palm side up, between the foil and the bottom of the pan. Lift the paper carefully and you will have the cheesecake in your hand. You can also do this with a large spatula but be careful not to tear the paper and the crust. Push down the foil and transfer the cheesecake to the other hand to remove the last part. Be careful as you place it on the serving plate.
- Spread the berry topping, covering the top surface, and serve.
Notes
Baking time: keep in mind that all ovens and pans are different, even if they look the same or very similar. The baking time in my recipes is as accurate as it can be, but it might take you more or less time. Use a thermometer inside the oven to check that the temperature is right. I recommend you keep track of how your oven works and what tiny details you might need to adjust.
Dessert for a crowd: bake this recipe in a rectangular pan (the cake will not be as tall). Then, you can cut it into smaller squares and feed many more guests. If you do two cheesecakes, you can serve dessert to 24 people or something. It depends on the size of the servings.
Ingredients: all filling ingredients must be at room temperature. This ensures they mix well without beating the batter, which is important and part of achieving a creamy consistency.
Creaminess: make sure you bake it in a medium/low oven, turn it off while the cheesecake still jiggles quite a lot. After the cooling process, wrap it and leave it in the fridge for at least 8 hours. I find the texture is superior after 1 or 2 days.
Cheesecake batter: the key is not beating it so that we don't incorporate air. If the ingredients are at room temperature, you should have no problem. I use that as my way of knowing if they're at the right temperature: if I'm not able to easily mix the batter with a hand whisk, it's because the ingredients have not softened enough.
Oven temperature: low is better than medium. I have gone back and forth for years testing this. And even though I might bake it at the standard 350°F (180°C) for ten minutes initially, the bulk of the baking is done at 300°F (150°C) at the most, sometimes less than that. Similar to baking a flan recipe, the lower temperature ensures that the batter doesn't puff up much. The cheesecake will slightly rise, but not much.
The cooling process is crucial and consists of three parts: letting it cool for a while in the oven after it's turned off, letting it completely cool to room temperature on a wire rack, and refrigerating it for at least 8 hours (a whole day is better). Freezing: cheesecakes can be frozen, and, in my opinion, many times, they are creamier and softer after a stay in the freezer. There’s probably a chemical explanation, but it's just my experience. Let thaw in the fridge overnight and then at room temperature. The slower it defrosts, the better the texture. Topping: keep in mind the ratio of filling and berry sauce if making squares or bars. This is not a very tall cake as it's baked in a rectangular pan, so too much topping will not let the filling shine. Besides the mixed berry topping shown in the recipe card, you can also use our basic blueberry sauce, strawberry sauce (topping), or homemade cherry sauce.
