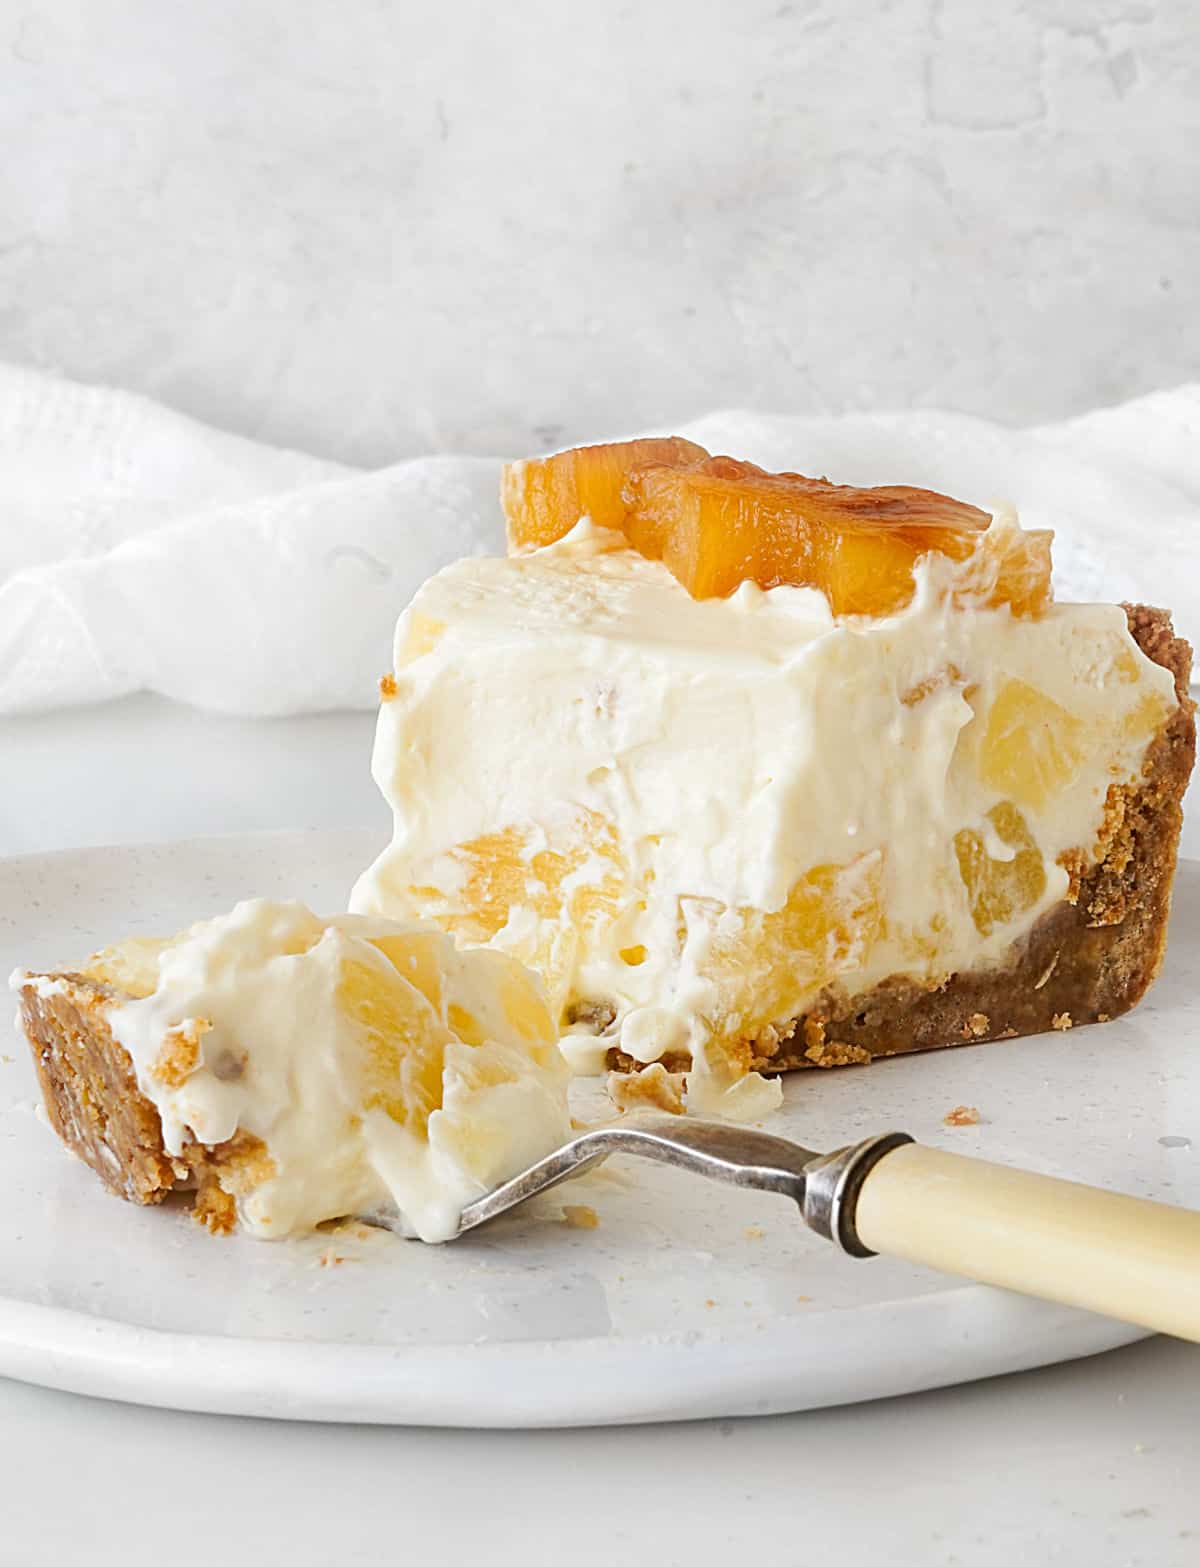
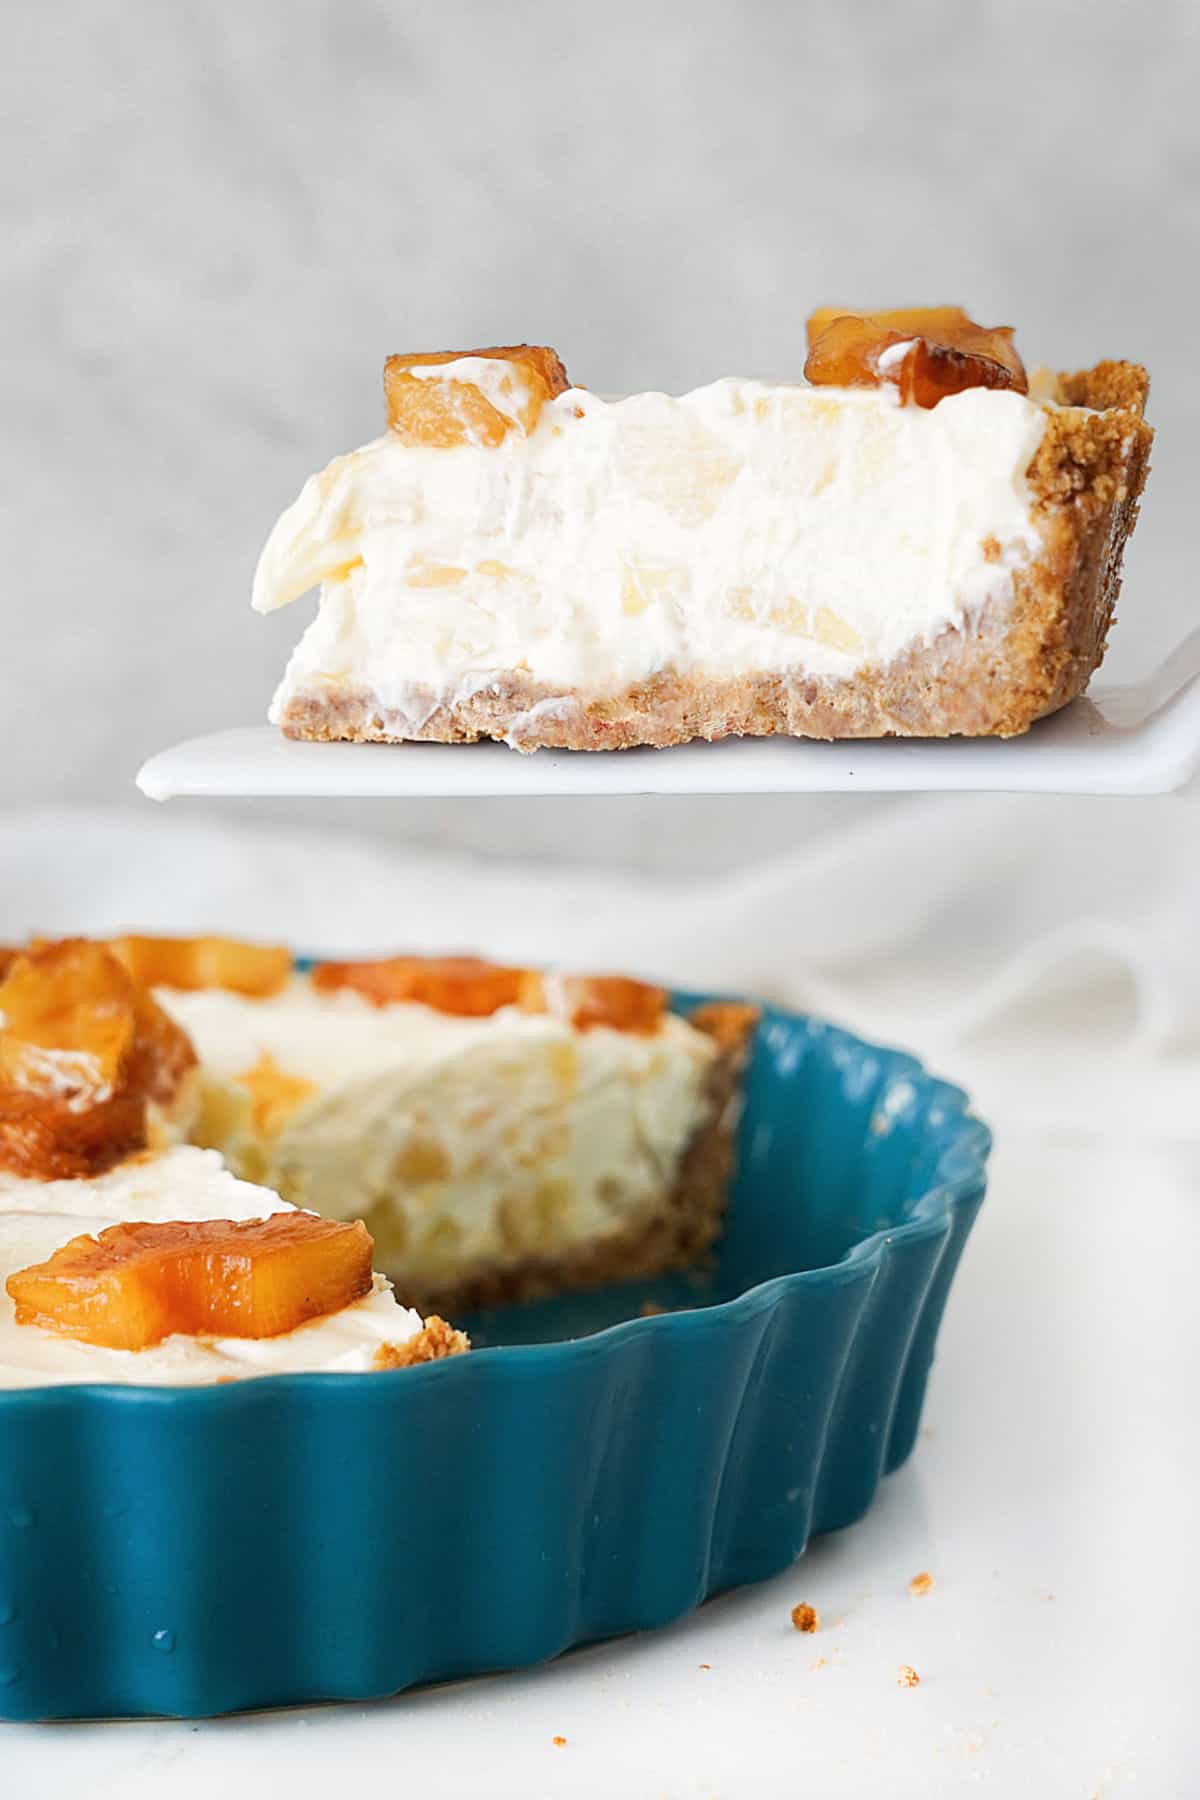
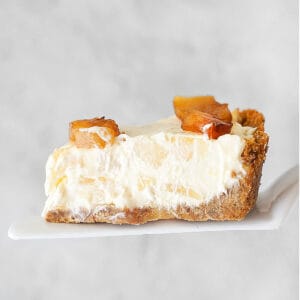
Meet the mouthwatering pineapple cheesecake pie: a dessert that's as easy to make as it is to devour. It's an incredibly delicious dessert with 5-star reviews, and I still have to meet someone who doesn't like it. The cookie crust encases a 5-ingredient, no-bake filling that comes together in minutes, though there's a chilling time.
If you're apprehensive about getting the right stage for the whipped cream or the pie holding well when you cut it, I give you all my tips, and there are process shots and a video tutorial to guide you.
SAVE THIS RECIPE
No-bake vintage pie
This pie caught me by surprise. Even though I knew it would be good, I wasn't expecting such a unique flavor. Truly irresistible.
It's amazing what simple ingredients like a can of pineapple, cream cheese and a few other staples can do together! I like a homemade crumb crust, but you can also use a store-bought graham cracker crust for an even quicker assembly.
Being not only no-bake, but also part of my pie recipes with a graham crust club, it's a simple and fresh dessert on a hot summer day. If you take it to cookouts and potlucks, check that you have a fridge close by.
Though I like briefly baking the crust, there's no need to turn on the oven if you don't want to. The filling only needs to be combined and then refrigerated. It keeps well for several days in the fridge, so that you can plan in advance.
Testing notes
Paula's baking tips that can make a difference.
Briefly bake the pie crust or just chill it? Both work, and, while it's not strictly necessary to bake it, I recommend you do so for 10 minutes to have a firmer and crisper crust. Let it cool completely before filling it. But know that you can just refrigerate it until it's set.
Fresh pineapple vs canned: It can add a vibrant, natural sweetness to the pie, but it's not the best ally for whipped cream, as it can add too much moisture and also interfere with the structure due to the enzymes it contains. For consistent results, I recommend canned pineapple. If you use fresh pineapple, eat the pie the day you assemble it. Or quickly cook the pineapple pieces for a few minutes with a little sugar and cool completely. That gives you the fresh flavor without the enzyme problem. But it's so much easier to open a can!
It's essential to drain the pineapple pieces to remove excess liquid. Excess moisture could make the pie filling too runny and affect its consistency. Use paper towels to blot the excess juice after you drain it as much as possible.
Add the topping at the last moment. Refrigerate the pie for several hours until firm, and decorate when ready to serve. You can have the caramelized pineapple made in advance. The pie should be served cold.
Make-ahead pie: I like to refrigerate it (for up to 4 days) rather than freeze it. Both work; it's just that sometimes the texture changes when you thaw frozen desserts with whipped cream, and it loses freshness. You can make the crust ahead, and then put together the filling the day before serving.
Reduced-fat, dairy-free or vegan version of this pie: I've been asked this, and though I feel the low-fat cream cheese is fine and creates a good pie, I don't like or use low-fat cream; they don't whip well in my experience. For the vegan option, I don't know, but I imagine there are cream and cream cheese substitutes to make a dairy-free version that holds well. I can't vouch for flavor, though.
FAQ
It does, and it's recommended to refrigerate the pie for at least 2-4 hours or until it sets completely. The chilling time will depend on how cold your refrigerator is and how deep your pie dish is.
You can experiment with different crumb crusts like shortbread, coconut or ginger cookies. Using a sweet tart crust can also work, but it's more laborious and time-consuming. You might want to add some shredded coconut to the dough, as it complements the pineapple flavor.
Ingredients
Quantities are listed in the recipe card toward the end of this post. The ingredients page has more details and lists the brands I use.
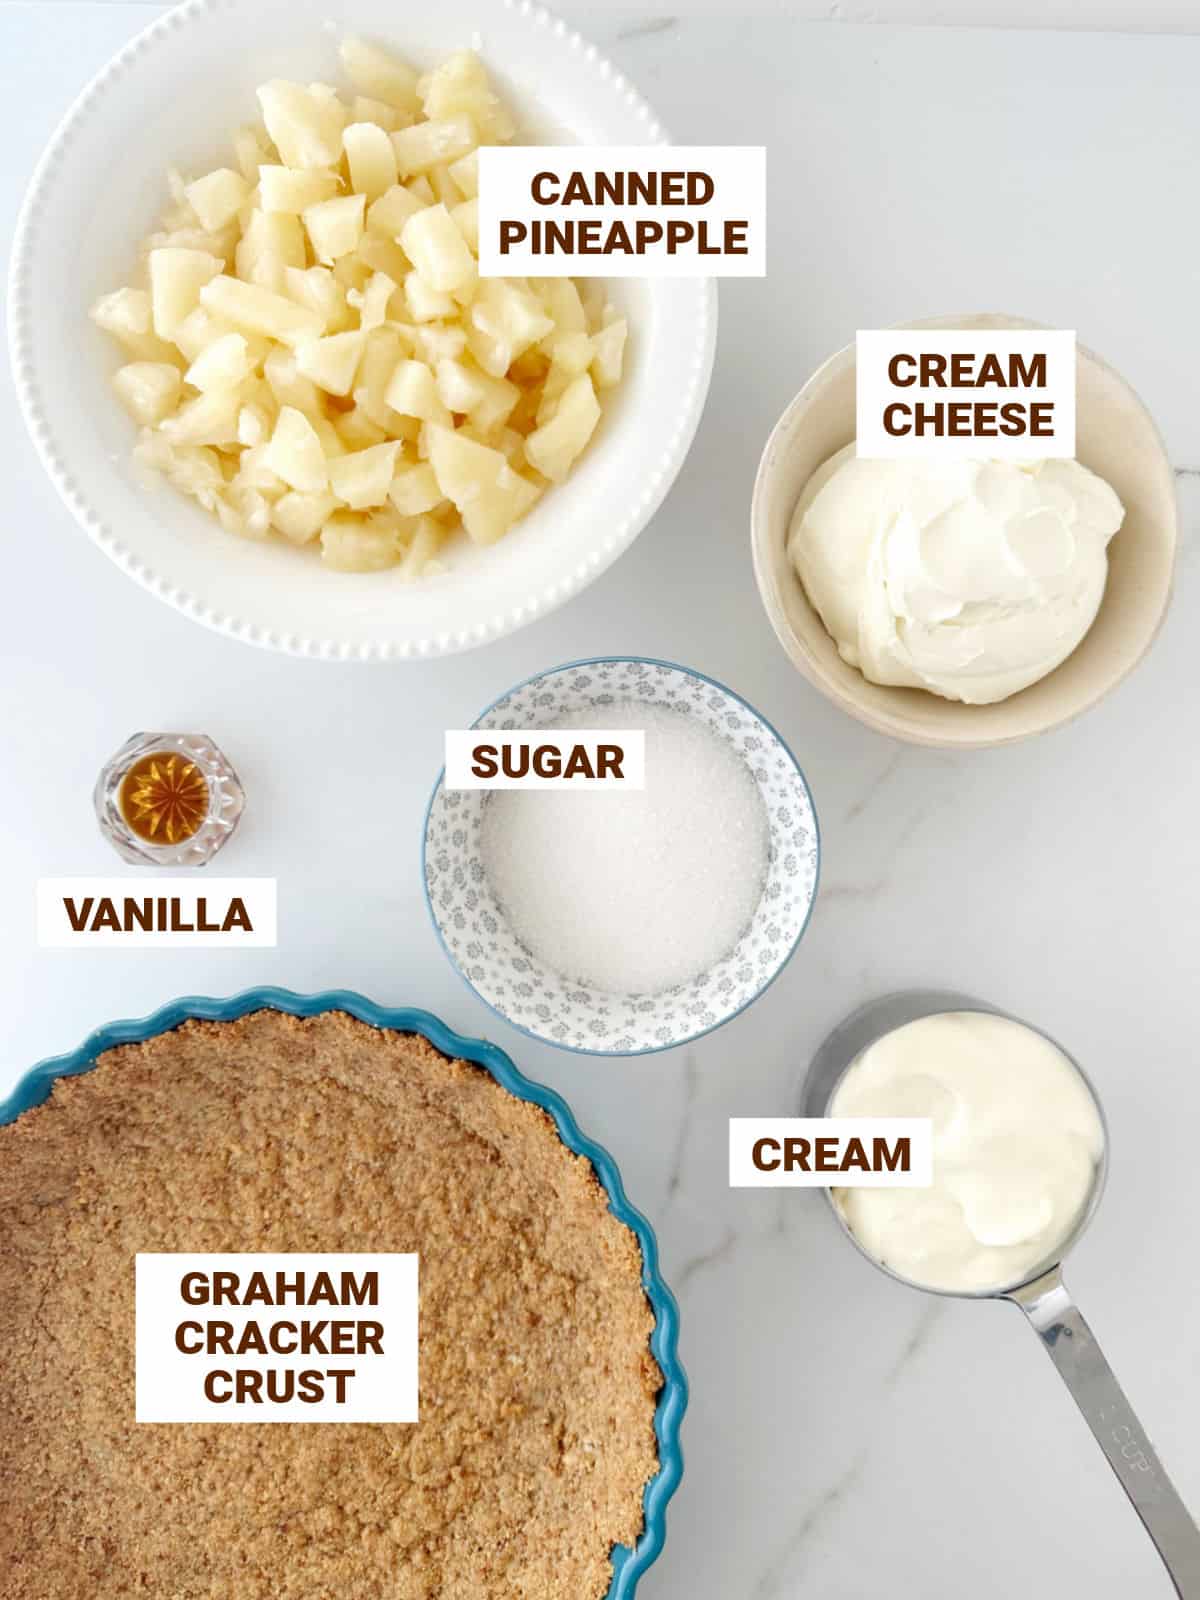
- Crumb crust: Use a homemade graham crust or a purchased graham cracker pie crust.
- Canned pineapple: it comes in slices or chunks. If you choose the first option, you have to cut them into pieces first. I don't recommend crushed pineapple as it's harder to drain well.
- Cream: I use heavy or heavy whipping cream. You can also use Cool Whip topping instead.
- Cream cheese: the regular type, full-fat cream cheese, is needed for consistency and creaminess.
Variations & substitutions
- Cool whip topping: Use an 8-ounce container instead of the cream for a quicker filling.
- Coconut: Add lightly toasted, shredded coconut to the cream cheese filling for an extra tropical twist. Sprinkle toasted coconut on top for added texture and flavor.
- Rum: it goes very well with pineapple, adding a more sophisticated flavor. Add a tablespoon of golden rum to the filling, taste and add more if necessary.
- Caramel: another flavor that pairs well. Marble a few tablespoons before you fill the crust or drizzle on each slice when serving.
How to make cream cheese pineapple pie
- Pineapple pie filling: it takes 5 ingredients and 10 minutes to assemble.
- Topping: it's encouraged but optional. You can omit it and still have a fantastically flavorful and creamy pineapple pie.
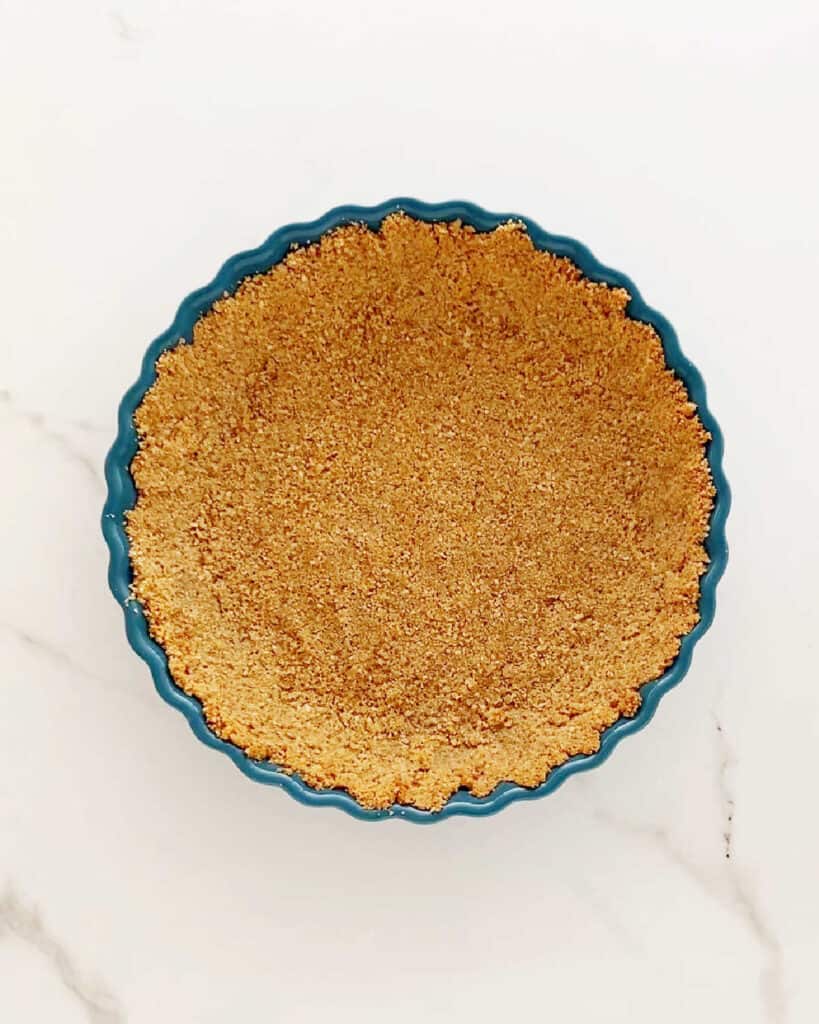
Crumb crust
I use the classic graham cracker crumbs for the crust. I recommend baking it for 10 minutes, but it can also be chilled until firm, about 1 hour. You can also use a purchased crust.

Whipped cream
The cream is beaten to medium-firm peaks, and it gives the pie structure.
Don't overbeat it! It should have consistency, but the tip should fall when the beaters are lifted.

Mix
The cream cheese is beaten until smooth with the sugar and vanilla. Then the pineapple chunks are added.
Mix and fill
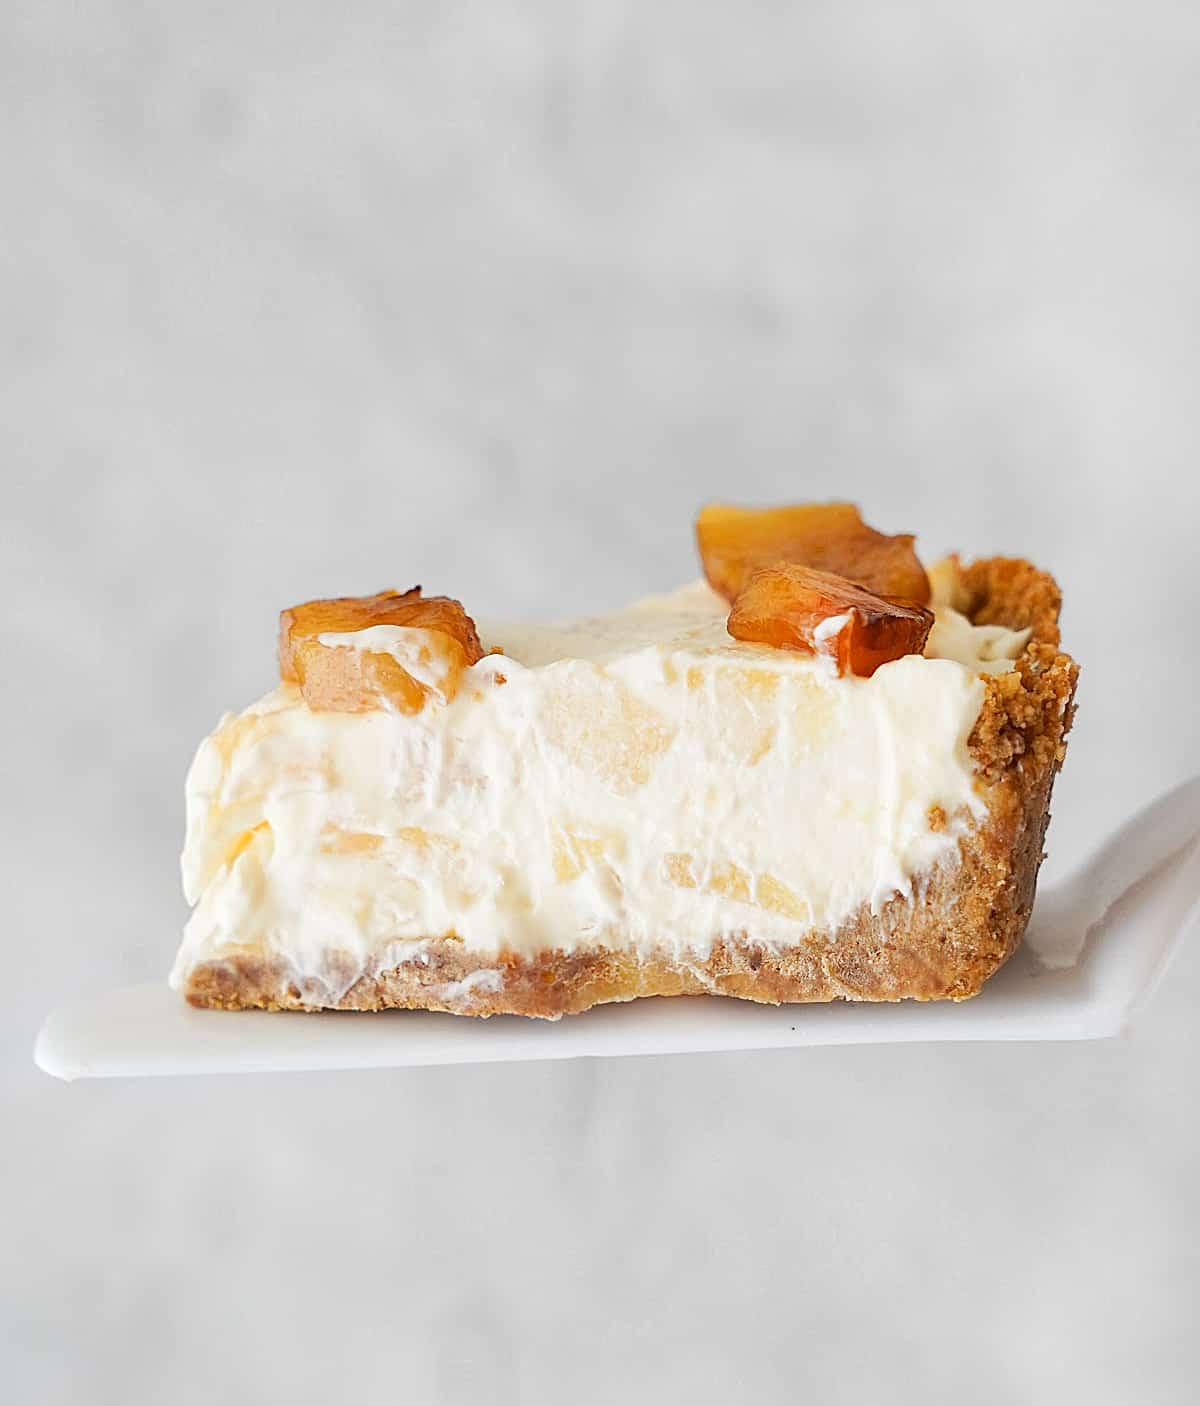
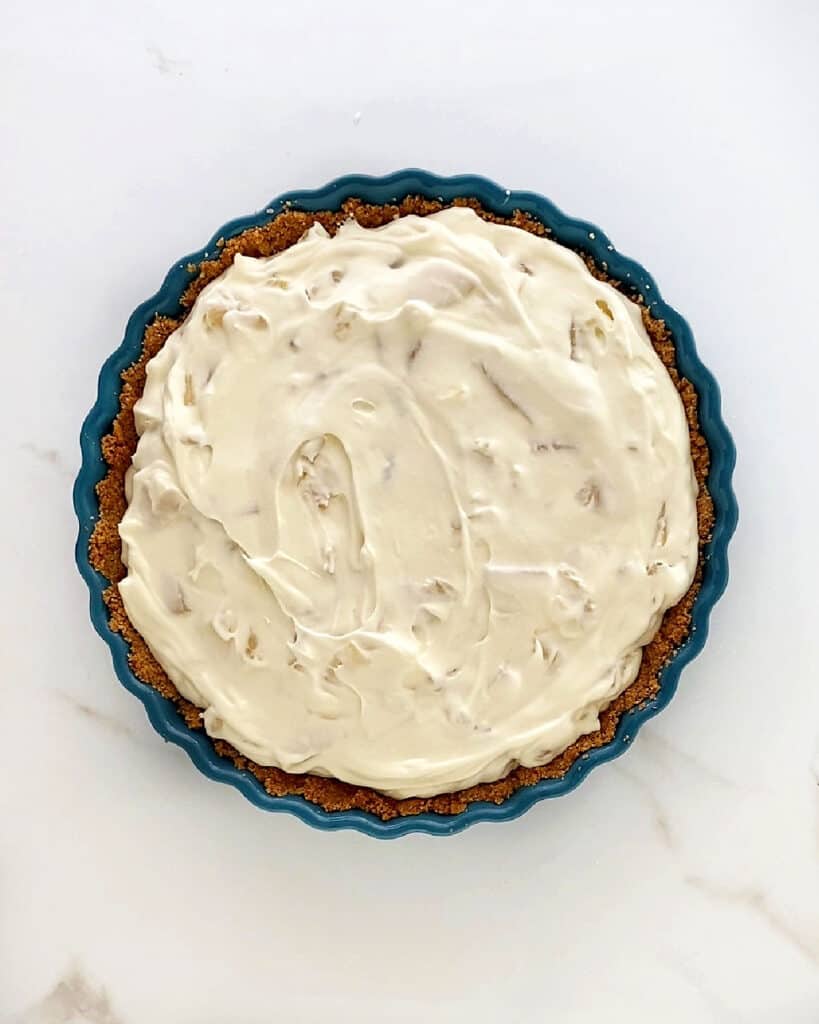
Spread the pineapple mixture in the prepared crust and smooth the top.
It needs to be refrigerated for several hours before topping and serving.
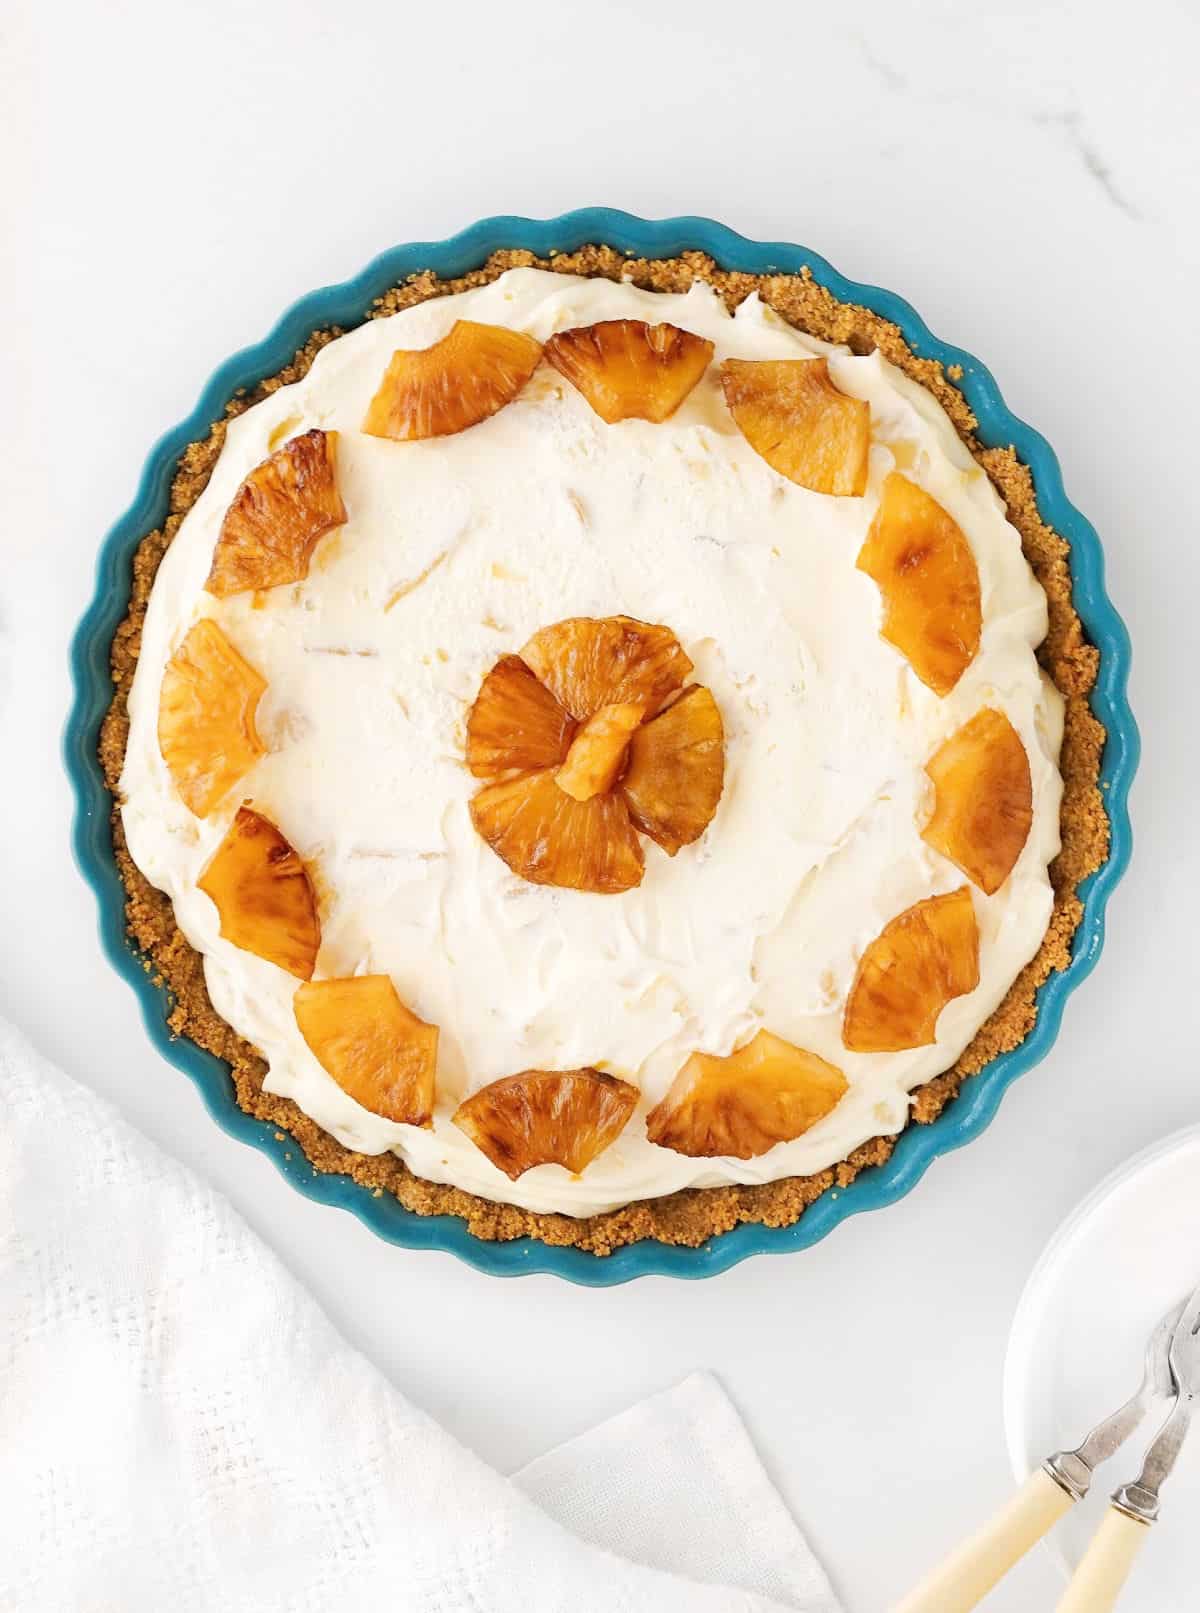
Pineapple topping
Some recipes might include a topping made from whipped cream, shredded coconut, or additional pineapple chunks to enhance the tropical taste.
I use caramelized pineapple pieces that are easy to make, look nice and add another fabulous layer of flavor.
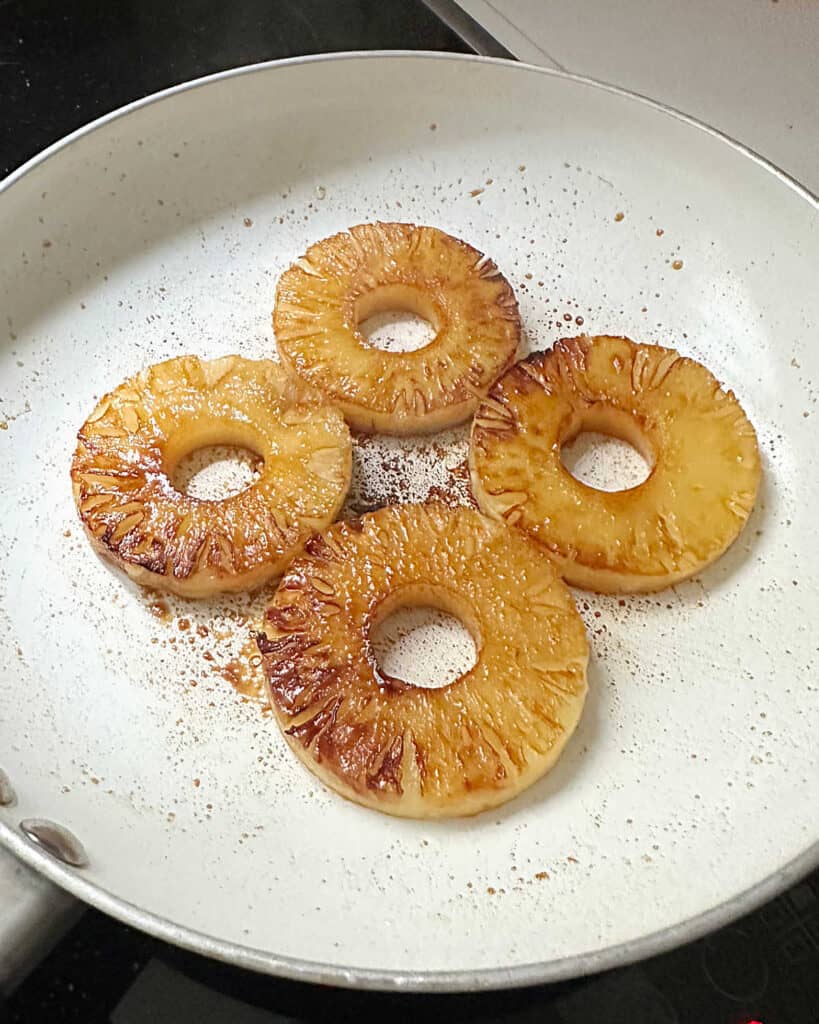
Caramelize
Heat butter or oil in a non-stick skillet and add 3-4 pineapple rings. Sprinkle with a little sugar and cook until caramelized. Flip over and repeat.
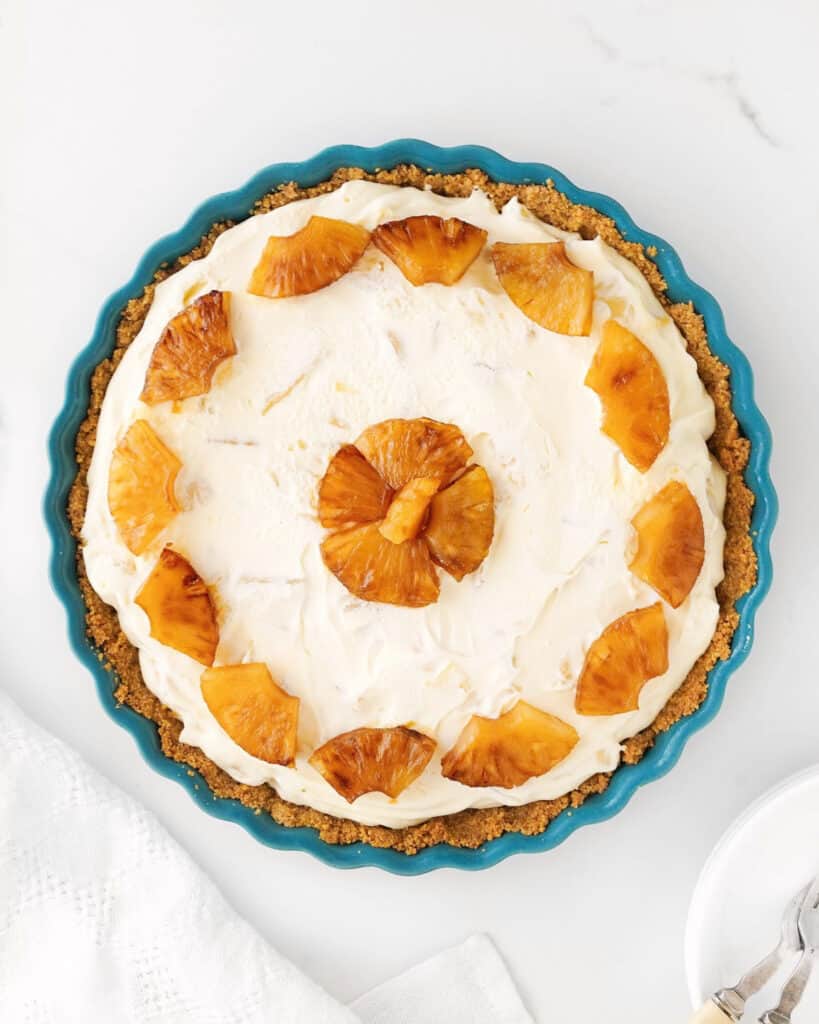
Garnish or topping
Let the pineapple rings cool down completely, cut them into chunks and decorate the pineapple pie however you want.
Serving
What toppings go well with pineapple cream cheese pie? Popular toppings include sweetened chantilly cream or whipped topping (Cool Whip or similar), toasted coconut, extra pineapple chunks (plain or caramelized), maraschino cherries, or a drizzle of caramel sauce.
Storage
- Refrigerator: This is the best way to store leftovers. Cover it with plastic wrap or place it in an airtight container.
- Freezer: You can freeze it for a month. I recommend slicing it first and using a freezer-safe container.
- Consume within 3-5 days for optimal quality and flavor: No-bake pies generally have a shorter shelf life than baked pies because they often contain dairy products.
As an Amazon Associate, I earn from qualifying purchases. Read my disclosure policy.
No Bake Pineapple Pie (with cream cheese)
Ingredients
For the crumb crust:
- 1 ¾ cups fine graham cracker crumbs
- 2 tablespoons brown sugar
- ½ cup unsalted butter, melted
For the filling:
- 1 cup heavy cream, cold, or heavy whipping cream
- 8 ounces regular cream cheese, at room temperature
- ½ cup sugar
- 1 teaspoon vanilla extract
- 20 ounce can of pineapple, drained
For the topping:
- 3 or 4 pineapple rings, use extra or from the total amount above
- 2 or 3 tablespoon sugar, if you wish to caramelize them
- drizzle of oil or dab of butter, if you wish to caramelize them
Instructions
For the crumb crust:
- Preheat the oven to 350°F (180°C) if you're baking the crust. You can opt for simply chilling it until firm.
- Have ready a 9-inch pie plate or pie pan with a removable bottom and high sides.
- For the cookie crumbs (if you have whole graham crackers), the easiest way is to use a food processor and process until you have fine crumbs. Make sure there are no large pieces or that it's very coarse crumbs, as it will prevent the mixture from compressing well. You can also make the crumbs by hand, but it takes a while and some patience. Crush the cookies with a rolling pin. It's easier if you put them in a large plastic bag, like a Ziploc bag, leaving it a bit open to let the air out as you roll.
- By hand: mix 1 ¾ cups fine graham cracker crumbs with 2 tablespoons brown sugar in a medium bowl. Add ½ cup unsalted butter, melted, and combine everything until it resembles wet sand and no dry spots remain.
- Food processor: Make the mixture directly in the bowl of the processor. Add 2 tablespoons brown sugar to the crumbs after you measure them, and add ½ cup unsalted butter, melted, to the bowl of the processor. Pulse a few times, and you have your graham mixture ready.
- Press the mixture onto the pan, starting at the edges and the angles where the base and sides join together and make sure it's compacted. This will help when removing the pie from the pan.
- Bake for 10 minutes, until lightly golden and dry. Let cool completely on a wire rack before filling.
- For a no-bake pie or dessert: Put the pie plate in the refrigerator for at least 1 hour to allow the butter to firm up. This will make it less sturdy and might crumble here and there when you cut it, but it's worth it if you don't want to turn on the oven.
For the pineapple filling:
- Beat 1 cup heavy cream, cold, in a large bowl until it forms medium-firm peaks. Reserve.
- In another large mixing bowl, beat 8 ounces regular cream cheese, softened, with ½ cup sugar until smooth, lump-free, and the sugar has dissolved a little. You can use an electric mixer for this part.
- Add 1 teaspoon vanilla extract and a 20 ounce can of pineapple, cut into bite-sized chunks and mix to incorporate well.
- Add the pineapple mixture to the beaten cream in 2 parts, mixing lightly the first time and making sure it's fully incorporated the second time. Don't overmix but make sure no streaks remain. Use a spatula to integrate well.
- Fill the prepared crust, smooth the top and refrigerate the pie for several hours until firm.
- Add the topping at the last moment. You can have the caramelized pineapple made in advance or use fresh or canned pineapple slices, chopped. The pie should be served cold.
For the caramelized topping:
- If you're short on time or don't want to caramelize the pineapple, simply chop it, drain it well and top the cold pie.
- If you want caramelized fruit, heat a drizzle of oil or dab of butter in a non-stick skillet and add 3 or 4 pineapple rings. Sprinkle with half the sugar and cook for a few minutes. Flip and sprinkle the rest of the sugar on top.
- When the bottoms are caramelized, flip over and let the other side get golden brown. Move them a little during baking to avoid burning. Let cool, cut into pieces and distribute on top of the pie.
Bridget says
Had the family to Sunday lunch today and this dessert was the star of the show!! Delicious and not too sweet. The caramelised pineapple just made it even more special. Thanks so much for sharing this lovely recipe.
Stephanie says
This was a hit at our Father's Day cookout today. Thank you so much! (You should put the recipe link or your website on the printout version.)
Paula Montenegro says
I'm SO glad you loved it Stephanie! As for the link, there's a QR code at the end of the printed recipe that takes you to the post. But I will see how to also add a regular link. Thanks for the heads up. Have a great week.
Renee Williams says
Delicious!
gina d price says
just perfect