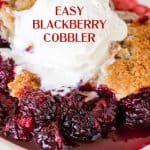

Cobblers are the answer to fruit desserts that require little work. This is an old-fashioned recipe with a layer of juicy blackberries and a golden biscuit topping. You can have it ready in an hour. Or make it in advance and keep it refrigerated for a few days or frozen for a month.
SAVE THIS RECIPE
A must-bake
If you've never made a berry cobbler before, it's one of the easiest desserts to make and especially good with fresh fruit. It's like a sweet casserole dish, similar in ease and style to a blackberry crisp or the quick and easy dump cake with blackberries.
I have several here covering different seasons, like the very popular pear cobbler that peaks in the Fall, and the classic old-fashioned cobbler with peaches, for the Summer months.
I'm always trying new recipes for different types of delicious cobblers and adding them to this blog after they come out right. A sort of summer ritual around here when the farmer's market is bursting with fresh fruit.
Make ahead. It keeps well in the refrigerator for several days and can be frozen. So it's a great dessert to plan ahead.
Flavorings. You can adjust and adapt to the type of blackberries you find, add more sugar if you can only find tart berries, add a tablespoon of liquor that pairs well, or some citrus zest. Find your own sweet spot when it comes to the flavor of this scrumptious dessert.
Important tips
Berries: the amount of some of the ingredients varies slightly if using fresh or frozen blackberries. Frozen ones will release more liquid, so I recommend you add more cornstarch. They might be more or less sweet, so I recommend different amounts of sugar. It's all explained in the Notes section of the recipe card, below.
Cobbler topping: follow the instructions on the recipe card, and you'll be fine. Don't over-mix it, that's the key. You can also use cold butter and make a topping similar to a scone, like the one we use in the blueberry cobbler recipe. But it takes a little more work, and I wanted to keep this a simple recipe. Crunchier topping: You can increase the amount of sugar in the recipe if you like a crunchier, golden crust. See Notes in the recipe card.
Storing: this easy blackberry cobbler recipe can be made ahead and kept frozen for a month or in the refrigerator for several days before serving, always well covered in plastic wrap. Store leftovers in an airtight container if the baking dish occupies too much space in the fridge.
Flavorings: Blackberries go great with lemon and orange. Add up to a teaspoon of vanilla extract if you like that mellow, sweet flavor. I find that it takes away from the fruit, but that's just me. And a pinch of ground cinnamon or mace can be a nice addition.
Ingredients
Quantities are listed in the recipe card towards the end of this post. The Ingredients page has more details and lists the brands we use.
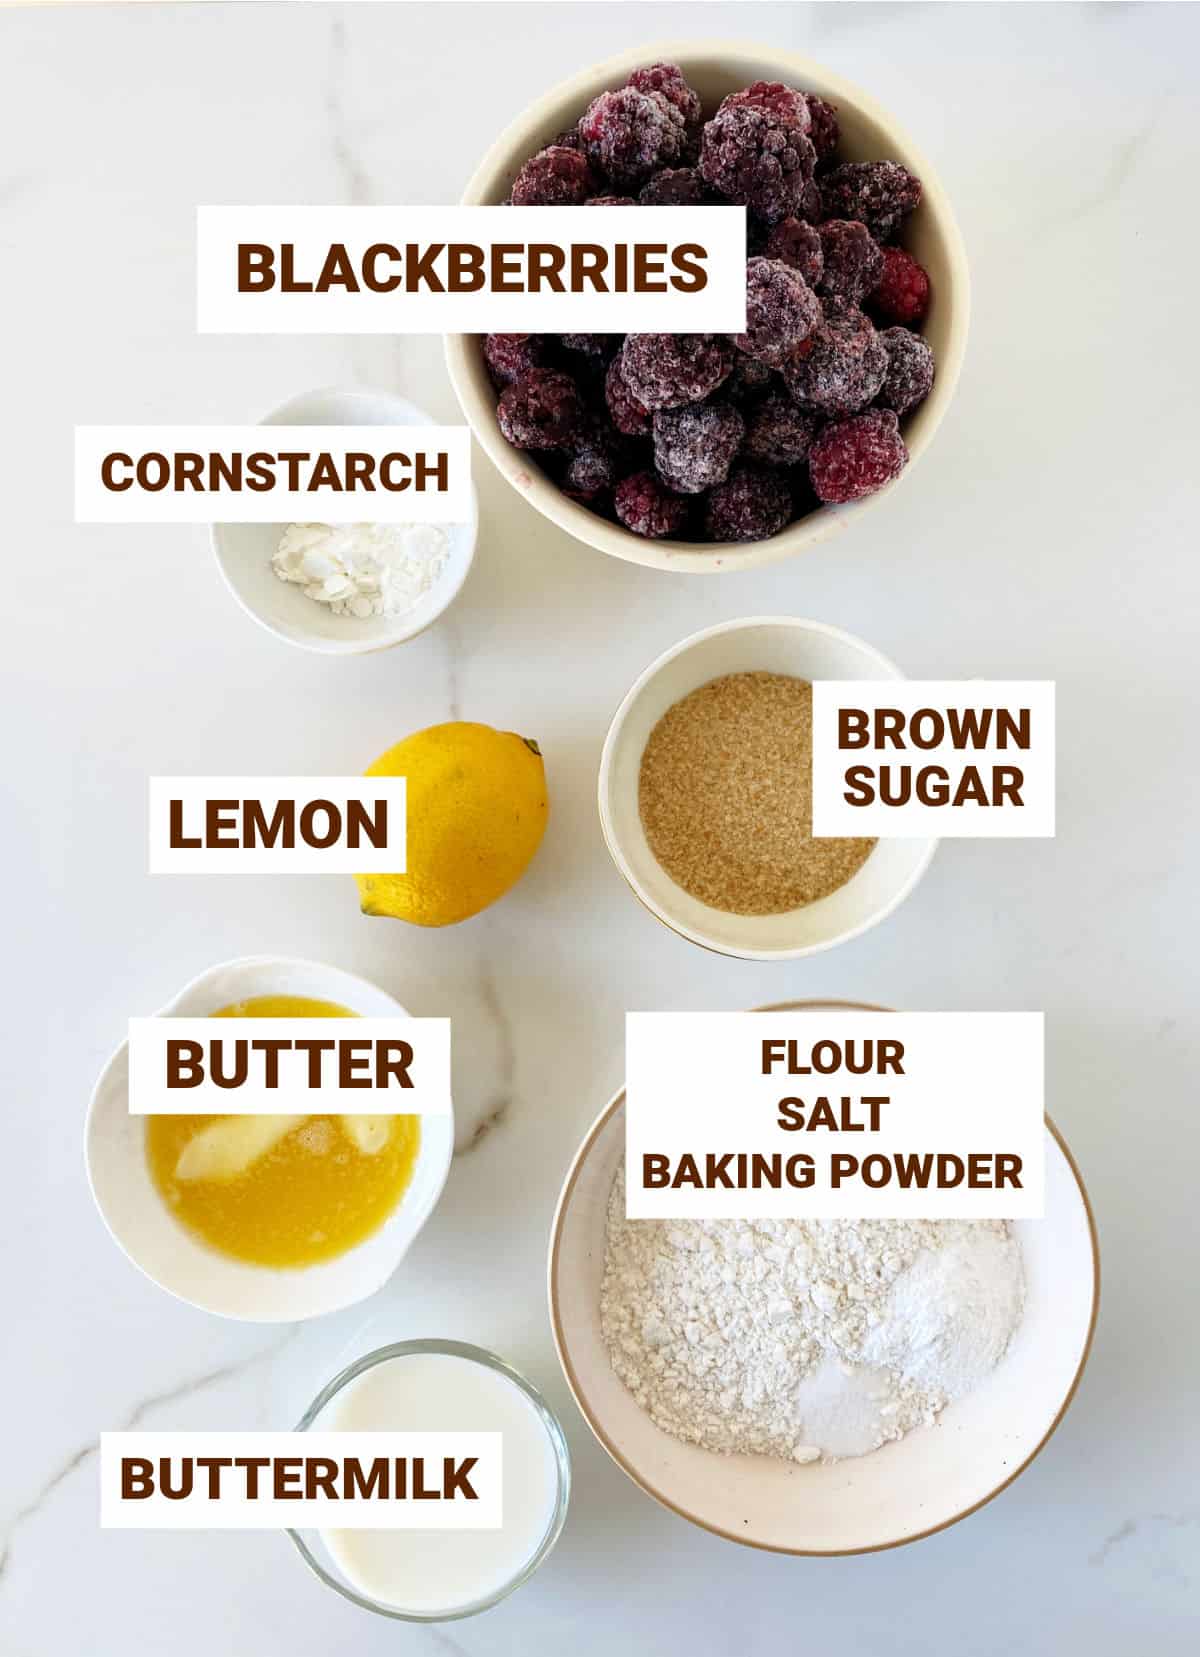
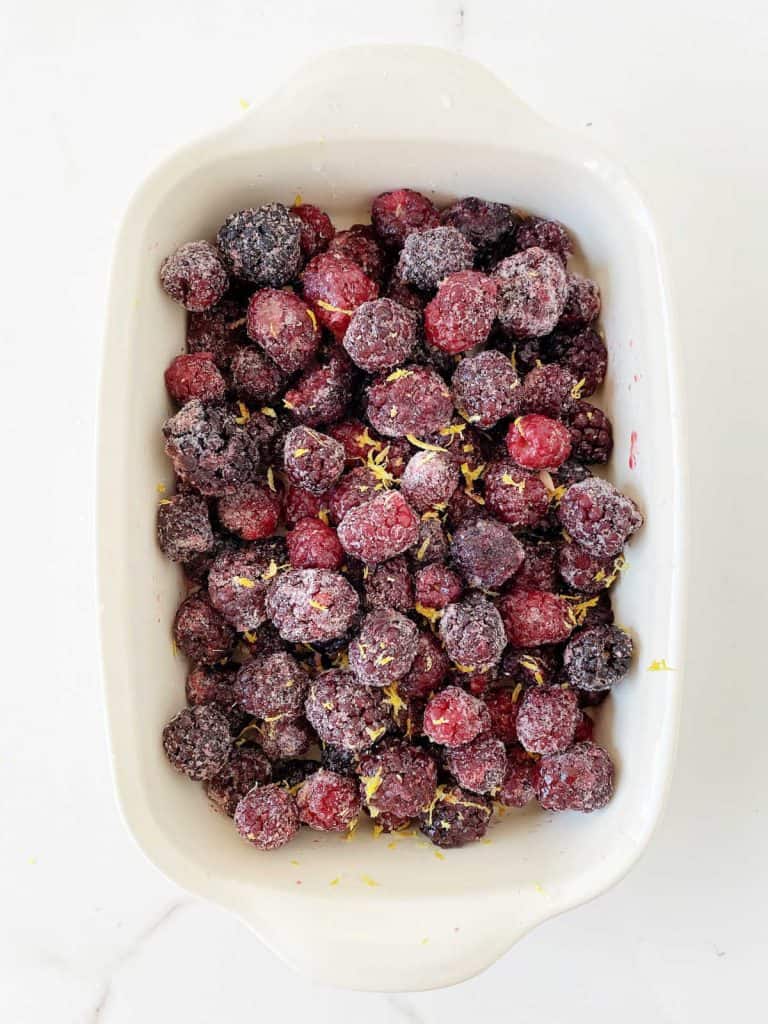
- Blackberries: I always favor fresh blackberries, but this dessert can be made with frozen ones (which is the case today because I couldn't find sweet berries). Wild blackberries can also be used, and you might need to adjust the sugar depending on how sweet they are.
- Sugar: I love brown sugar for this cobbler for its caramel flavor, but using only white sugar or a mix of both also works very well.
- Baking powder: make sure it's not expired.
- Buttermilk: What if you don't have buttermilk? You can buy buttermilk powder and prepare it as you need to. Or make homemade buttermilk that is super easy and explained in the recipe card.
Steps to make a cobbler
It's straightforward to make a homemade blackberry cobbler.
What you need: a grater for the zest, a medium bowl for the topping mixture, a spoon or rubber spatula, and a ceramic dish.
Berry mixture
The fruit layer is mixed directly in the baking dish. But you can use a separate large bowl to mix it and then dump it into the dish.
Flavorings
Go easy on the lemon zest, as it can be bitter, and blackberries are not always super sweet. You can omit using it, but a little bit is nice for an extra punch of lemon flavor. If you like a mellower flavor, orange zest and juice also work very well with blackberries.
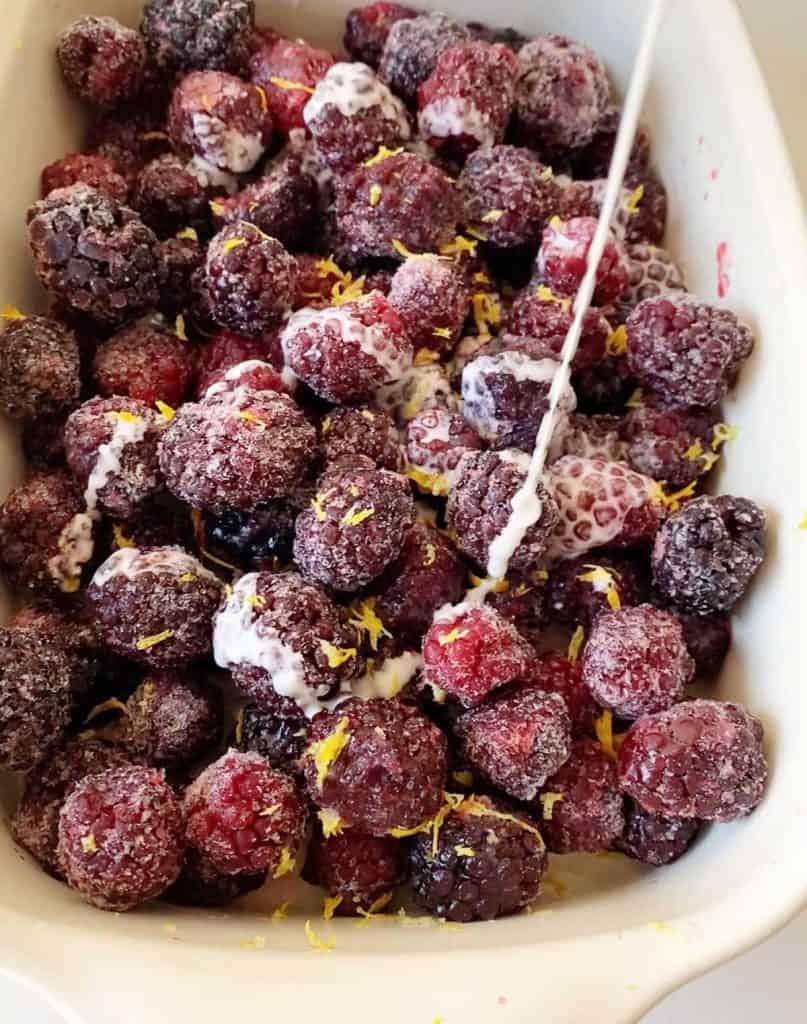
Cornstarch slurry
This is the thickener needed for the blackberry juice to turn into a syrupy sauce as it bakes. Be sure to completely dissolve it first (with lemon juice or water) before drizzling it on top of the berries. Otherwise, it might not integrate well.
Cobbler topping
- Start by mixing the flour mixture with the brown sugar (the dry ingredients) in a bowl.
- Add the wet ingredients, starting with the buttermilk.
- Melted butter: make sure it's warm, or parts of it will probably seize when you add it and won't integrate well.
- Stir everything to mix. Do this very lightly. Don't beat or over-mix it as it will toughen the dough. This is important!
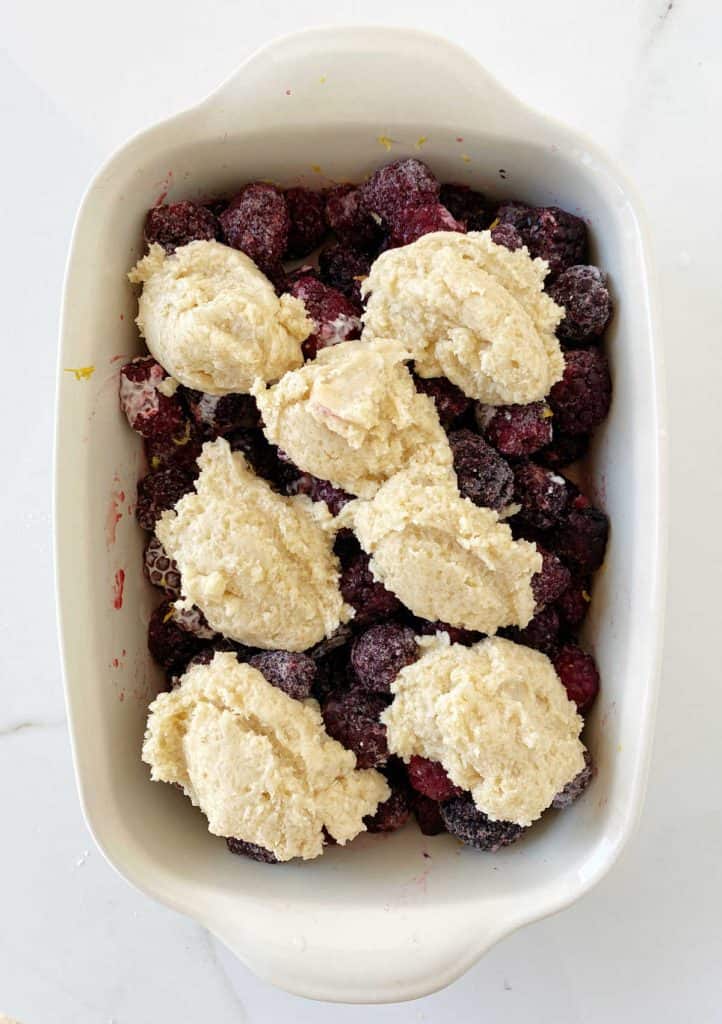
Biscuit batter
Use a large spoon to add the biscuit topping in mounds, not covering the filling completely, so it has space to grow during baking.
Assembling and baking
- Make sure you have the right pan size. This is important if you don't want the filling to overflow before the biscuit topping is fully baked. If it does overflow (it happens), put a piece of foil on the bottom of the oven to catch the spilled juices.
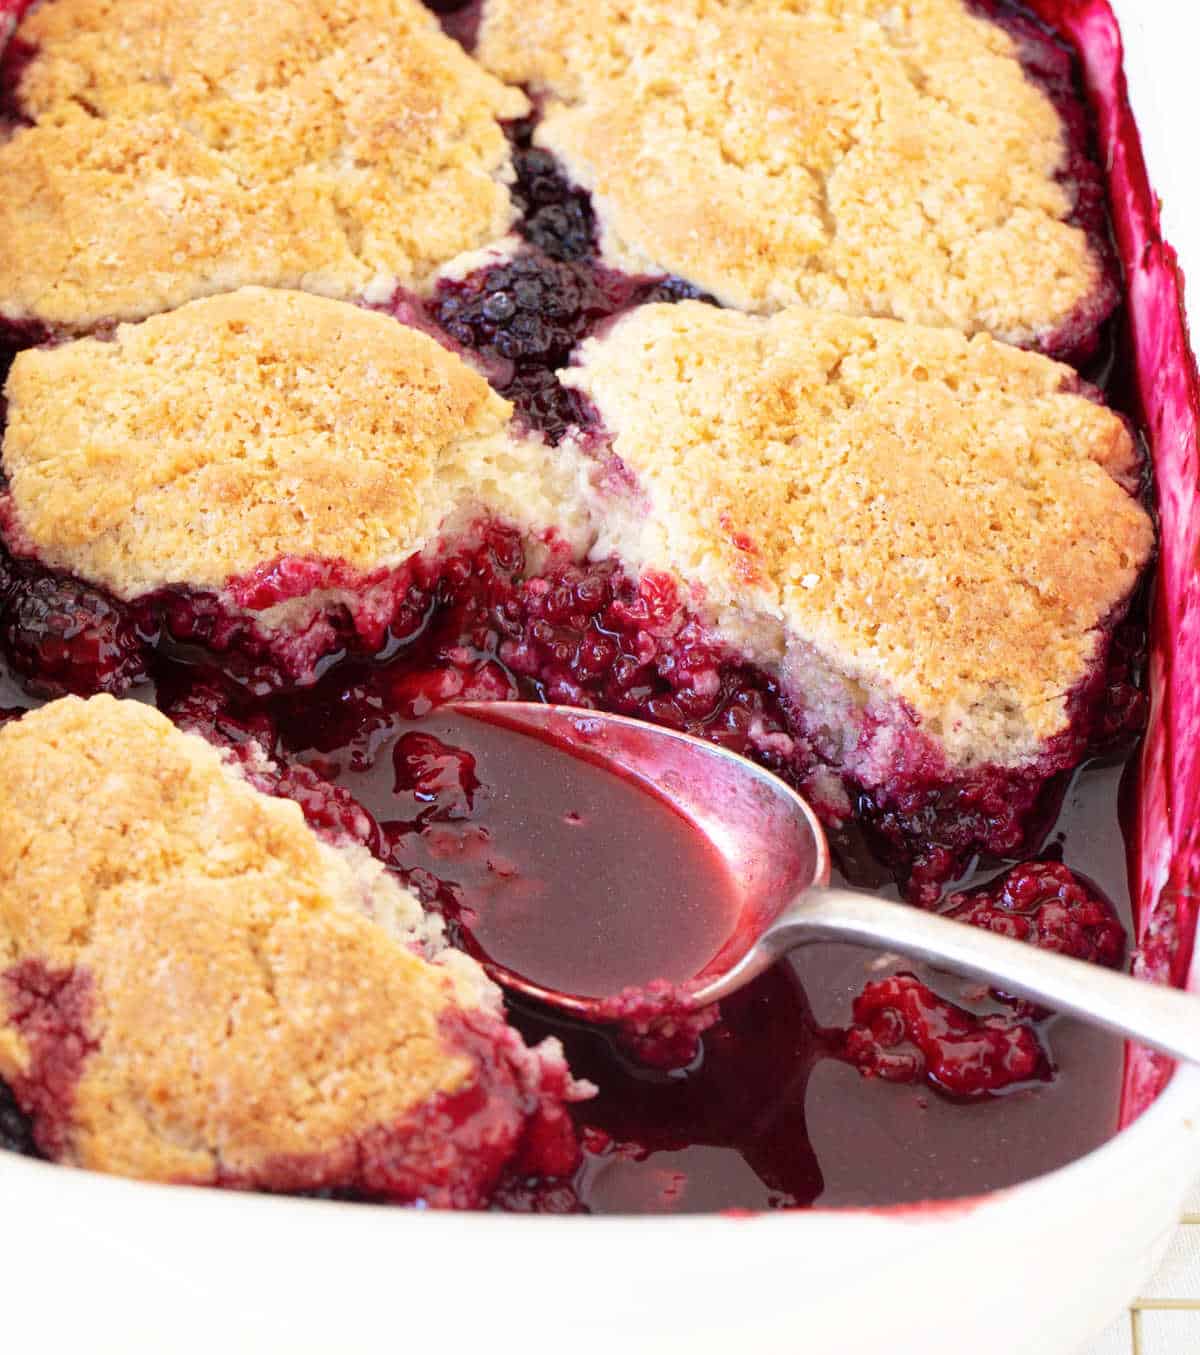
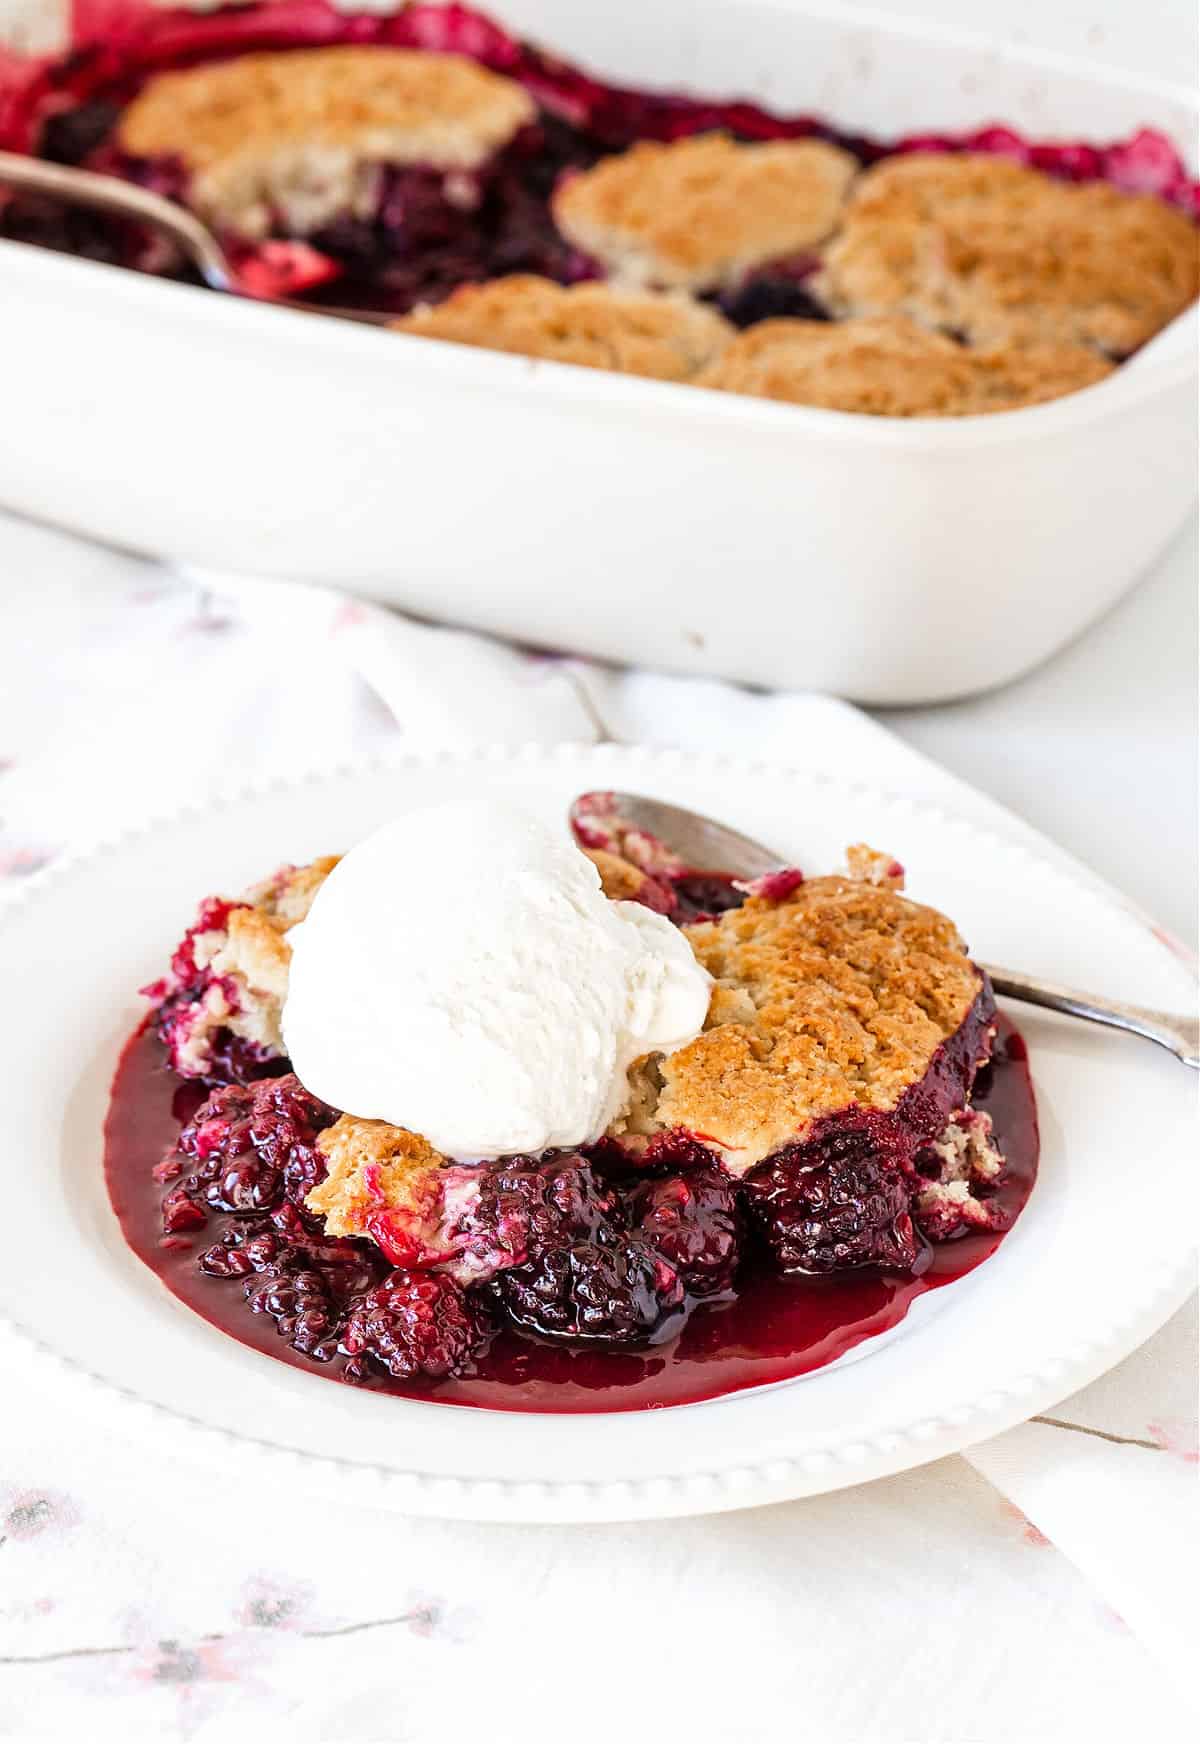
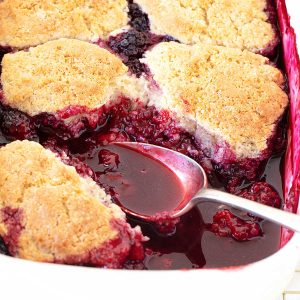
- Drop mounds of biscuit dough on top of the blackberry filling (image below). Space should be left between them, allowing the juices to bubble up and the crust to bake properly. You can flatten the mounds slightly, but don't spread them to cover up the blackberry filling.
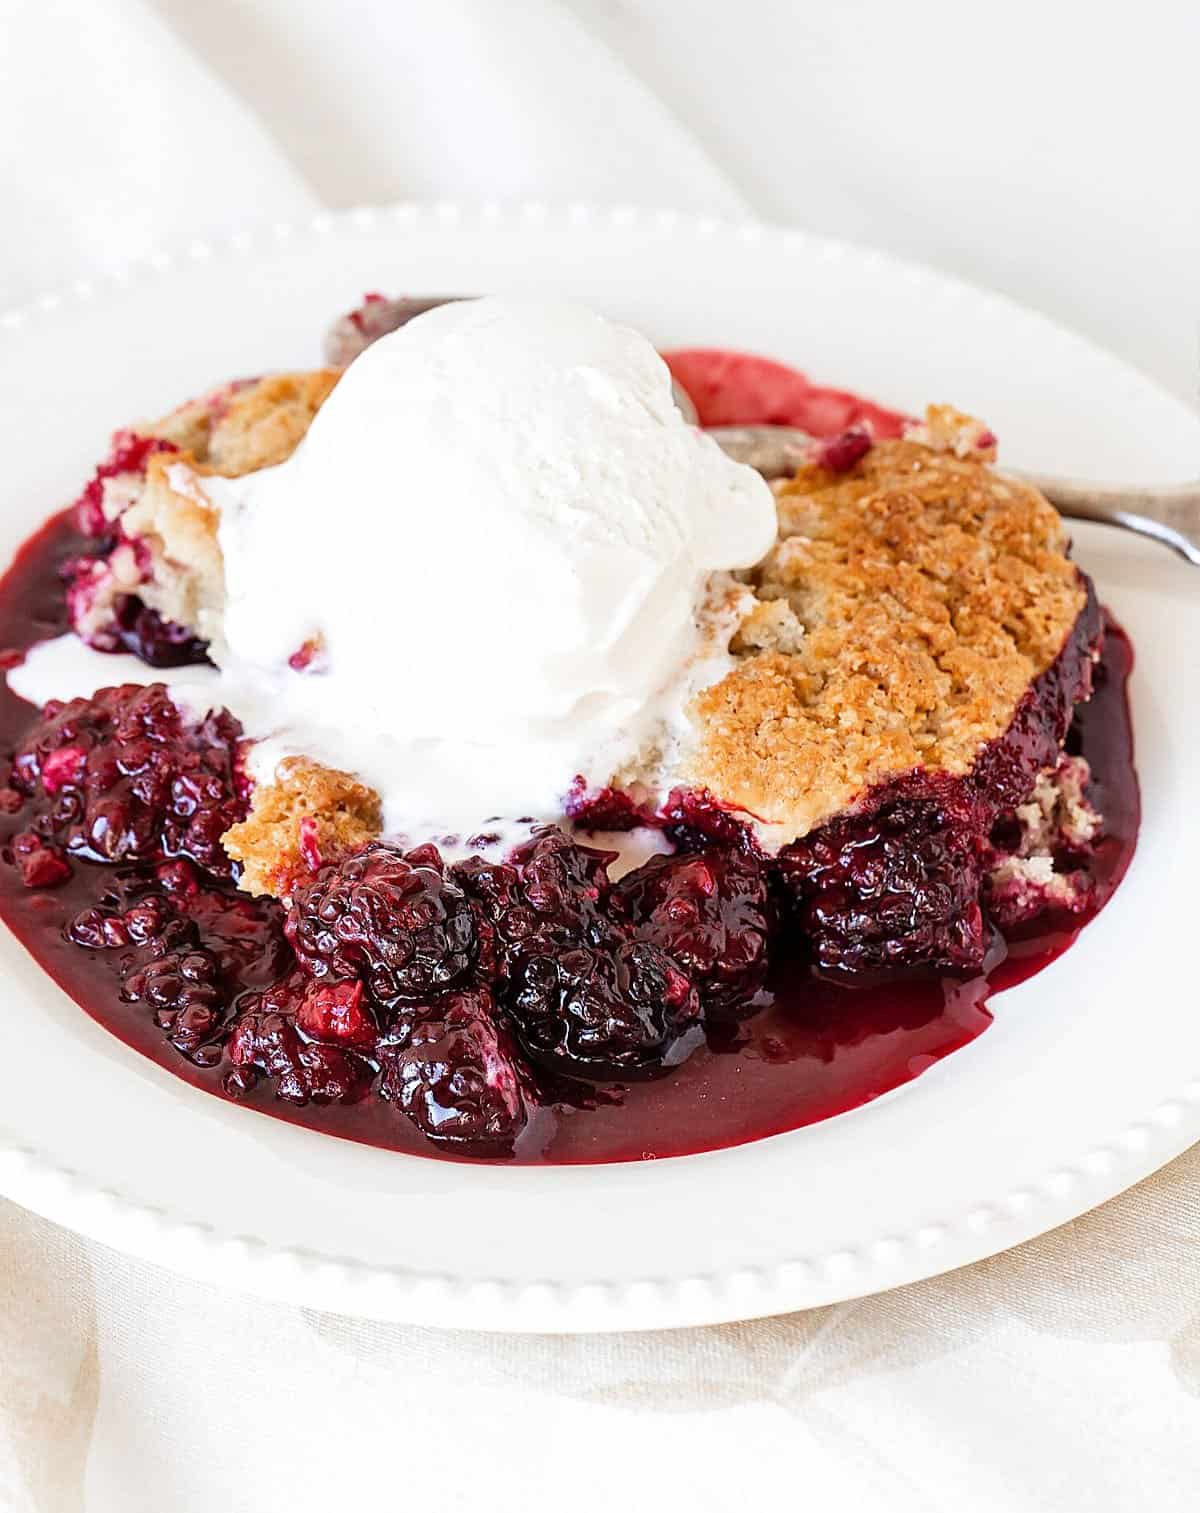
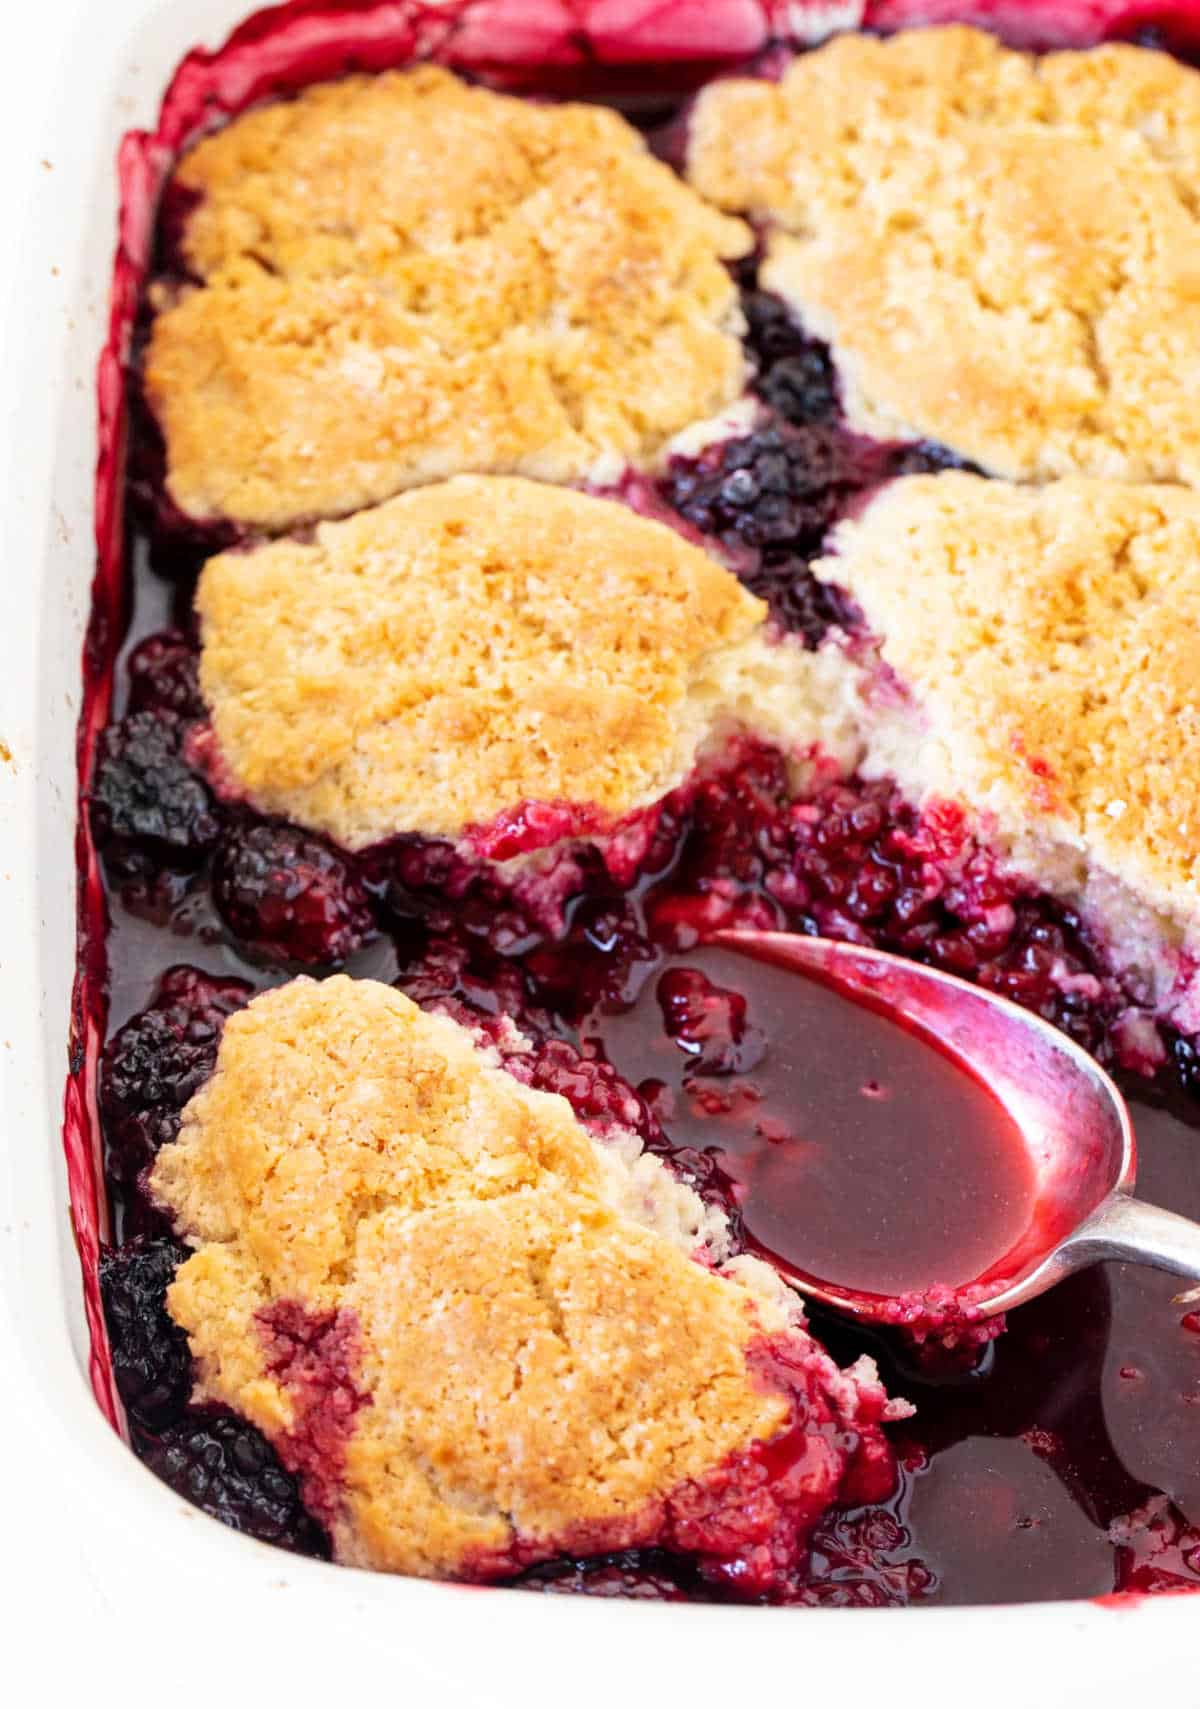
- When is it done? The top will get golden brown, and the strawberry layer will be bubbling. But always lift the dough here and there with a fork to check that it's completely baked inside. There should be no wet parts at all.
Variations
Southern blackberry cobbler: the most common variation is using pie crust dough on top of the berries instead of a biscuit topping. If you like this idea, check out the cinnamon plum cobbler that uses pastry dough cutouts for the top crust. You can also do a more traditional lattice crust. And use a cast-iron skillet, as I do for this easy cherry cobbler.
Other berries: strawberries and raspberries can be substituted for the blackberries.
As an Amazon Associate, I earn from qualifying purchases. Read my disclosure policy.
Old Fashioned Blackberry Cobbler
Ingredients
For the berries:
- 5 cups blackberries, fresh or frozen (see Notes below)
- ¼ teaspoon lemon zest
- 2 tablespoons brown sugar
- 1 tablespoon cornstarch, see Notes below if using frozen berries
- 2 tablespoons lemon juice
For the topping:
- 1 cup all-purpose flour
- 1 ½ teaspoon baking powder
- ¼ teaspoon salt
- 4 tablespoons brown sugar
- ¼ cup unsalted butter, melted
- 3 tablespoons buttermilk
- whipped cream , or vanilla ice cream to serve, optional
Instructions
- Preheat the oven to 350°F (180°C).
For the berry mixture:
- Have ready an 8x11-inch (or a 9-inch round or square baking dish) ceramic or glass dish.
- Mix 5 cups blackberries directly in the baking dish (or in a medium bowl and then add to the dish) with ¼ teaspoon lemon zest and 2 tablespoons brown sugar.
- Mix 1 tablespoon cornstarch with 2 tablespoons lemon juice in a small bowl until smooth and no lumps remain. Pour over the blackberry mixture and mix lightly.
For the topping:
- In a large bowl combine 1 cup all-purpose flour, 1 ½ teaspoon baking powder, ¼ teaspoon salt and 4 tablespoons brown sugar.
- Add 3 tablespoons buttermilk and then the warm melted ¼ cup unsalted butter.
- Mix lightly with a fork or spoon. Don't overmix or beat it so the biscuit topping bakes soft and tender. It should be like a scone or thick muffin batter. Spoon mounds of this mixture over the blackberries, leaving some space between them so the juices can bubble up. You can sprinkle some extra sugar on top for a crunchier top.
- Bake for 40-45 minutes, until it's dry, golden and, when you carefully lift the topping with a fork, it's baked and not wet. Make sure you check this, as it sometimes appears well-baked on top but still needs some time to fully bake inside.
- Leftover cobbler should be kept refrigerated in a well-covered dish or container.
Notes
- Fresh berries are great when in season, but frozen ones absolutely work too! Use 2 tablespoons of cornstarch for the filling, as they usually release more liquid.
- If you like a very sweet dessert, or if the berries are too sour, add up to 3 more tablespoons of sugar to the blackberry filling.
- Fruit to topping ratio: I like more fruit than biscuit, so I use 5 cups of fruit. But if you like less fruit, use only 4 cups. Homemade buttermilk: Mix 1 cup of milk (preferably whole milk) with 1 tablespoon of lemon juice or white vinegar. Let the mixture sit for 5 minutes at room temperature until it thickens and slightly curdles. Stir it once more and measure it again before using. Crunchier topping: if you like a topping with more crunch than crumb, you can use more sugar, double the amount in the recipe. Serving: cobblers are served directly on the dish they were baked in, so make sure you use one you like to take to the table. A dollop of whipped cream or vanilla ice cream rounds up the plate. Make ahead: You can make it a day ahead and keep it covered in the refrigerator. Warm in a 350°F (180°C) oven before eating. This dessert can be frozen after it's baked. Blueberries can be kept year-round in the freezer, and the topping comes together in ten minutes, so it's very easy to put together.
angiesrecipes says
One of the easiest and prettiest summer desserts!