
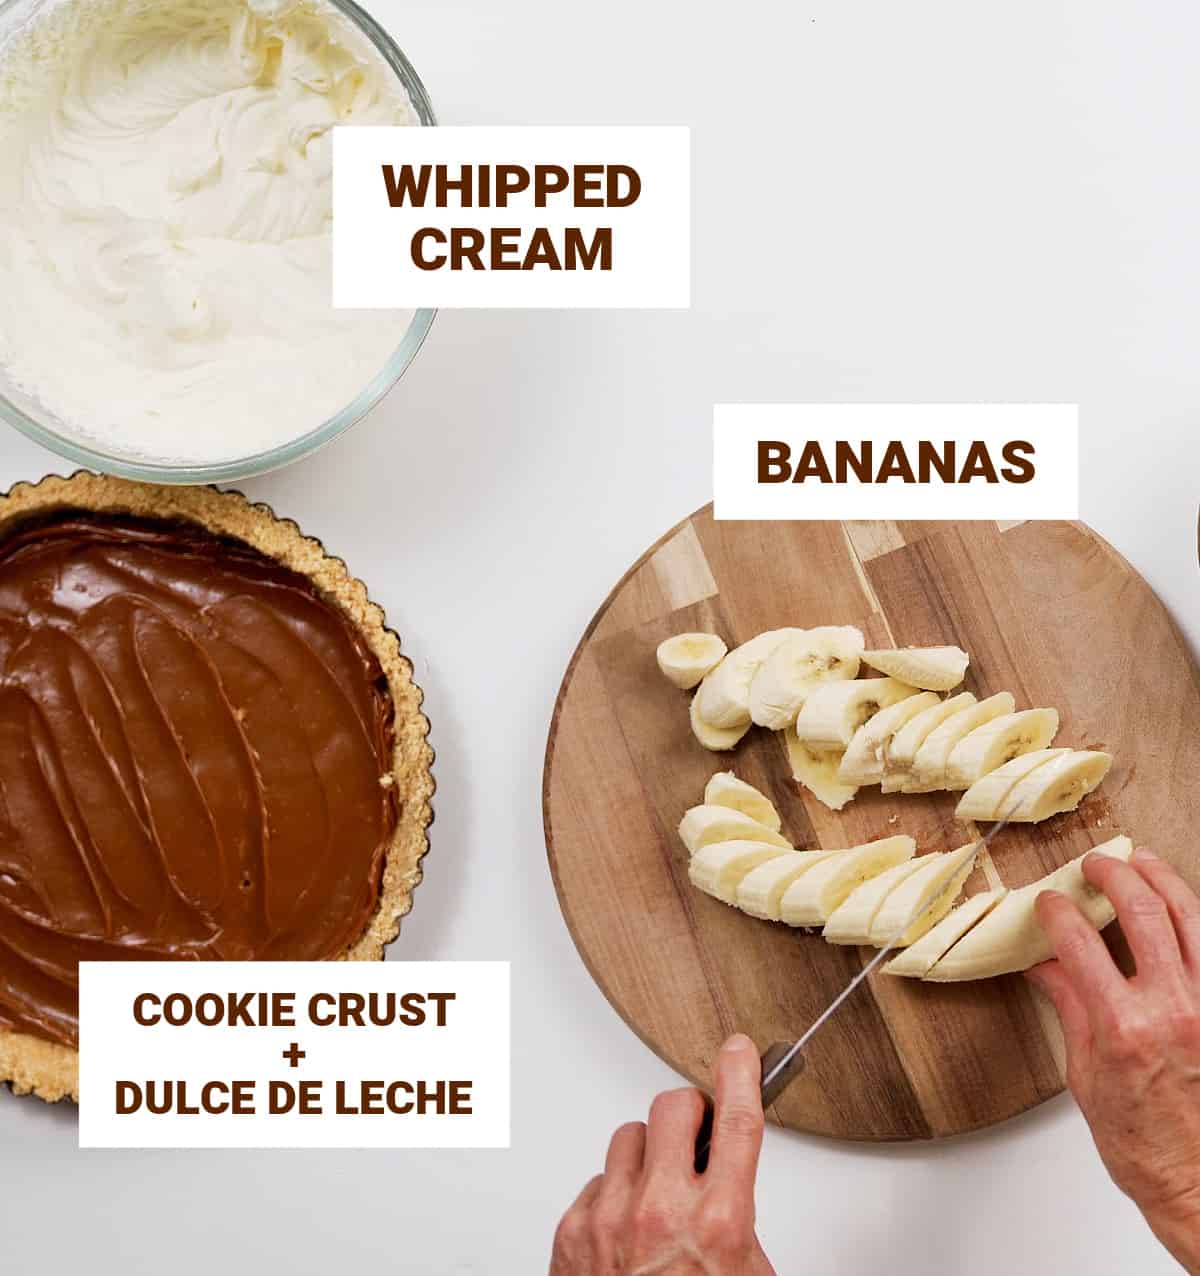
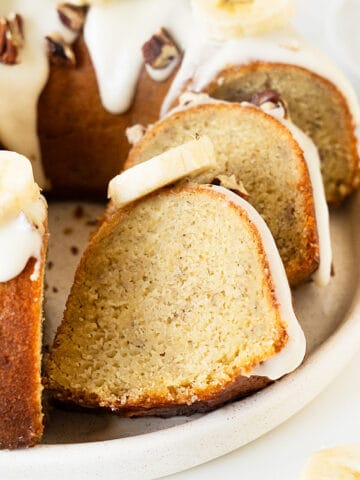
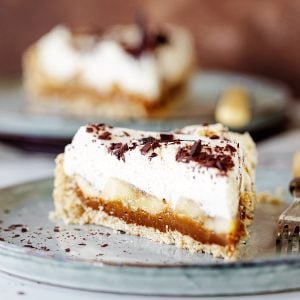
Smooth, rich and utterly delicious, every bite of this pie is an experience. There's a cookie crust, gooey dulce de leche (heavenly paired with bananas), a mound of whipped cream and chocolate shavings. So it's easy to put together, and the combination of flavors is simple perfection. This is a dessert recipe you must try!
SAVE THIS RECIPE
Incredible flavors
This is an easy version of banoffee pie, one of my favorite desserts and the best I've yet to make.
It's all in the details and the layers. All of them are essential to the success of this fantastic dessert.
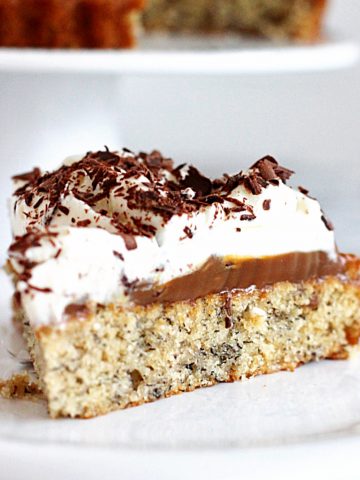
As with the easy banoffee cake recipe, you can make some of the components ahead and assemble the banana pie an hour before serving.
The original recipe for this pie has bananas and a toffee filling, which is a caramel-like concoction that uses sugar and cream. It was invented in the United Kingdom, where toffee is a huge deal.
My twist is using dulce de leche, which translates to milk jam, and it's a great substitute.
An easy dessert
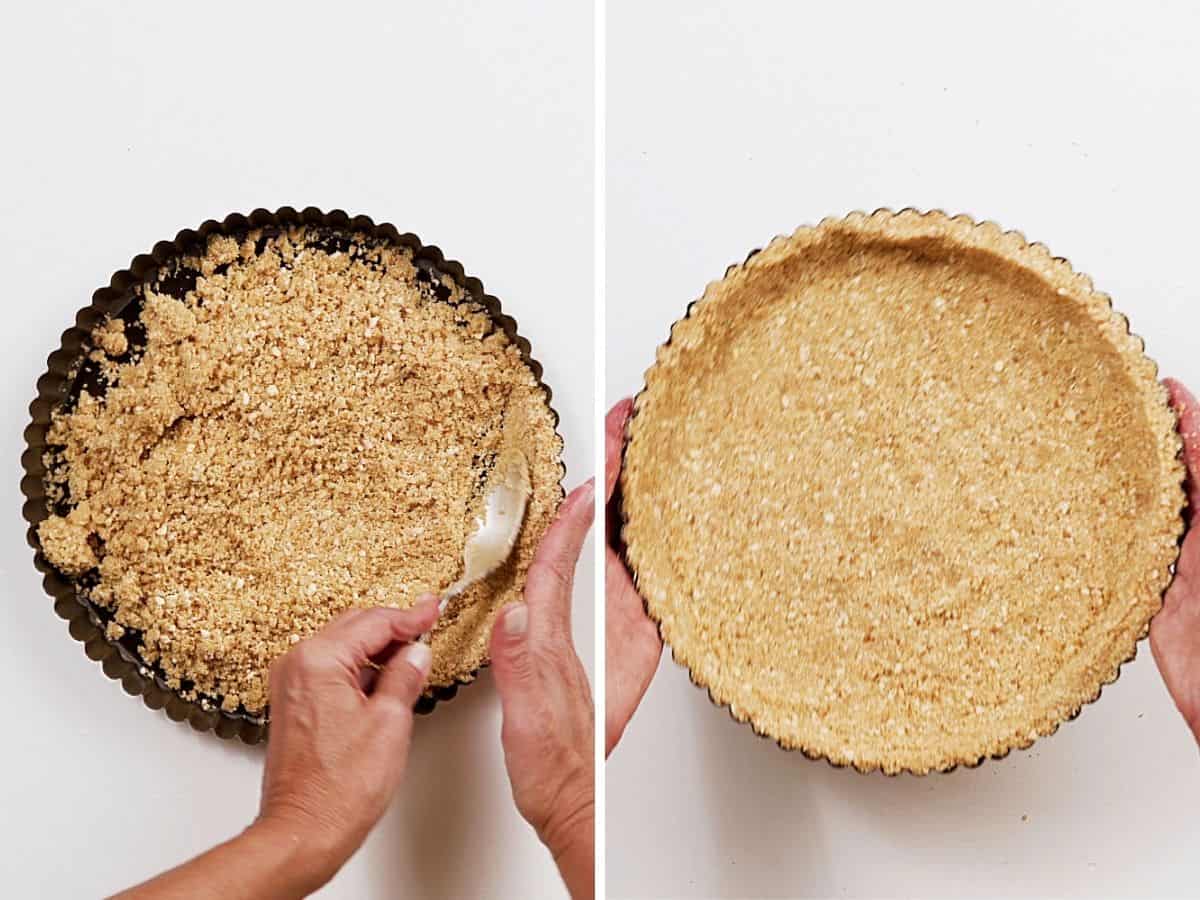
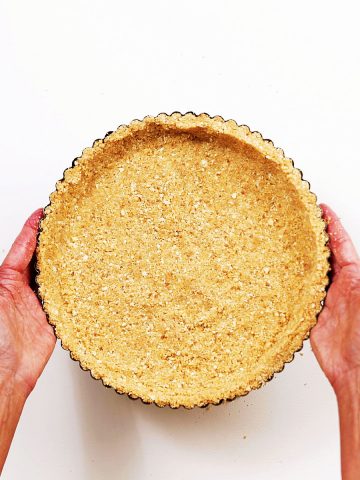
- Cookie crust: it's the easiest one of them all. No need to labor over homemade pie crust that needs to be chilled. Simply mix ground cookies with melted butter, pat into the pan, bake for ten minutes to solidify and let cool completely. Super simple.
- Dulce de leche: I'm a huge fan of it because I'm from Argentina, where it's the most common jam and used for everything (like the Alfajores recipe that is so popular)
- Flavors: if you haven't tried bananas and dulce de leche together, you're missing out, let me tell you. Add some whipped cream and chocolate shavings, and the synergy is phenomenal. These are flavors that were meant to be together!
- Make ahead: the cookie crust can be frozen, the dulce de leche can be store-bought and lasts for months, and the cream can be whipped a day ahead. So, there is a way to make this dessert even simpler.
FAQ
It can be due to the toffee or dulce de leche not having the right consistency and the whipped cream not being firm enough. It's all in the details.
It's best eaten up to 24 hours after it's made, and I recommend that it be chilled for 2-3 hours after being assembled before serving it. It can last for 2-3 days, well covered, in the refrigerator. But keep in mind that the bananas will turn darker with each passing day.
I don't recommend freezing the assembled pie. The whipped cream and bananas will not have the right texture or consistency after thawing them. But you can make and freeze the cookie crust and have the cream whipped in the fridge up to 2 days before assembly.
Ingredient list
- Cookies: plain wafers or digestive biscuits are traditional. This cookie crust also works with a plain vanilla wafer or a graham cracker pie crust.
- Unsalted butter.
- Dulce de leche: it's not hard to make, but I recommend buying pastry dulce de leche. Regular dulce de leche is too runny and will drip and pool when you cut the pie.
- Bananas: firm but ripe ones because they have a good color and flavor.
- Heavy cream: this is my first choice. Heavy whipping cream also works, as does double. I don't recommend light creams that have little or no fat content.
- Cream cheese: the regular type, full-fat cream cheese.
- Powdered sugar: also called confectioners or icing sugar.
- Chocolate shavings: a good semisweet chocolate bar is the best choice.
Quantities are listed in the recipe card towards the end of this post. The Ingredients page has more details and lists the brands we use.
How to make banoffee pie
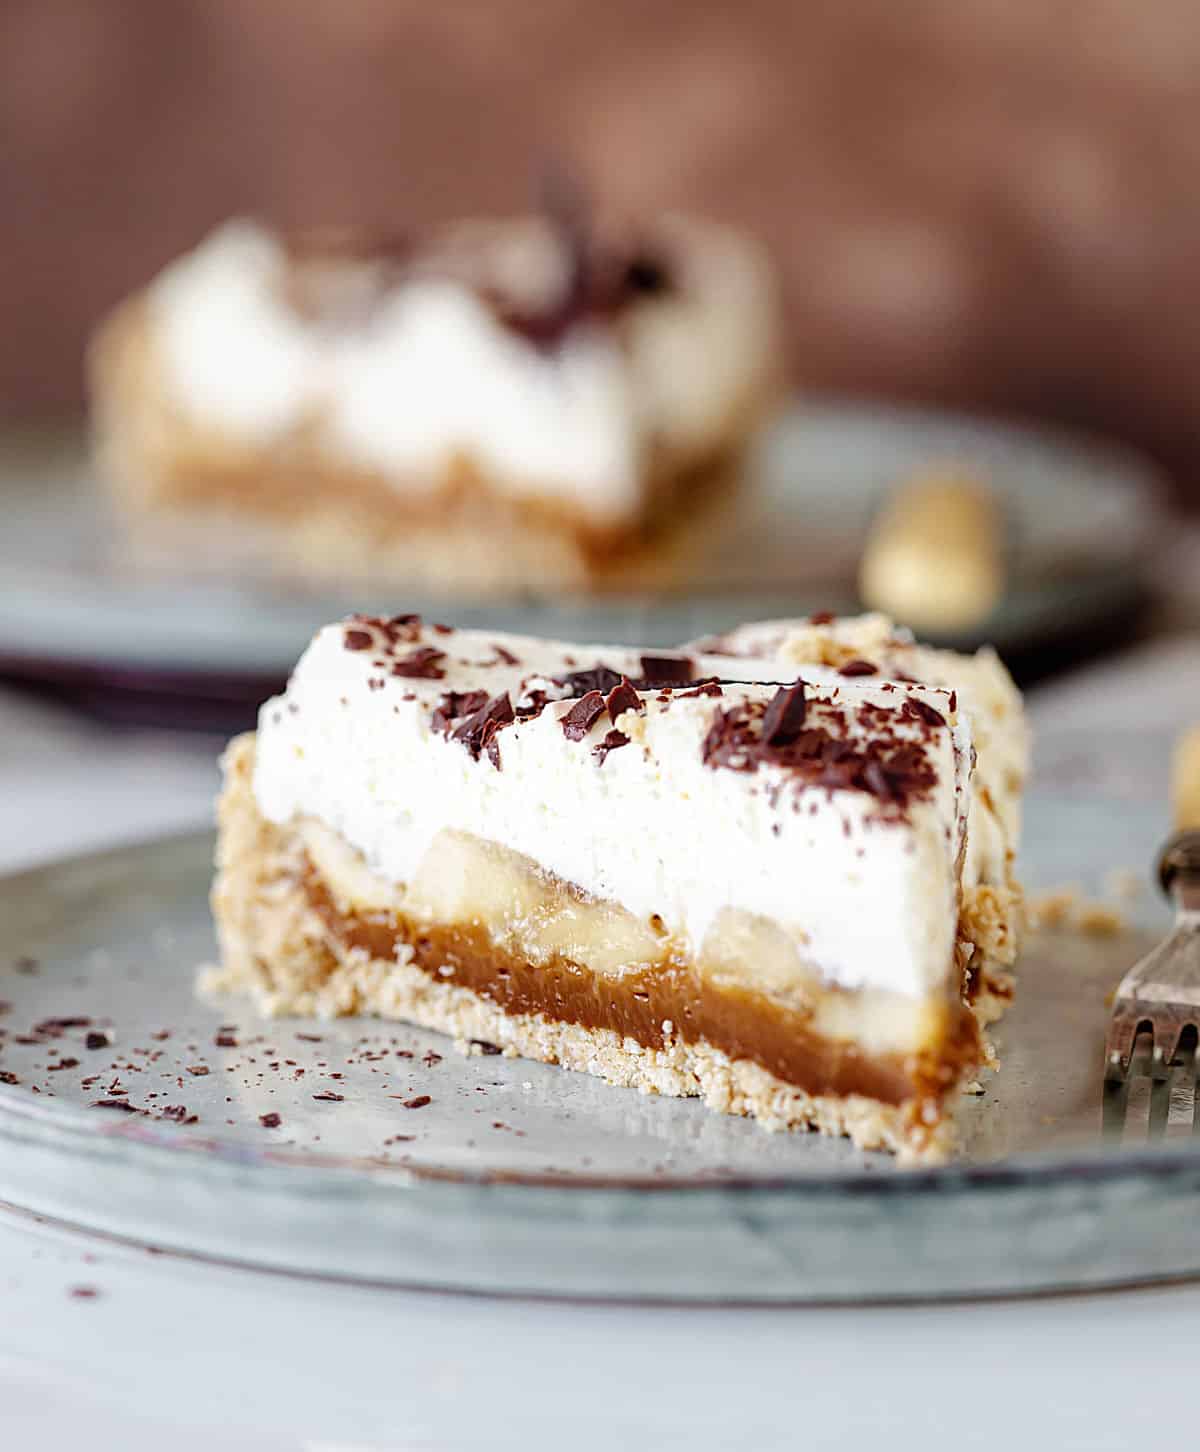
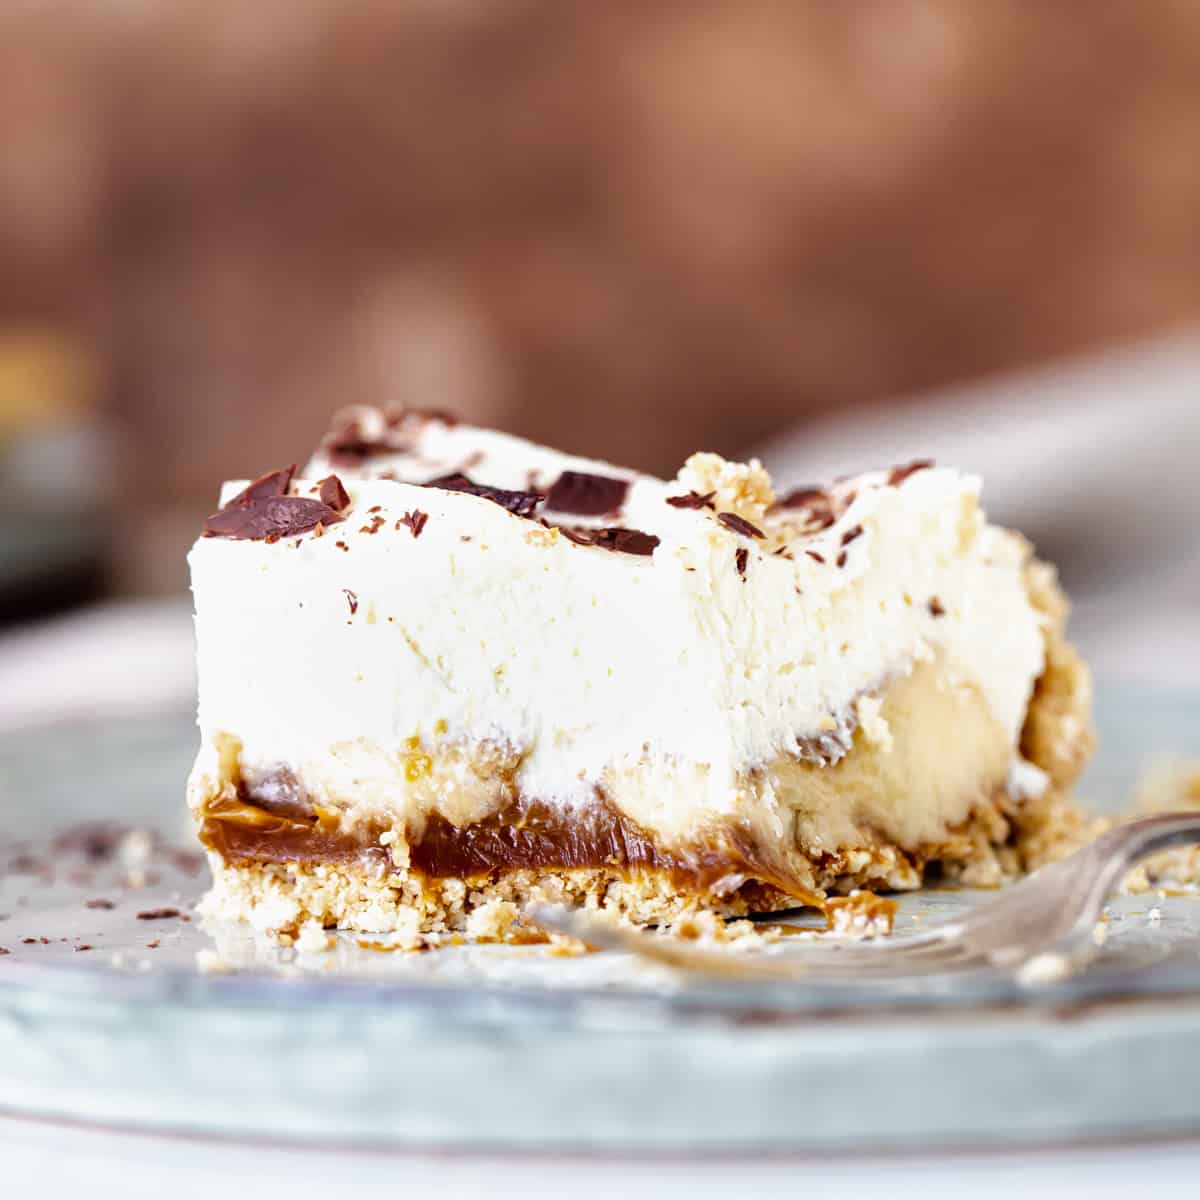
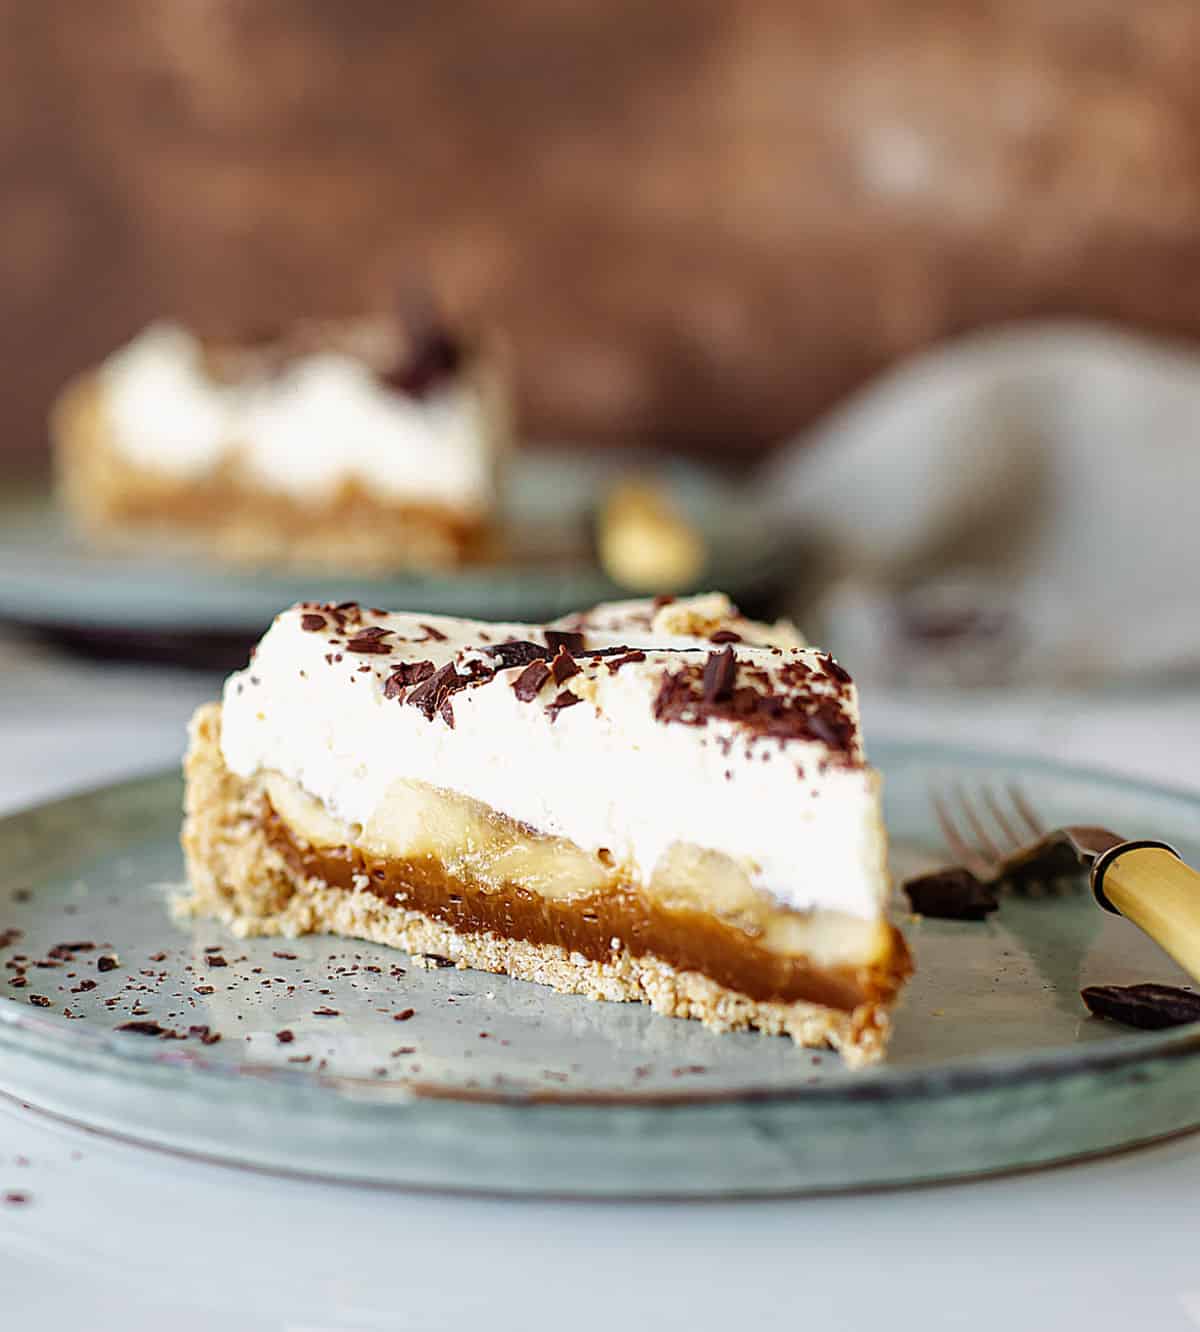
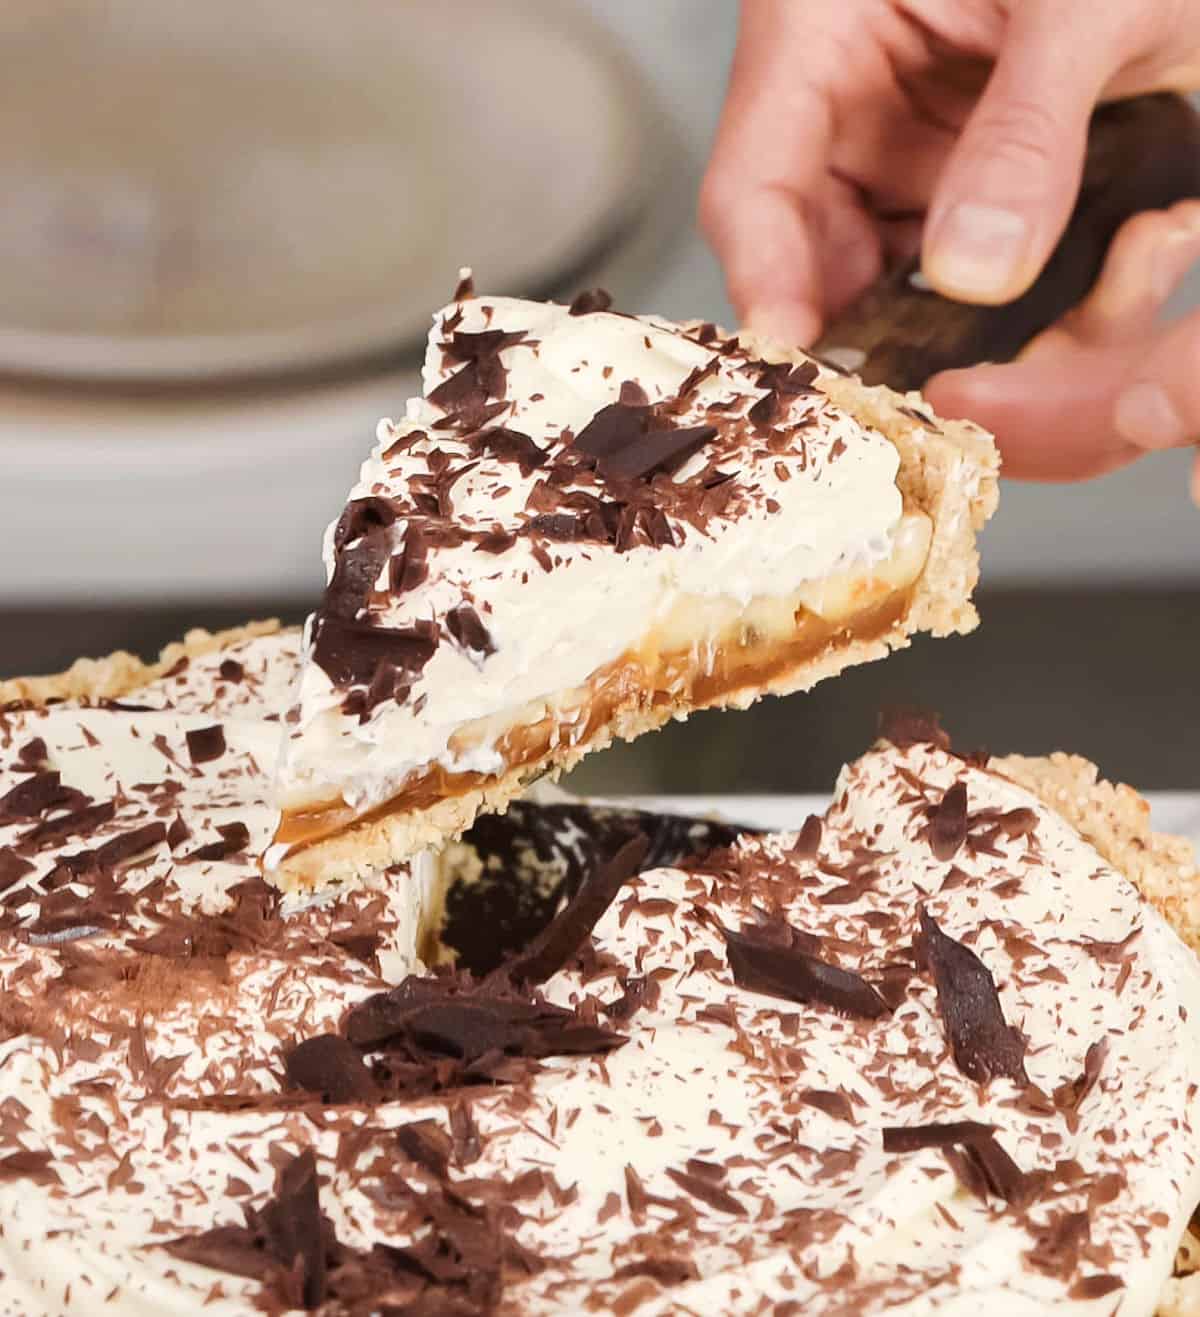
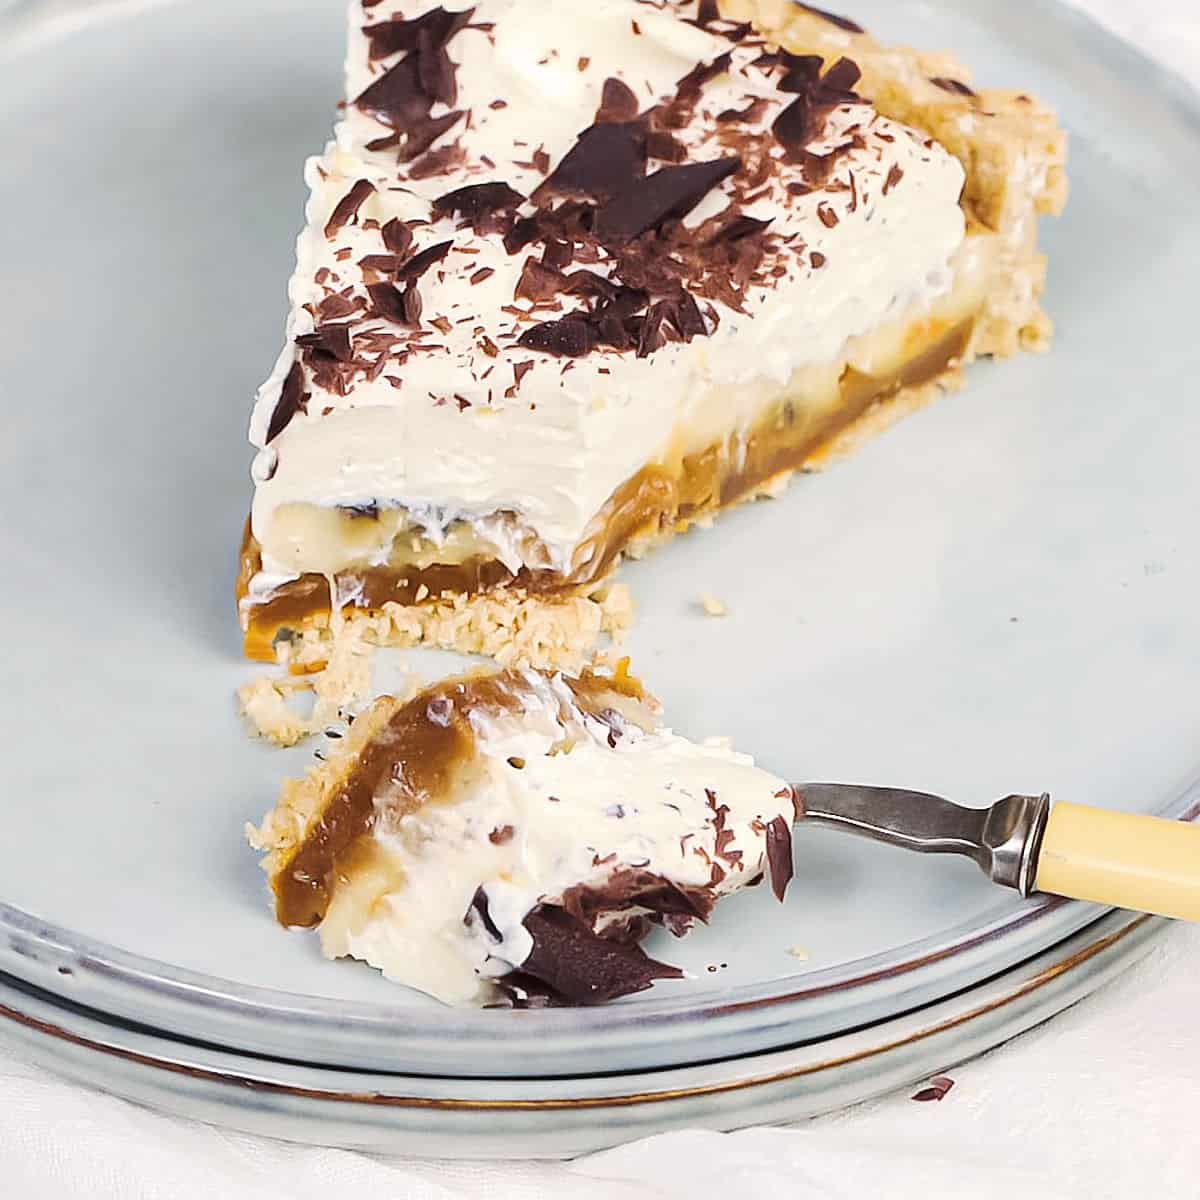
There are three filling layers and a topping to make this easy banoffee pie recipe a success, and they're all necessary and important.
So don't be tempted to omit any of them.
Watch our step-by-step videos
Cookie crust
- Type of biscuits: originally made with digestive biscuits, you can use graham crackers, or other plain vanilla wafers or cookies. They must be ground into fine crumbs, so avoid filled cookies. You can enhance the caramel flavor of the pie by adding a tablespoon of brown sugar to the crust.
- Process: mix the cookie crumbs with the melted butter until it resembles wet sand. You can do this directly in the bowl of the food processor where you ground the wafers or use a separate bowl.
- Line the pan by patting the crumbs firmly. Then you have two options: chill it until firm if you want a no-bake pie, or bake it for 10 minutes and then cool it completely before filling (the crust will have more structure and be easier to remove from the pan and transfer to the serving plate).
- Crumb crust recipe: there is a post about how to make a graham cracker crust with a video, tips and more images that you can check out.
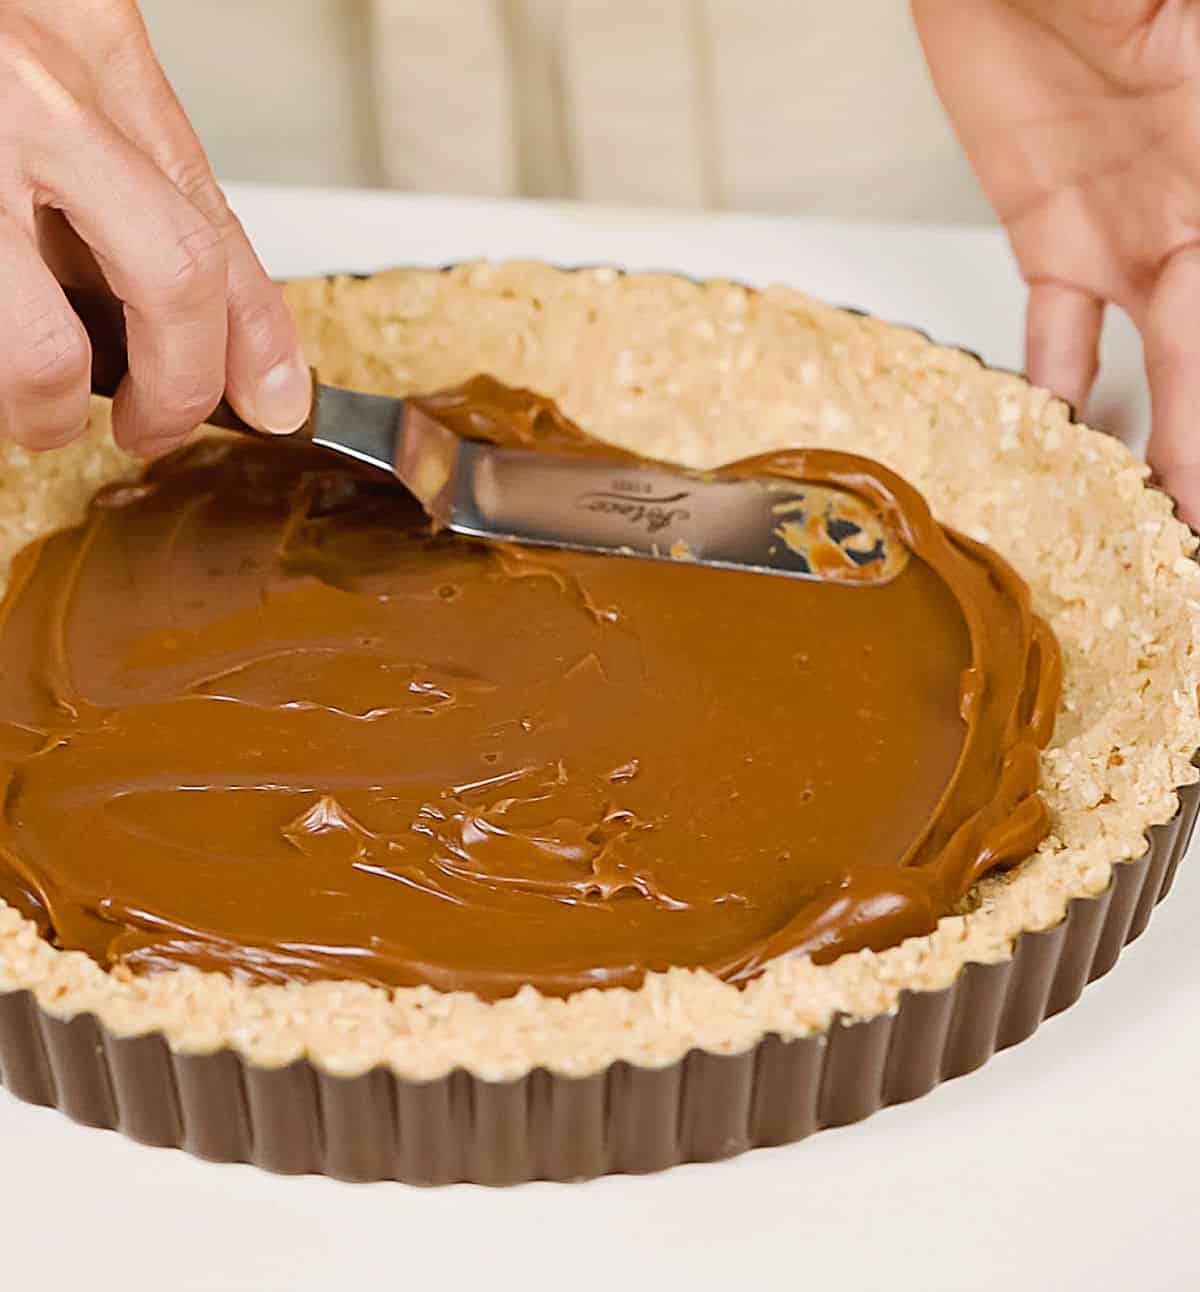
Dulce de leche
What you need for this pie is what we call 'pastry' or 'baking' dulce de leche. It's thicker and used for filings because it holds well, similar to the difference you find with commercial peanut butter and the natural version.
You can make it at home but it's usually thinner and when you cut the pie it will spill out.
So you have options:
1) Buy it. Best brands to buy online: Vacalin Dulce de Leche Repostero (is the best, the one many pastry shops use here in Argentina), and also Dulce de Leche Veronica repostero is very good, and I have used it several times. Regular dulce de leche is too runny and will drip and pool when you cut the pie.
2) Make it yourself with my homemade dulce de leche recipe.
Spreading it: we're using a thick ingredient so we need to make sure it doesn't detach the crumbs as we spread it with the back of a spoon or offset spatula (image below). For this we soften the dulce de leche a little (in the microwave is the easiest way) so it's of a better spreadable consistency. It will firm up again as it cools.
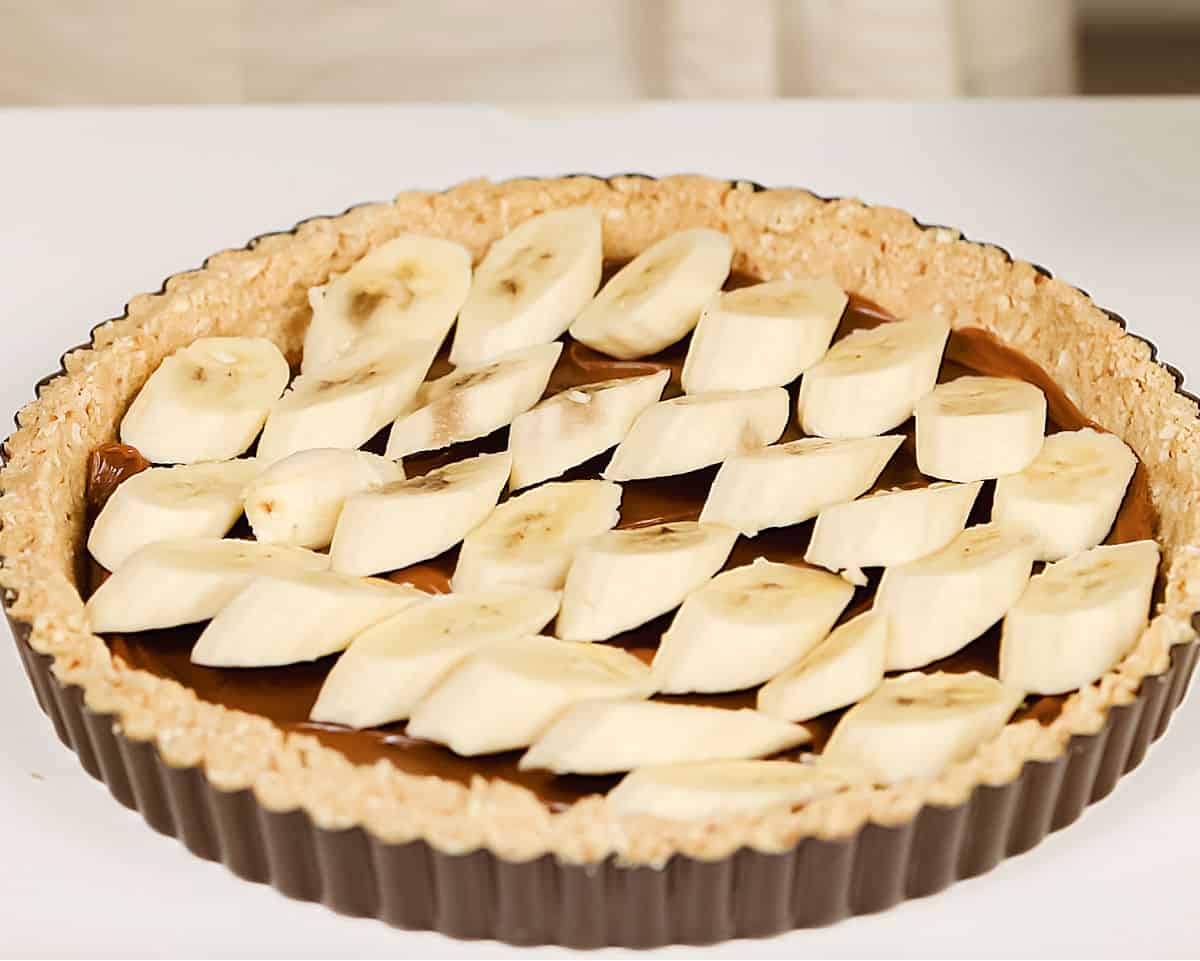
Banana slices
They go on top of the caramel sauce. Some recipes like to mix it with the dulce de leche, and you can go that route.
For this layer, we need to use fresh bananas that are not overripe and cut into slices. That's all this step entails.
Slicing the bananas: mine are relatively thick and slightly slanted rounds, but any way is acceptable as long as they're not large chunks that will be difficult to eat.
How do you arrange them over the caramel sauce? However you want! A cloud of whipped cream will cover it, so it doesn't matter.
Whipped cream topping
This layers is added on top of the bananas, and the idea is to cover them completely, or almost, so that they don't brown quickly. It's a way to preserve the color longer.
My favorite way to make whipped cream is with powdered sugar (not a lot because the dulce de leche is very sweet) and with a few tablespoons of cream cheese to help it hold better. It doesn't change the flavor but it aids with the texture, especially if you're making the pie the day before.
But, you can absolutely use only cream and sugar, beat them until stiff peaks form and make a traditional chantilly cream.
Vintage Kitchen Tip
Use a large bowl to beat the cream as it splatters a bit until it starts to thicken, but also because it'll thicken quicker due to the extra room. It will double or triple in volume when ready to use. It will take longer and be messier if using a small bowl.

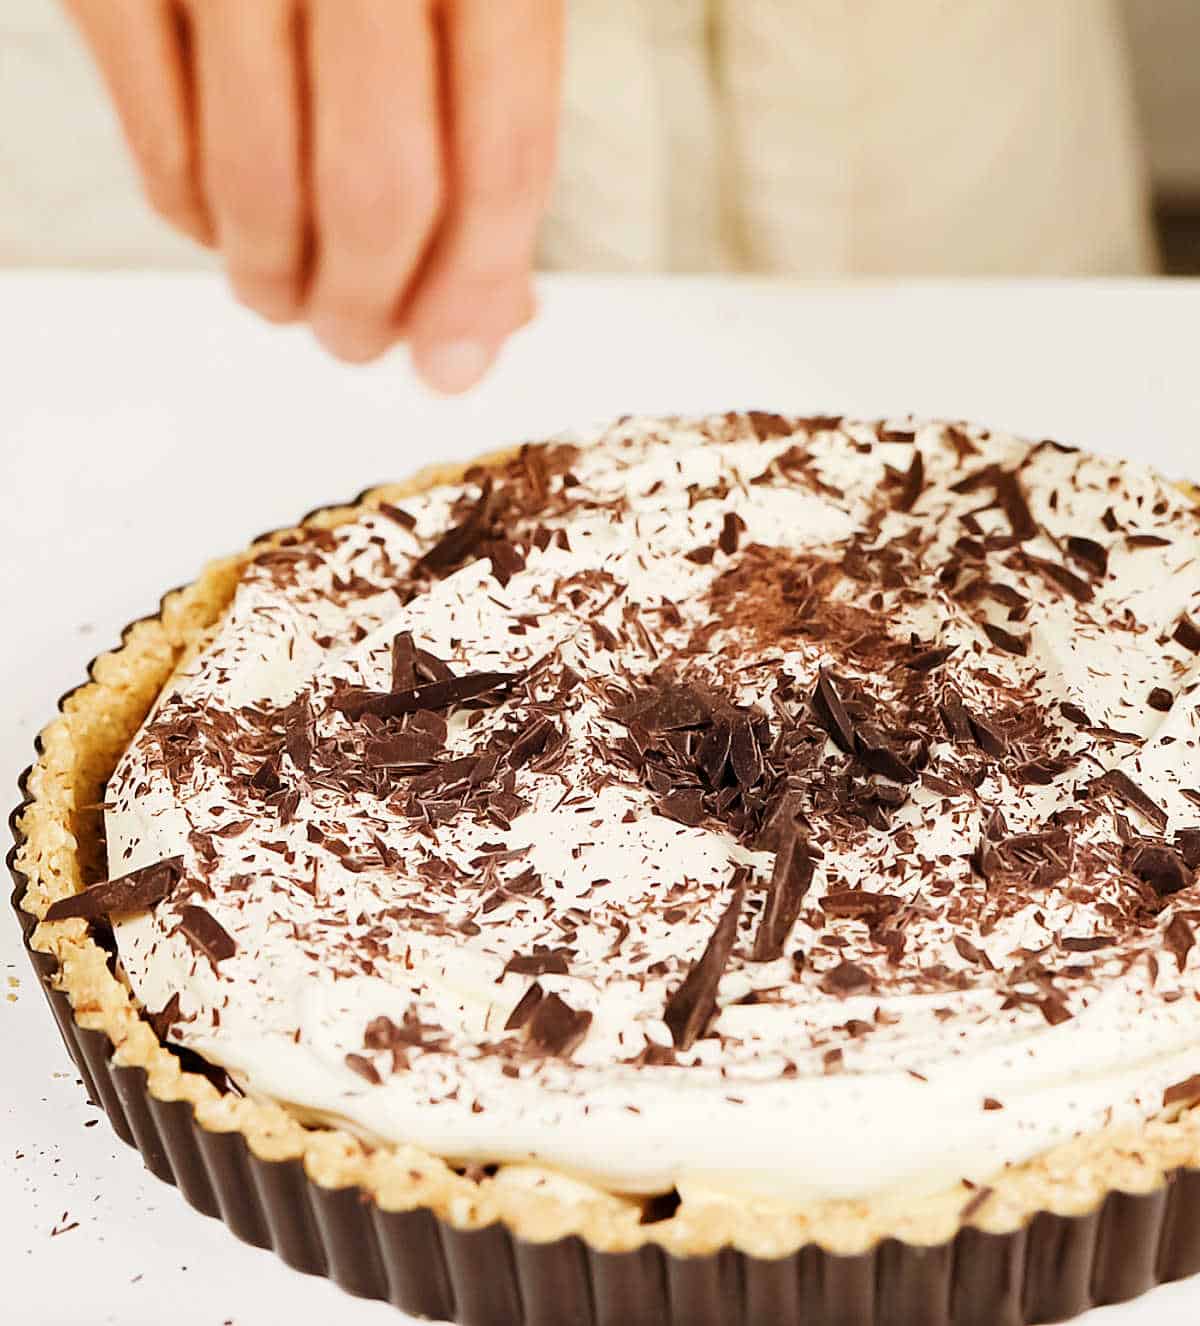
Chocolate shavings
They might look or sound like an afterthought, something that is added just to make the top of the pie look prettier, but it's not. When you bite into this pie, you'll realize that the subtle flavor the semisweet chocolate adds is a big part of this banoffee pie experience. So I recommend you don't omit it.
- To make the chocolate shavings, it's best that the chocolate block be at room temperature. I use a kitchen knife and thinly slice it, creating different sizes of shards and shavings, and that's the beauty of it. A vegetable peeler also works. Or make chocolate curls instead of shavings. You have to hold the chocolate in one hand and peel it like a potato; your hand will start to melt the chocolate quickly, so it can be tricky. Alternatively, leave it flat and shave or peel it before it softens.
- Chocolate: use your favorite dark semisweet chocolate for this recipe. I love Ghirardelli Chocolate Dark Bar 60%, Green & Black's dark chocolate 70% and Ghirardelli 72% intense dark chocolate. The higher the percentage of cocoa, the less sweet the chocolate is. The shavings are not invasive, and the dulce de leche is very sweet, so dark chocolate works very well.
- Chocolate chips: they don't work as well, in my opinion, because they are too clumsy. But it's your choice, of course. You might try it with chocolate chips and love it! If you're going this route, I suggest sprinkling them on top of the dulce de leche.
Kitchen notes
- Organization: read the recipe first and ensure you have ingredients at the correct temperature, equipment, and enough workspace. This will make the process so much easier.
- Whipped cream: be careful at the end so you don't overbeat it as it might curdle. If in doubt, use an electric mixer until medium thick, and then change to a hand whisk until you have the desired consistency. It's harder to overbeat it by hand.
- Make ahead: you can make the cookie crust several days before and keep it at room temperature. The whipped cream can be made up to 2 days before and kept in the refrigerator, well covered. Dulce de leche is a pantry ingredient with a long shelf life, as is the chocolate needed for the shavings.
- Serving it: chill the assembled pie (without the chocolate shavings is better) for a few hours before serving it. It allows the layers to settle and the cream to firm up. There's not much to accompany it, as it's a pie that already has everything. The bananas will darken after more than a few hours in the fridge. But the flavor will still be amazing! If you plan to add fresh bananas on top as decoration, make sure you do so at the last moment so the color is vibrant.
Related recipes you might like:

As an Amazon Associate, I earn from qualifying purchases. Read my disclosure policy.
Banoffee Pie (easy recipe)
Ingredients
For the cookie crust:
- 2 cups plain cookie crumbs, digestive biscuits, plain vanilla wafers or graham crackers
- ½ cup unsalted butter, melted
For the whipped cream:
- 1 ½ cups heavy cream, cold
- 2 tablespoons cream cheese, at room temperature
- 3 tablespoons powdered sugar
For the filling:
- 2 ½ cups dulce de leche repostero, softened. I use dulce de leche repostero Vacalin.
- 2 to 3 bananas, ready to eat but not brown
- ¼ cup chocolate, in shavings or curls
Instructions
For the cookie crust:
- Preheat oven to 350°F (180°C). Have ready a 9-inch pie pan with removable bottom. An 8-inch also works but the crust will be thicker.
- Mix 2 cups plain cookie crumbs with ½ cup unsalted butter in a medium bowl until it resembles wet sand.
- Pat onto a removable 24cm pan and press well, starting at the edges and the angles where it joins the bottom part. Make sure it's pressed and compact but don't overdo it. This will help when removing the pie from the pan.
- Bake for 10 minutes, until lightly golden and dry. Let cool completely on metal rack before filling.
- For a no-bake dessert, simply put the crust in the refrigerator for at least 1 hour to allow the butter to firm up. This will make it less sturdier and might crumble here and there when you cut it.
For the whipped cream:
- Beat 1 ½ cups heavy cream, cold with 2 tablespoons cream cheese and 3 tablespoons powdered sugar in a large bowl until thick and medium peaks form. Be careful at the end so that you don't overbeat it, as that might make the cream curdle. If in doubt, you can beat the first part with an electric mixer until medium thick, and then change to a hand whisk and beat until it's the desired consistency. It's harder to overbeat by hand.
- Keep it refrigerated, covered, if not using immediately.
For the filling:
- Soften 2 ½ cups dulce de leche repostero by placing it in a bowl and microwaving in 10 or 15-second spurts. Mix and see if it's of a nice spreadable consistency but not too runny. Repeat if necessary.
- Peel 2 to 3 bananas and cut about ¼ inch thick slices. Do this at the last moment, right before assembling the pie so that they don't turn brown.
- Chop ¼ cup chocolate finely with a kitchen knife or make curls with a peeler. You will have larger and smaller shavings, and some dust.
To assemble:
- Spread dulce de leche on the bottom of the prepared crust and smooth top.
- Top with sliced bananas. Arrange them however you want.
- Spread the whipped cream on top of the bananas.
- Sprinkle the chocolate shavings over the cream.
- Refrigerate for an hour before serving and up to a day. Keep leftovers refrigerated, covered in plastic wrap or an airtight container.
Sue P. says
Instructions say to "soften the heavy cream" -- is that right? Also, do you use canned dulce de leche?
Paula Montenegro says
Hi Sue! It was a weird typo and it's already corrected. It's the dulce de leche that needs to be softened so it's spreadable. Thanks for the heads up.
You need the thick type that holds itself well for fillings and is labeled repostero. From what I read, the one from the can (La Lechera I think, and it's from Nestle) is pretty thick. I use dulce de leche repostero Vacalin which is available on Amazon (I added the link in the recipe card). If you use the regular type, the pie must be cold or it'll be too runny. And even cold, depending on the brand, it might still be a bit messy. The flavor will be great though.
Ryana Nerissa says
Hi! Would like to ask a question regarding banoffee. I’m facing a huge problem. It would mean the world to me if you could help me out. First of all, I’m selling Banoffee pies. And I have tried and tried and failed. I made the caramel sauce from scratch. It was perfect and thick. I even added cornstarch. So as everything has set and chilled. Once I added the sliced bananas, after few minutes it became like soup! When my customers scooped it, it became like a watery mess. Even after I have chilled it overnight. I know the culprit is the bananas. I could see the liquid coming out from the bananas. What do I do? How do I prevent this? Is it the type of the bananas that I should change? I saw few banoffee sellers that sell banoffee pies that arent watery.
Paula Montenegro says
Hi Ryana! I strongly recommend using pastry dulce de leche for banoffee pies, especially if you're selling them. It's made for filling and for holding its shape, so your pies will hold their filling, even with the bananas. Also, use just ripe bananas, the type that have flavor but are still firm. Not the type for banana bread. If using purchased dulce de leche is not an option or you want to use caramel, you should probably cook it a little longer so it reaches a harder stage. How much longer I don't know because I've been using dulce de leche for years now.
Also, try out several recipes that have a from-scratch filling and see if you can find one that is firmer. Hope this helps.
angiesrecipes says
Very rich and yummy! I love your twist with dulce de leche, which is one of my favourite guilty pleasure.