
These peanut butter fudge squares with chocolate on top are beyond amazing, easy to make and a total crowd-pleaser. Trust me on this last part: I've been taking them to every potluck and making them for every party for the past few years, and it's an absolute hit! A no-bake recipe that uses few ingredients and keeps very well. It's a savior if you need an easy candy, similar in flavor to a peanut butter cup.
SAVE THIS RECIPE
Chocolate and peanut butter
This no-bake recipe slightly differs from the traditional buckeye candy, those irresistible peanut butter balls covered in chocolate.
A foolproof homemade fudge with a rich peanut butter flavor that needs no candy thermometer and keeps for a few weeks. Yet very different from this 2-ingredient peanut butter fudge.
Insane flavor: the combination of peanut butter and chocolate is always fantastic; in this case, it's mind-blowing! There's something about the brown sugar, nut butter, and semisweet chocolate that will make a fan out of anyone who takes a bite.
Fudge recipes are a holiday staple loved by everyone. I strongly believe in eating them year-round and most certainly do. They're an excellent idea for the holiday season (perfect gift for Christmas!), road trips, birthdays, potlucks, tailgating or just because you want a snack.
Kid-friendly: It's a great project to make with them, as there's no baking or need to use small appliances.
Baker's tips
Chocolate: if using chips, make sure they melt well. Some brands have too much sugar (or whatever) and are not made for melting. I use semisweet (sometimes mixed with bittersweet), but you can use milk. The type you use will determine the sweetness.
Peanut butter: depending on the type you use, this layer will be more or less crumbly. Natural nut butters without added sugar are usually more fluid than traditional ones like Jif or Skippy. The mixture should be thick and easy to pat by hand. Add ¾ of the powdered sugar at first and see if you need to use it all or not.
Lining the pan: Using a strip (or two crisscross style) of parchment paper wide as the pan will help you remove the block of fudge more easily. I highly recommend it.
Make sure to refrigerate the peanut layer before spreading the melted chocolate.
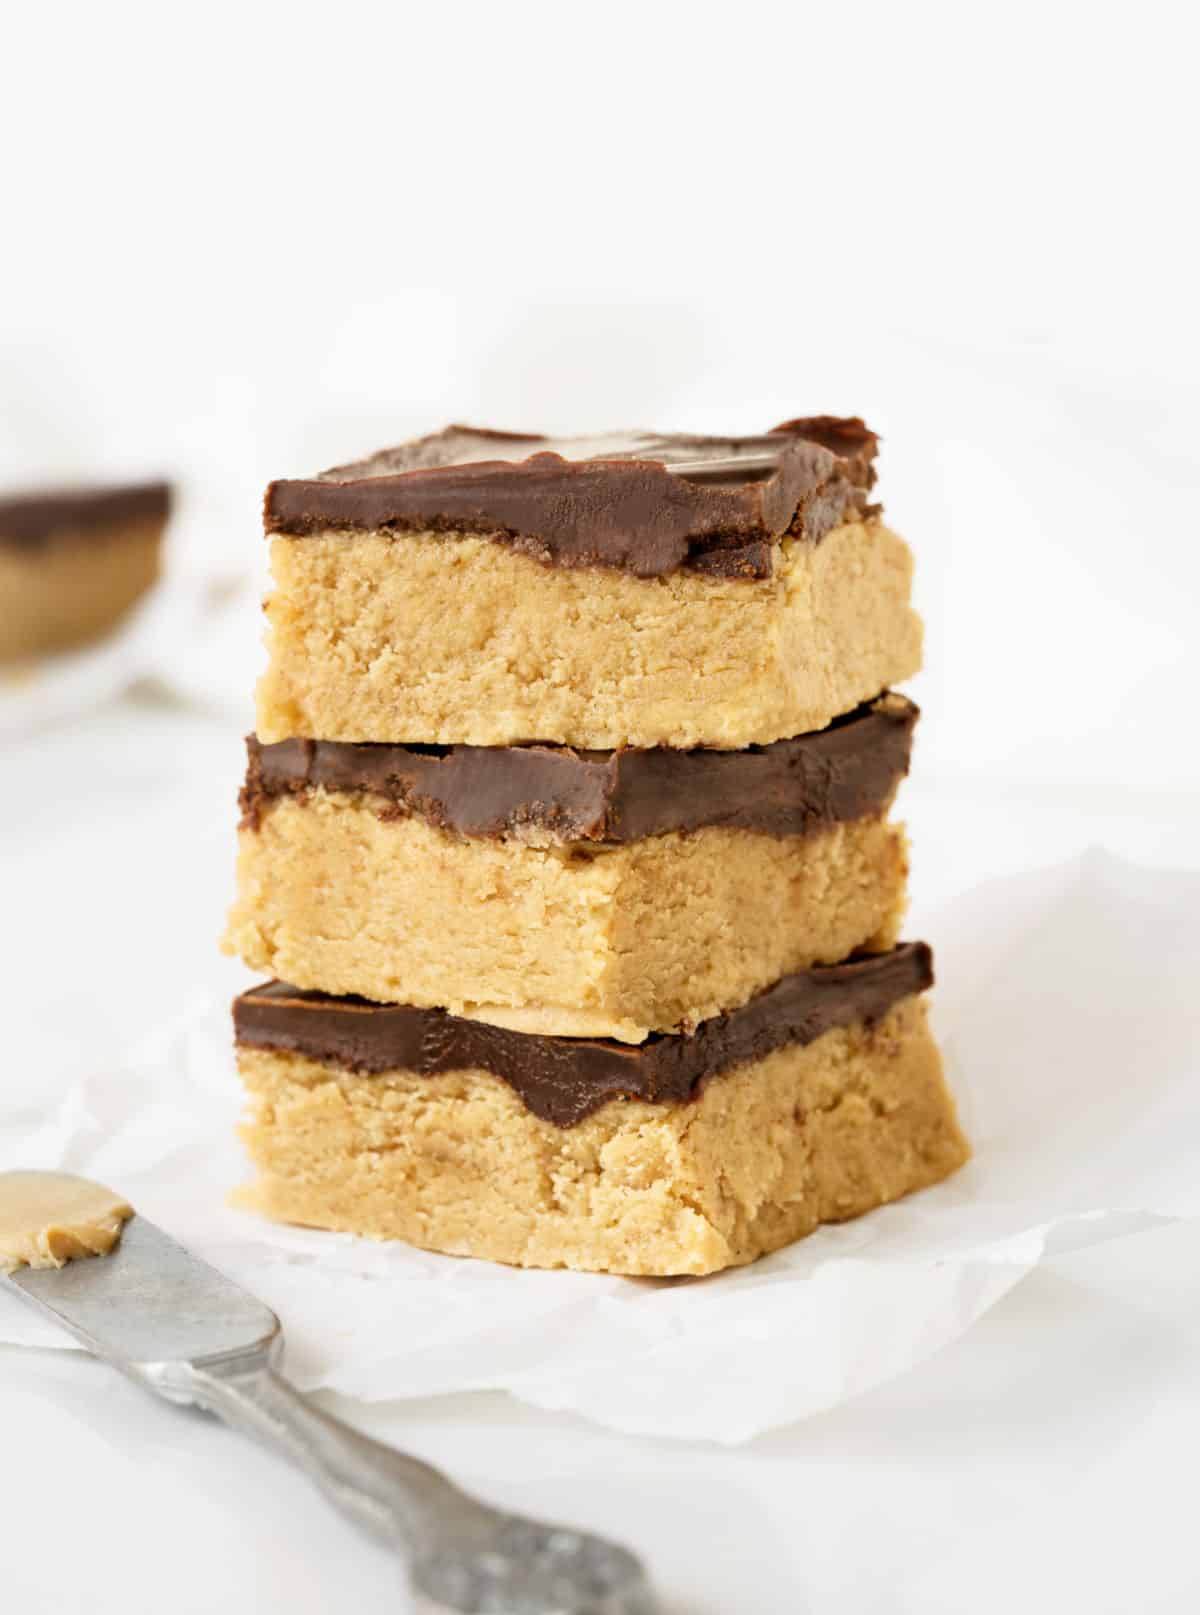
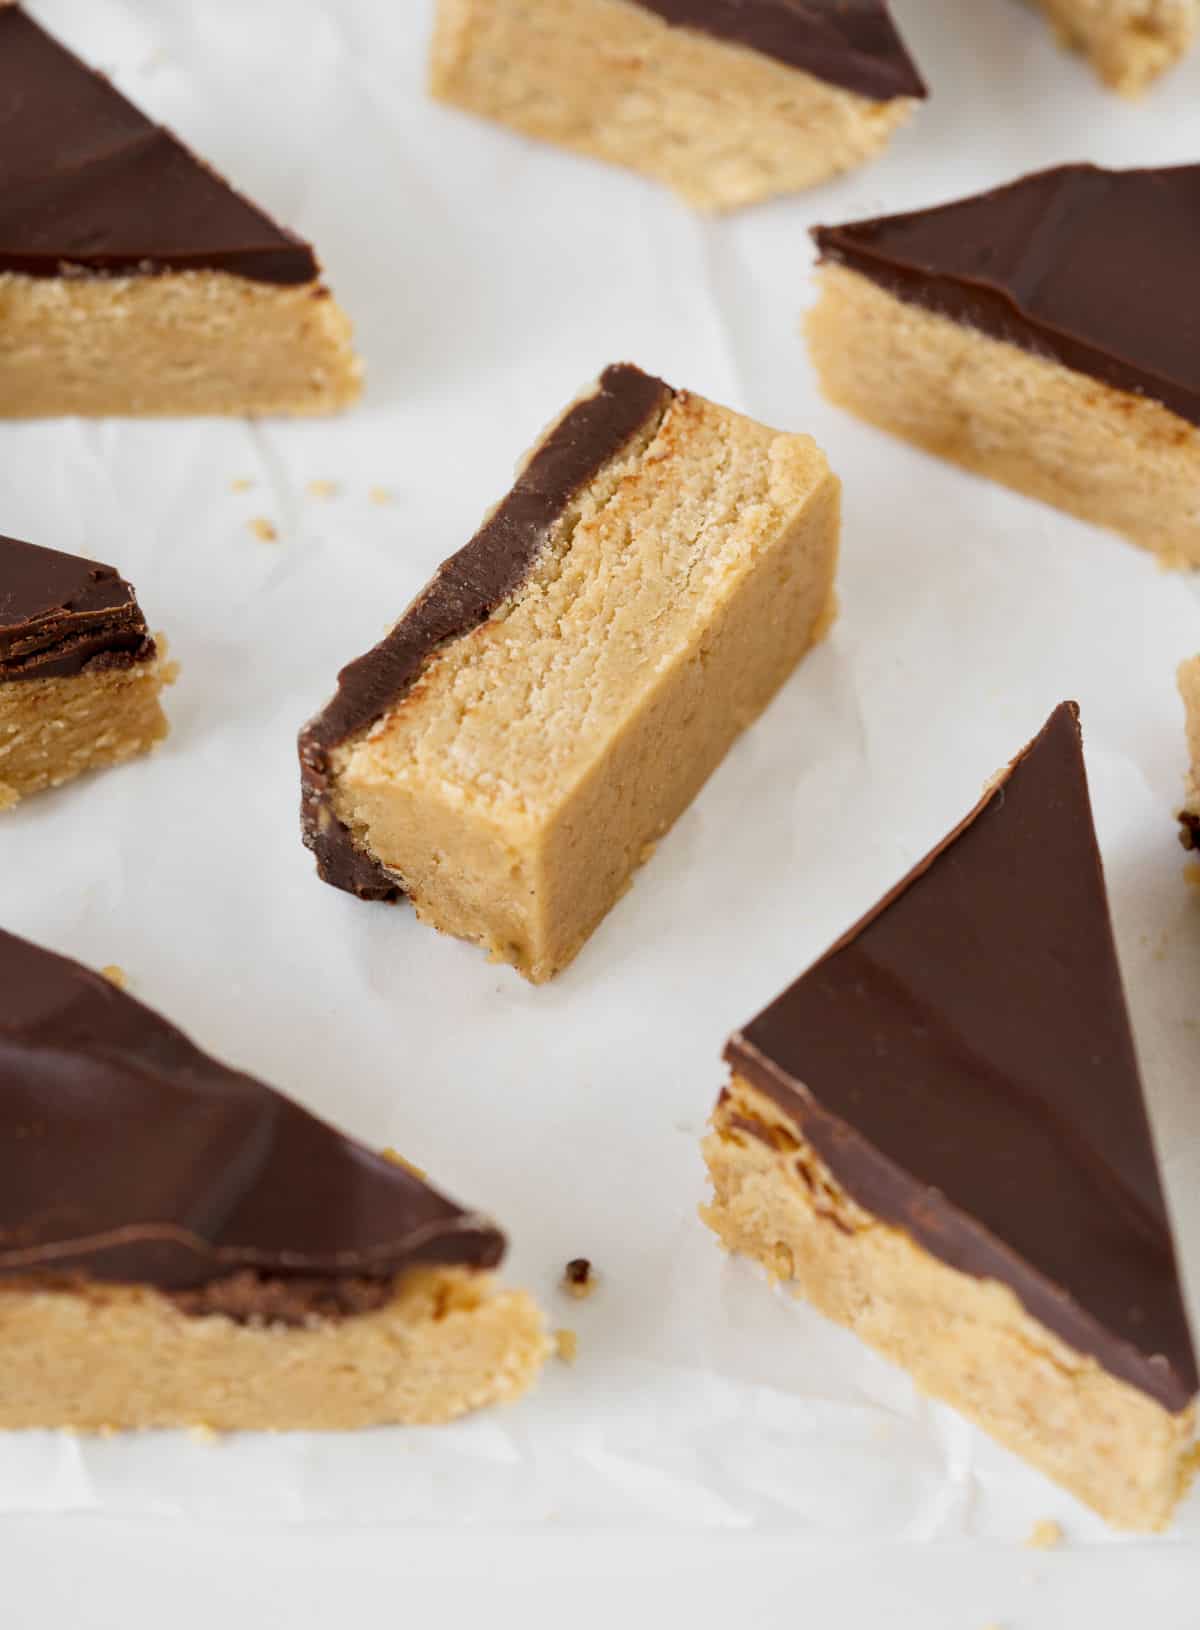
Cutting the bars: the top chocolate layer can crack when you cut it cold, so let it sit out for 15-20 minutes or so before cutting, and run the kitchen knife through hot tap water, wipe the blade with a clean kitchen towel and carefully cut. The warm blade will soften the chocolate and avoid cracks.
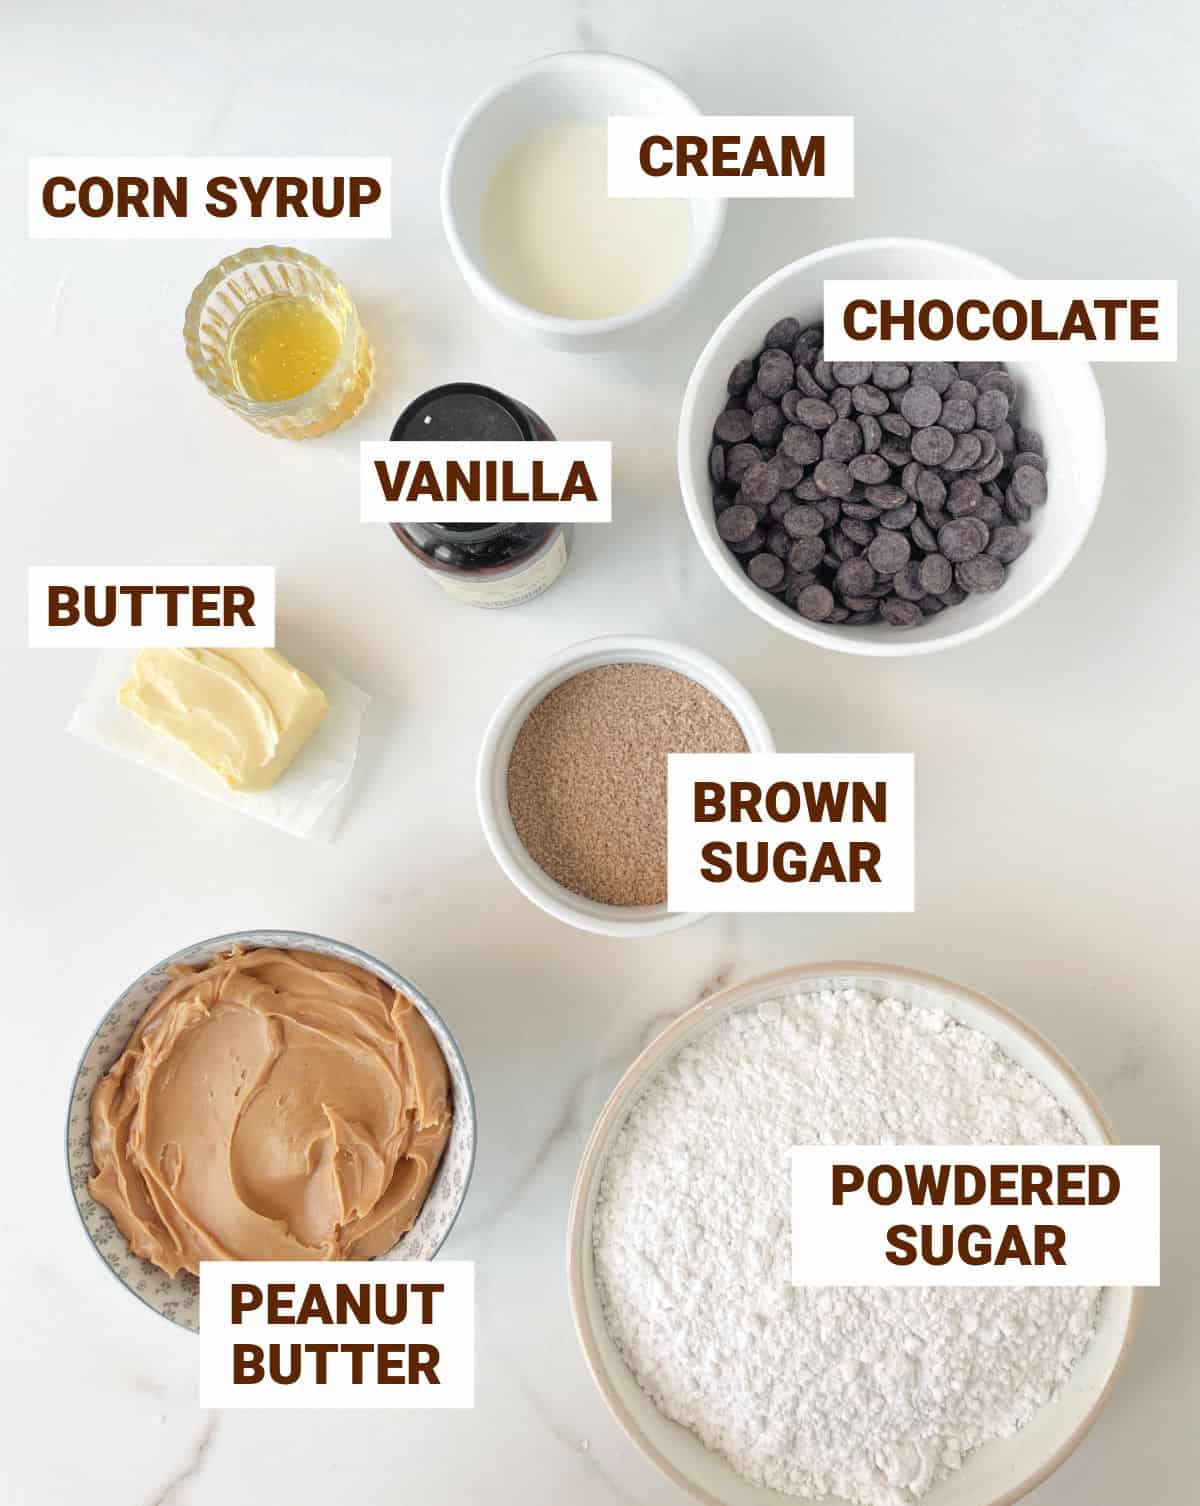
Ingredients
- Peanut butter: the thicker, commercial type, creamy peanut butter will render a denser fudge, and the more fluid, natural peanut butters a softer fudge. Both work for this recipe.
- Brown sugar: I like to use light brown sugar for a softer color. But dark brown sugar can also be used.
- Corn syrup: A very small amount is used to make the chocolate coating softer and shinier. You can also use honey or fructose.
- Cream: whipping, double, or heavy cream; they all work.
Variations & substitutions
- Peanut butter layer: Use crunchy peanut butter or add peanut butter chips to the bottom layer for a more rustic texture.
- Milk chocolate chips: Use instead of dark chocolate chips for the topping. You'll get a sweeter treat.
- Use almond butter or cashew butter instead of peanut. Use part milk chocolate together with semisweet.
How to make buckeye fudge
Since there's no baking involved, this is a quick and easy recipe to assemble. Consider the time it takes for both layers to settle and dry.
Peanut butter layer
Mix until crumbly
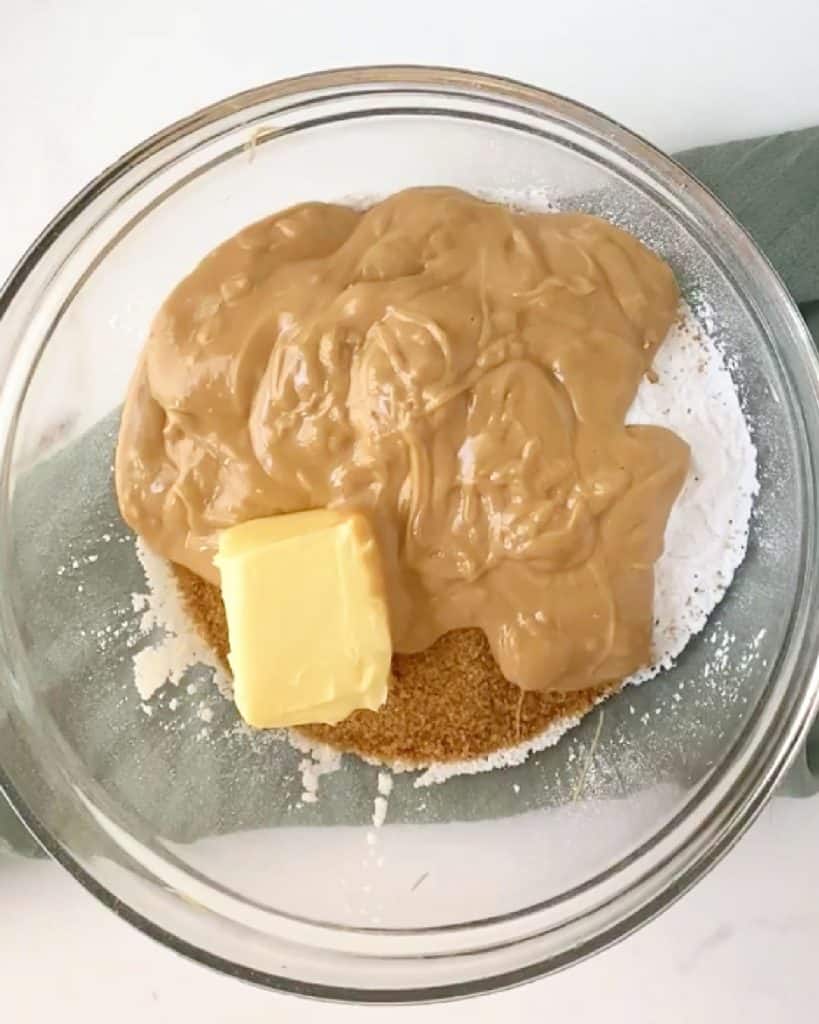
Combine all the ingredients in a large bowl and beat or mix until completely integrated.
The peanut butter dough is crumbly.
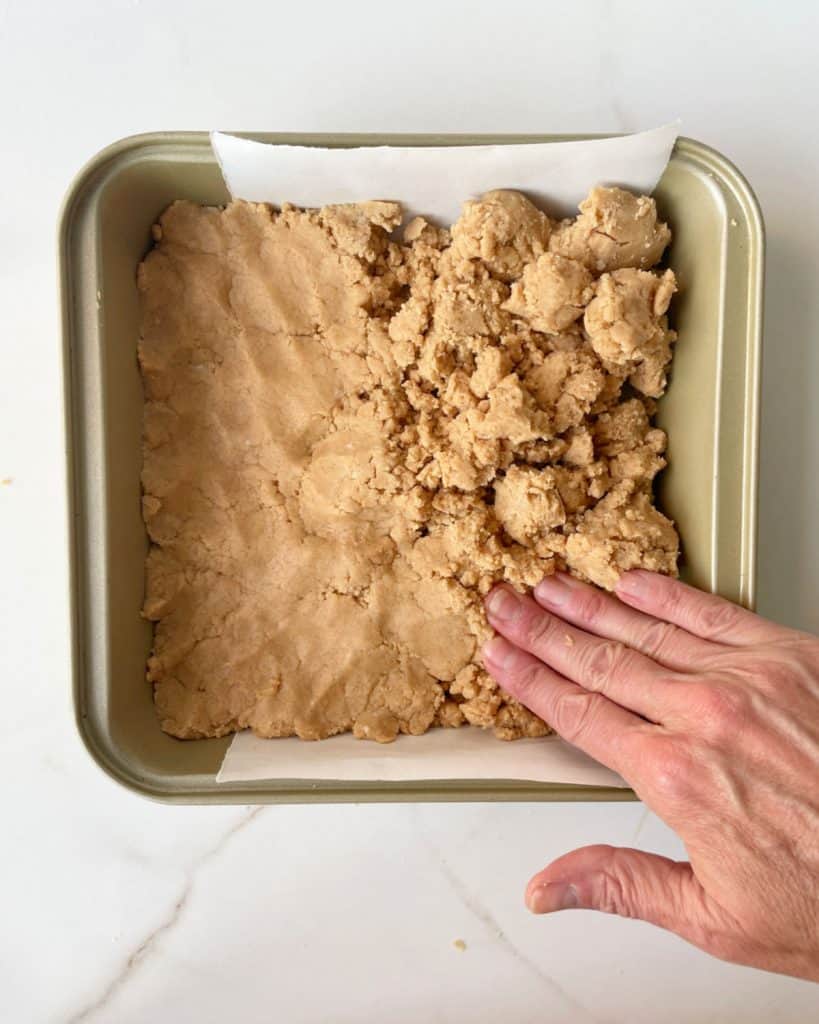
Pat the dough
Dump the peanut dough into the prepared pan. Pat it until even; I use my hands.
I like to line it with a piece of parchment paper for easier removal.
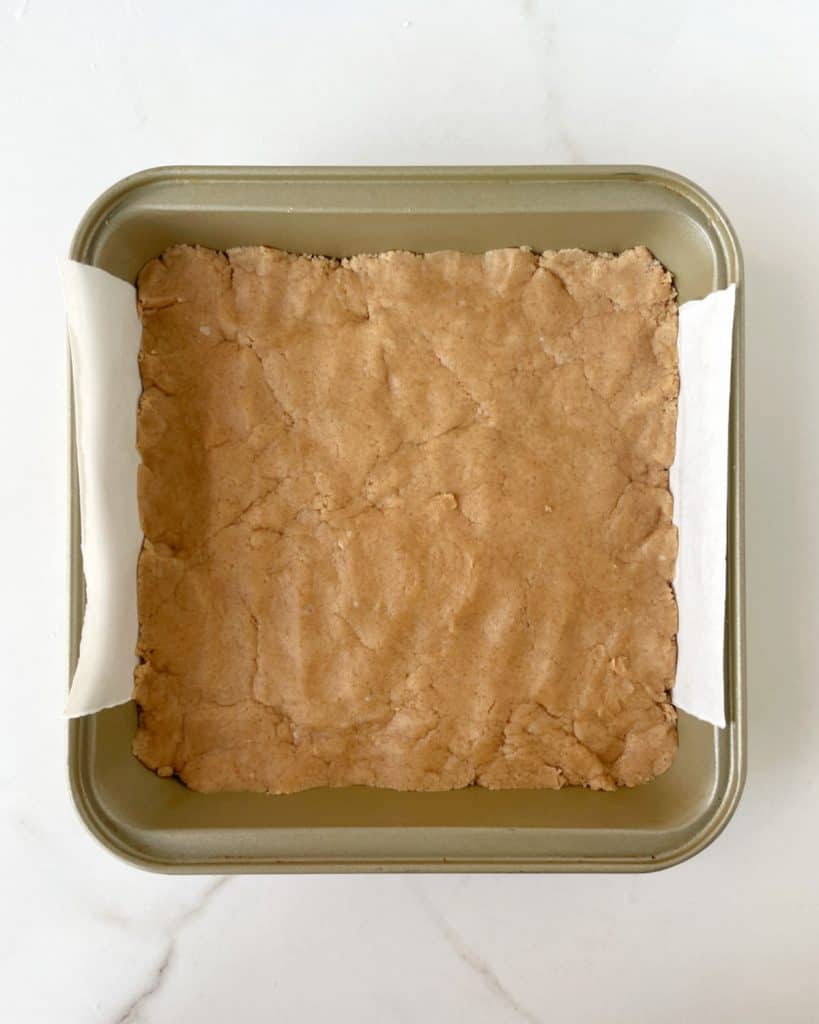
Refrigerate
Place the pan in the refrigerator until firm. If making it ahead, cover it with plastic wrap so it doesn't dry out.
Chocolate layer
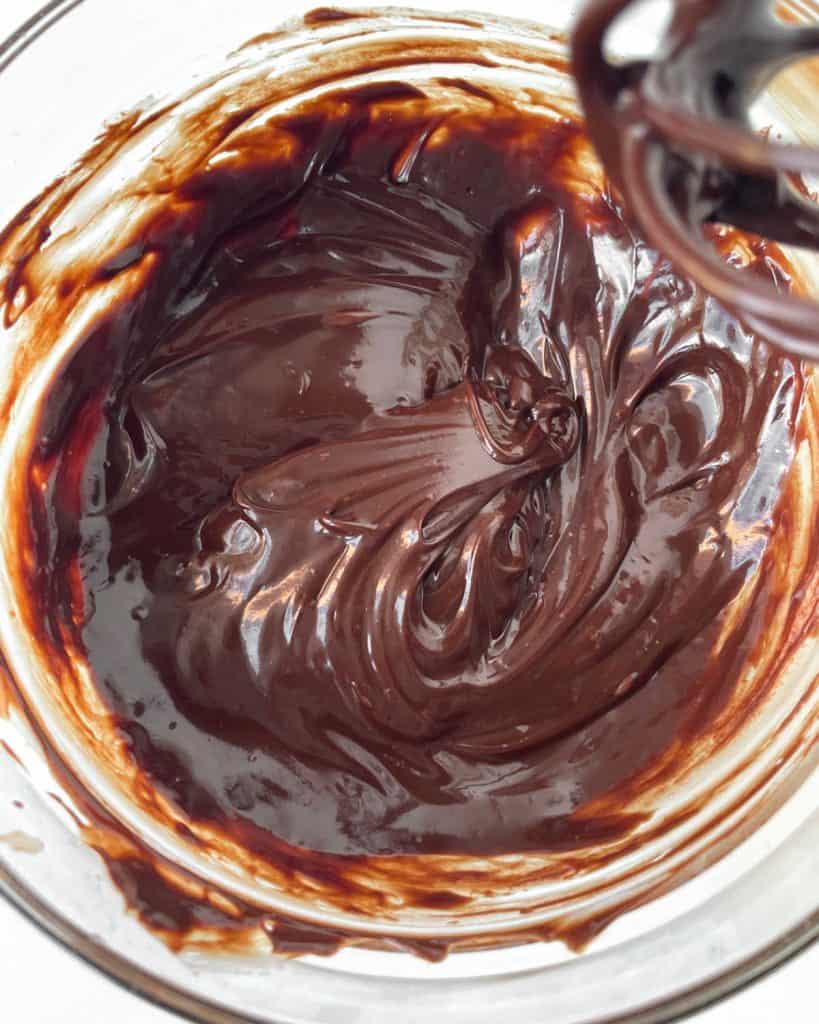
Melt and stir
Melt the chocolate and butter, and then add the cream. It will help make it more fluid.
The final mixture is unctuous and shiny; you might want to eat it with a spoon from the bowl. I don't blame you.
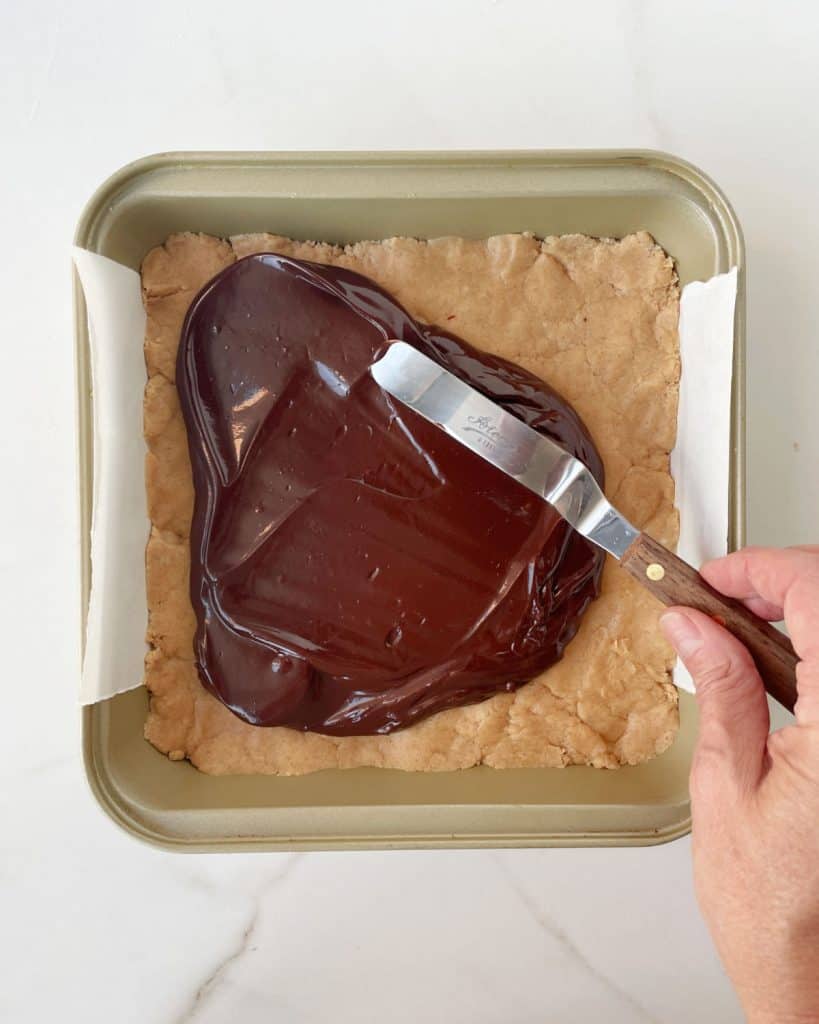
Spread
Pour the chocolate ganache on top of the peanut butter layer and spread evenly, reaching the edges and covering the whole peanut butter layer.
I highly recommend an offset spatula for this, as it helps level this layer, so the amount of chocolate is roughly the same for every piece of fudge. Or use the back of a spoon.

Chill to set
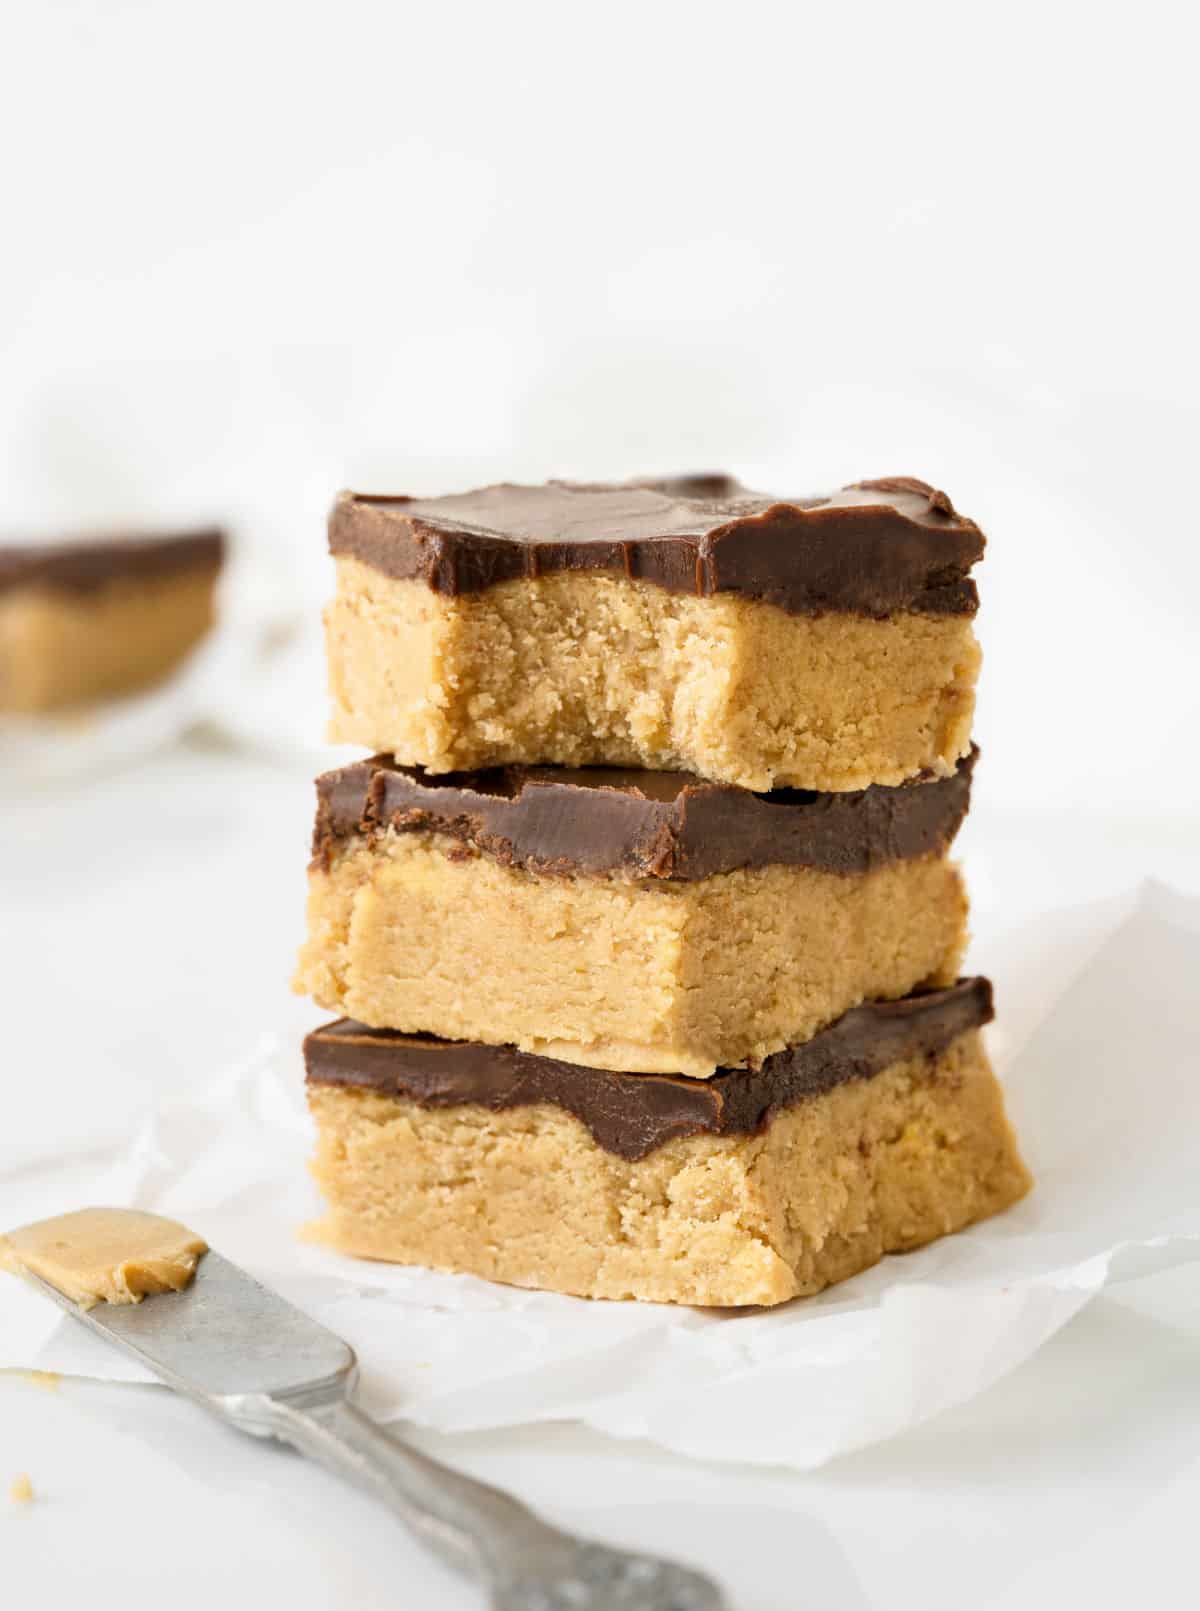
It should not be a very thick layer of chocolate, or it will overpower the peanut flavor.
Chill in the fridge until solid enough to cut.
Paula's Tip
These no-bake chocolate peanut butter bars keep well for weeks, so you can plan your holiday baking ahead. You can double (or triple!) the recipe and use a larger pan.
Kid-friendly treats
Like the peanut clusters, Halloween bark, or cookie bark, this fudge is so easy, you can make it with your kids.
It doesn't need to be baked and can be mixed by hand instead of an electric mixer.
Depending on their age, they will need help with the melted chocolate part.
In a few hours, you can all enjoy these sweet squares, with that incomparable flavor of peanut butter and chocolate. Or give them as homemade gifts.
If you made this recipe and loved it, you can comment below and leave a 5-star ⭐️ review. Also, if you had issues, let me know so we can troubleshoot together.
You can also subscribe to our FREE email series 'Baking the Best' and our regular newsletter. Or follow and save my recipes on Pinterest.
As an Amazon Associate, I earn from qualifying purchases. Read my disclosure policy.
Peanut Butter Fudge with Chocolate (buckeye)
Ingredients
For the peanut butter base:
- ½ cup packed brown sugar
- 1 ¾ cups powdered sugar
- ¼ cup unsalted butter, at room temperature
- 1 cup smooth peanut butter, at room temperature
- ½ teaspoon vanilla extract
For the chocolate glaze:
- 4 ounces semisweet chocolate
- 1 tablespoon unsalted butter
- 1 tablespoon corn syrup
- 3 tablespoons heavy cream
Instructions
For the peanut butter base:
- Butter or use baking spray on an 8-inch square pan, metal, ceramic or glass. You can line it with a strip of parchment paper for easy removal, covering the pan's bottom and two sides. The other two sides remain unlined but greased. This will help you easily lift the block of fudge from the pan. You can use a 9-inch pan and have shorter pieces of fudge.
- In a large bowl, beat ½ cup packed brown sugar, 1 ¾ cups powdered sugar, ¼ cup unsalted butter, 1 cup smooth peanut butter, and ½ teaspoon vanilla extract until completely integrated. It will be crumbly.
- Pat into the prepared pan. Try to even the top as much as you can.
- Refrigerate while preparing the chocolate glaze. You can keep it in the fridge for 2 days, covered in plastic wrap so it doesn't dry out.
For the chocolate glaze:
- Melt 4 ounces semisweet chocolate, 1 tablespoon unsalted butter, and 1 tablespoon corn syrup in the microwave or double boiler. Mix well.
- Add 3 tablespoons heavy cream and mix until completely smooth and shiny. Use a whisk or a rubber spatula.
- Pour on top of the peanut butter mixture and spread to cover evenly. Use an offset spatula, a rubber spatula or the back of a spoon. Refrigerate until firm, anywhere from 30 minutes to a couple of hours, depending on your fridge.
- Slide a smooth-bladed knife along the sides of the pan to release any chocolate that might be stuck, and lift the whole block of fudge with the help of the paper.
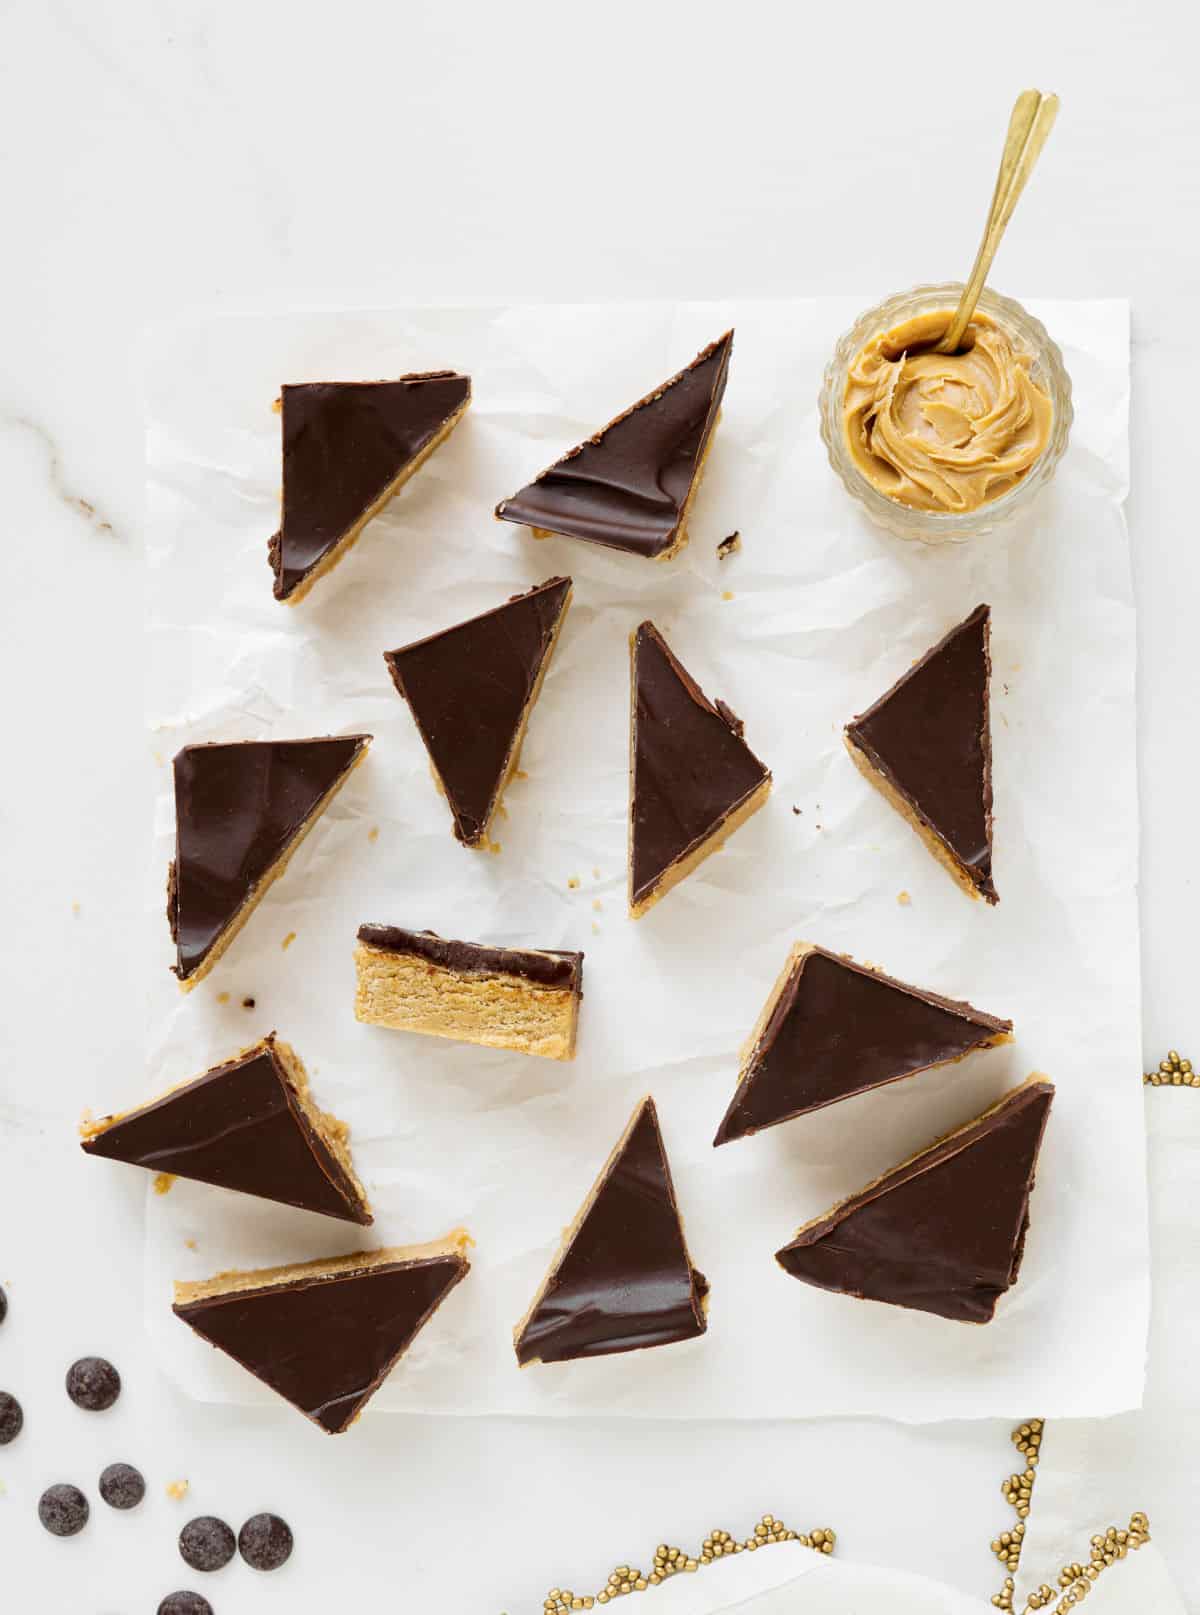
- Transfer to a flat surface and cut into 1-inch squares, triangles, or rectangles. A sharp, large kitchen knife works very well for this part. You can dampen it with hot water and wipe clean the blade before you slice it, so the chocolate layer doesn't crack.
- Store leftovers in the fridge, covered, or in an airtight container. It lasts for several weeks or a month.
Monah says
The notes say use 3/4 of the powdered sugar and see if you need the rest. How do I judge that?
Also are there any substitutes for cream? I don't keep that in the house.
TY
Paula Montenegro says
Peanut butters have different consistencies and some might absorb more powdered sugar than others. You can use coconut cream, but I haven’t tried it.
Ann says
What type of cream?
Paula Montenegro says
Heavy or whipping or heavy whipping, they both work.
Dorla says
For the peanut butter base, no cooking or heating required? thanks
Paula Montenegro says
Hi Doria, no baking the peanut butter layer, it's a no-bake recipe.
Rebecca says
In the directions it says mix butter twice so do you half the 1/4 cup into the PB and chocolate separately?
Paula Montenegro says
Hi Rebecca, there are two different measures of butter (1/4 cup and 1 Tbs). I changed the recipe a bit so it is easier to read. Let me know if you have more questions!
Cocoa and Lavender says
What a perfect summer treat! Minimum cooking and maximum taste! Now that is a recipe we can all love! They remind me a bit of a confection here in the States we call "buckeyes." It is little balls of peanut butter dipped in chocolate - but I love these little triangles best! ~ David
PS... Congrats on the organization of everything! Doesn't it feel gratifying? I bet your kitchen looks great and I don't think you can ever have too many cookbooks, magazines, nuts or kitchen utensils. 🙂
yummychunklet says
Yum! I love the taste of sweetened peanut butter with chocolate. This looks so good!
Deb says
Oh my goodness! I would be frightened to organize my kitchen during this time of holiday frenzy! The Peanut Butter Squares look so much better than those mass produced candies we all adore. A very tempting holiday recipe!
Mica ♥ Imprimerie says
I think I died and went to PB-chocolate heaven. It's a pair meant to be. Like apple and cinnamon! Or PB and apple! Or chocolate and orange! Everything PB and chocolate. You totally got me.
Medeja says
Yummy! PB fudge i just love! Adding that chocolate layer would make it even better 😀
Lizzy Do says
Oh, I LOVE these! I've made something similar before and they are outstanding! I'm sending the hubby out for peanuts tonight so I can make some cookies...wish I was your neighbor b/c I'd be happy to take a cup of them off your hands 😉
e / dig in says
PAULA! those photos are too much for 8 in the morning!
loved your post. i'm on christmas holidays soon (last day today!) and i use the time to go thru my kitchen cupboards and pantry and freezer etc and have a good sort out and invariably i too find things that have been forgotten and used up, as you did here. it's a good mental challenge!!
have a lovely christmas in argentina, and see you in the new year. e XX
Marissa | Pinch and Swirl says
I love the ingenuity that led to these Paula...I wonder how they would taste with a sprinkle of maldon smoked salt?
ahu says
Did somebody say peanut butter? Yum! I wonder if these would work with crunchy PB.
Nancy @ gottagetbaked says
I can totally relate to the state of your kitchen, Paula. I have so much bakeware and ingredients - it's all over the place! It makes my beloved baking experience a bit frustrating because I have to dig things out of my cupboards and pantry and then there's stuff everywhere. My New Years resolution is to organize! At least you made this delicious dish out of your abundance of peanuts. I love chocolate and peanut together and having a no-bake recipe up your sleeve is always a good thing.
thelittleloaf says
I'm the kind of person who buys ingredients for a specific recipe then forgets to use them up so my cupboard is full of bizarre ingredients! I'm glad you had a clear out thought because this looks SO yummy. Love the combination of chocolate and peanut butter 🙂
Melissa Bo says
Im a new follower, these look so good!
Liz @ The Lemon Bowl says
These are my ultimate naughty favorite treat!!!
Caroline - All That I'm Eating says
Oh these look so good! I haven't made fudge in ages.
Miss Char says
There is a man at our local Veterans Home who loves any kind of fudge, I think I'll make this for him today. Thanks for sharing.
Cher Rockwell says
These are one of my favorite treats (when I can get someone to make them for me 🙂 ) Beautiful