
If you've ever wanted to make Danish pastry at home, this is the recipe to try. It takes a little planning, but the process is much easier than traditional Danish dough and absolutely worth it. This is a gem of a recipe, made partially in the food processor, and a few simple folds create those buttery, flaky layers we all love.
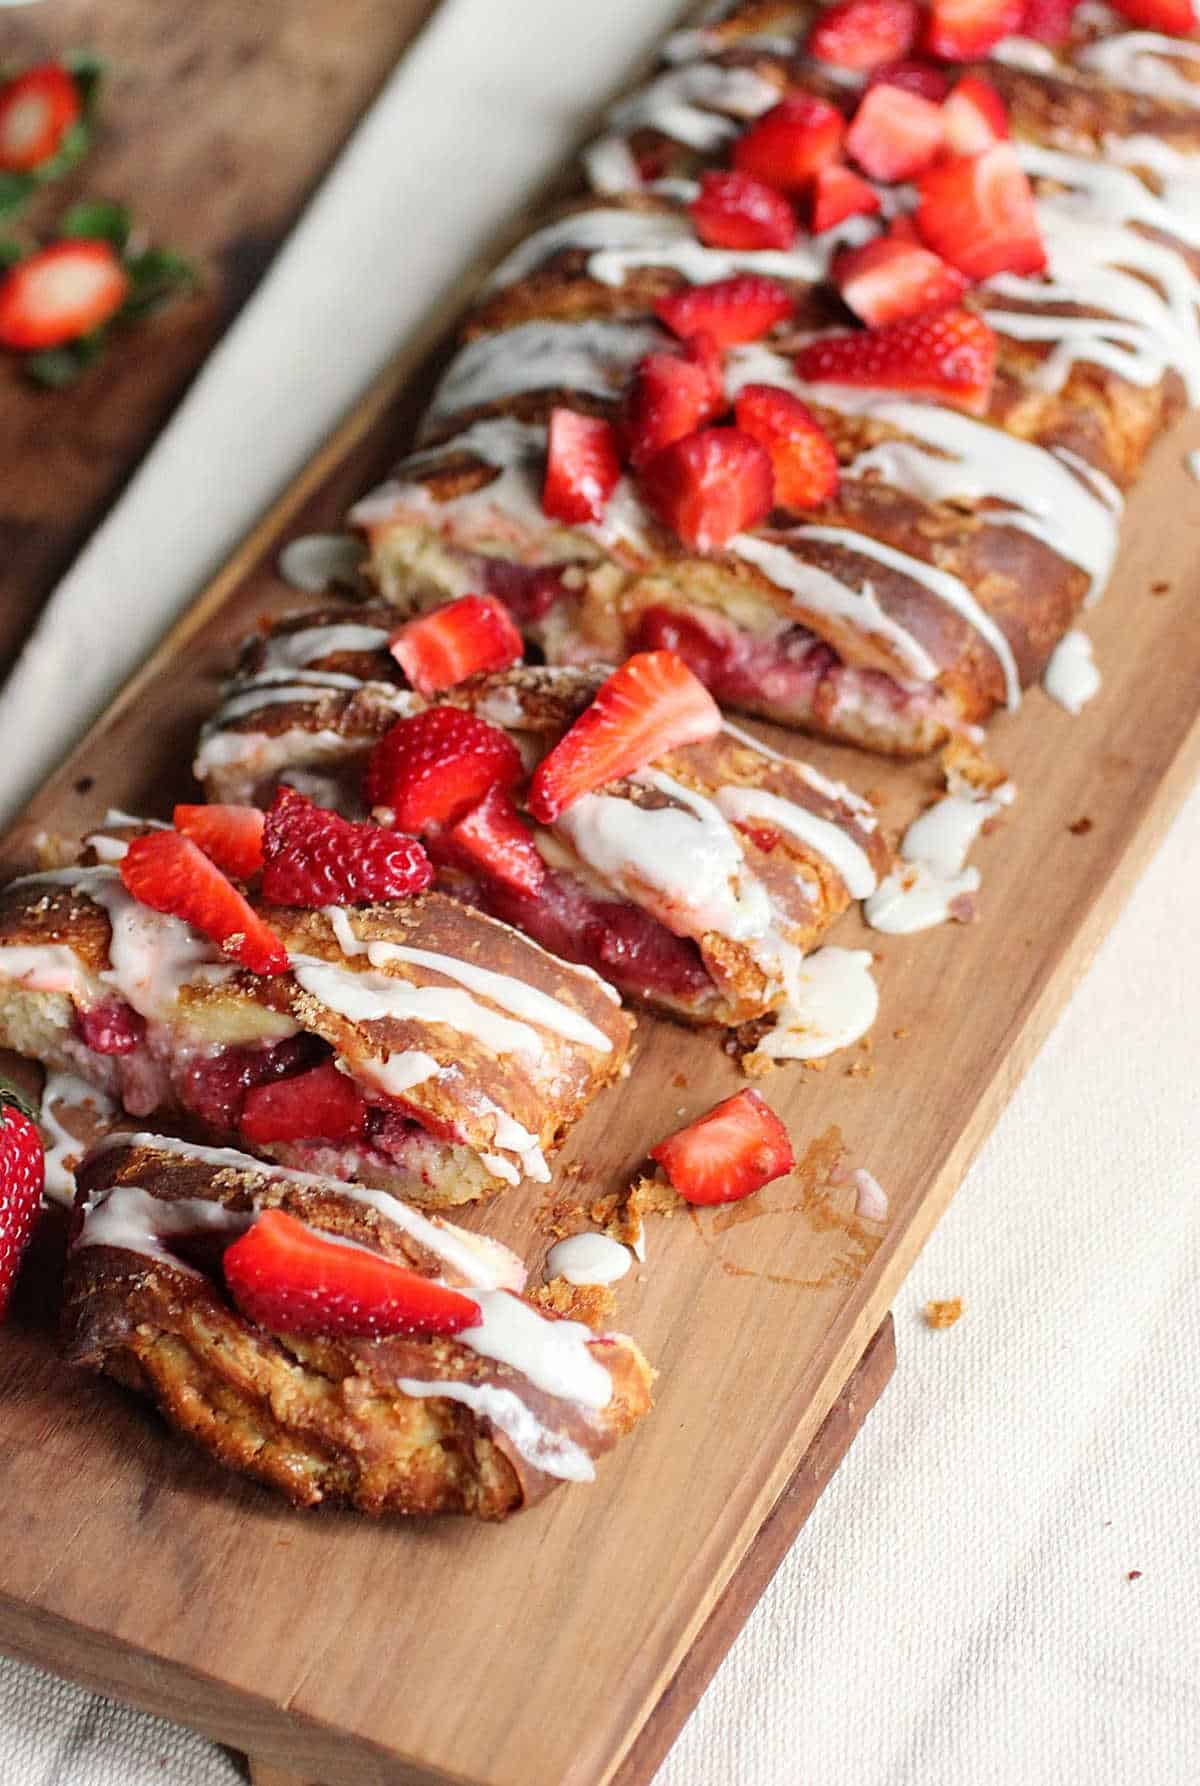
I made one large braid instead of individual pastries because it's easier, faster, and every bit as impressive. You still get the crisp layers, creamy filling, and bakery-style look, with much less work.
SAVE THIS RECIPE
A superb Danish
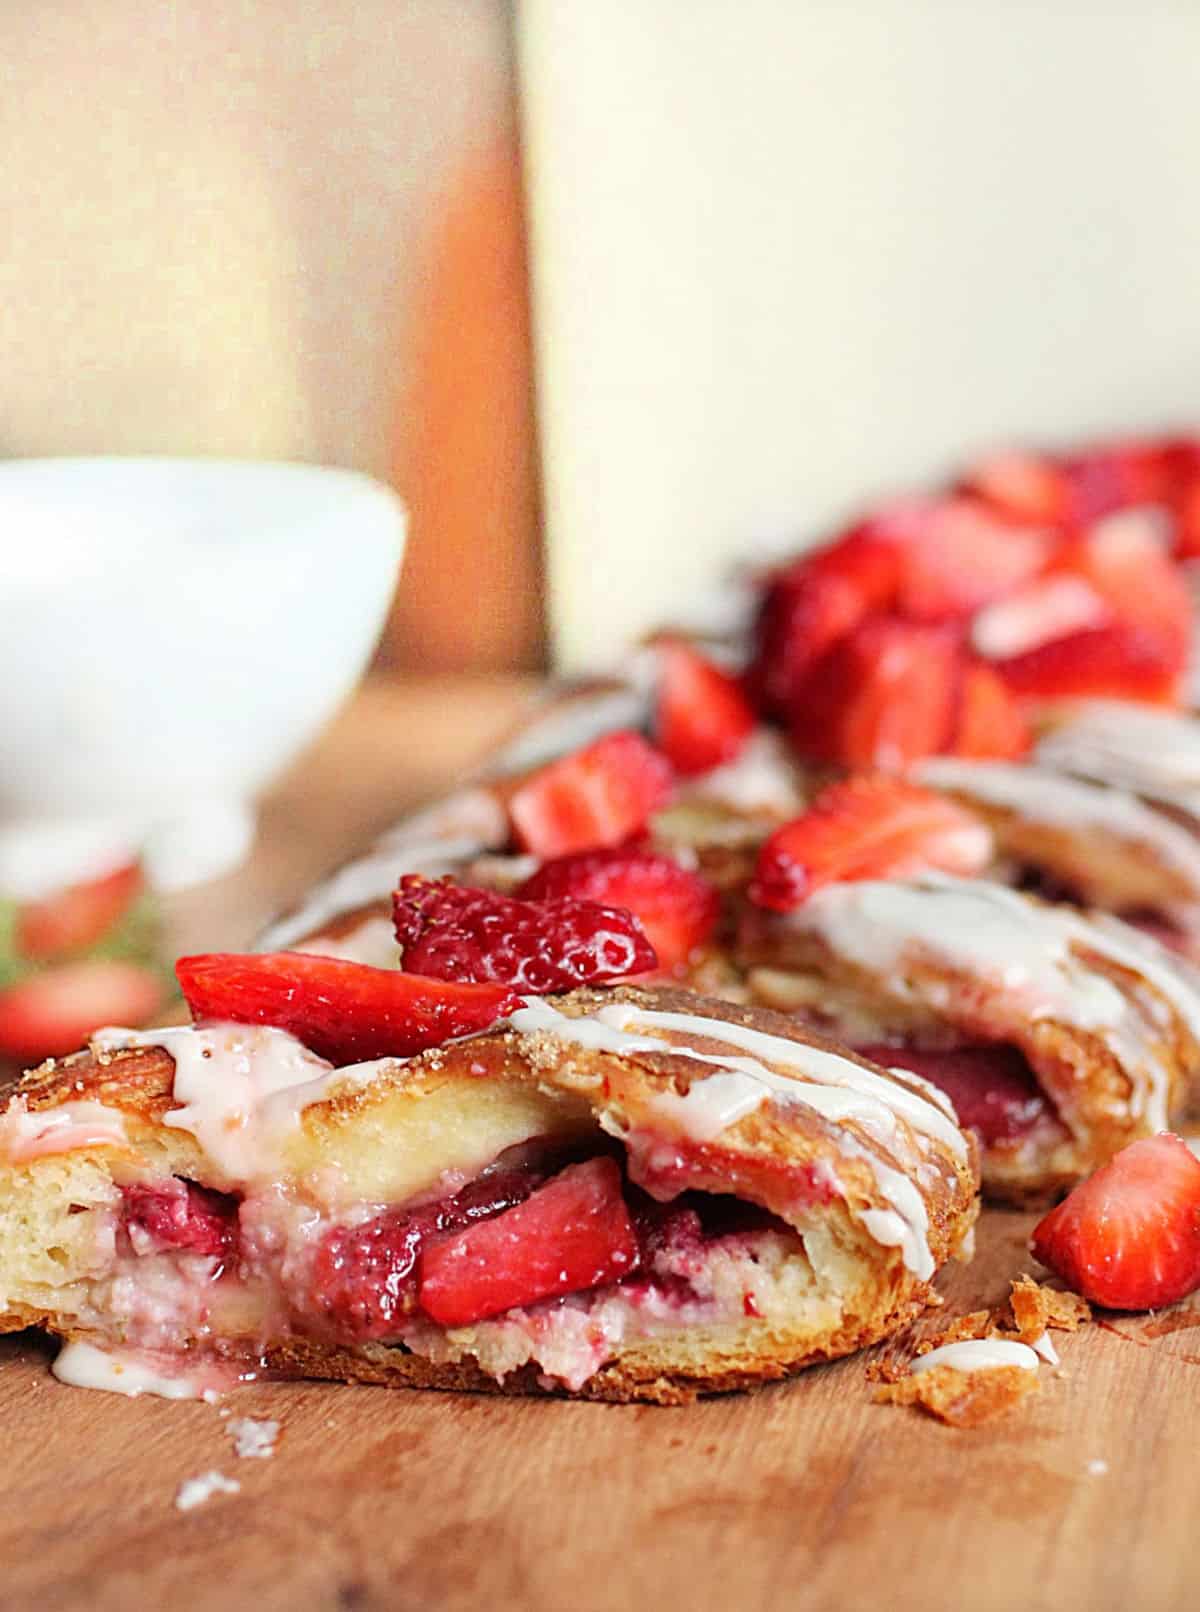
Just look at those flaky layers, the creamy filling, and the juicy strawberries tucked into every bite. This is the kind of pastry that makes an ordinary morning feel a little special.
The dough is a simplified version of classic laminated Danish pastry. It's not a quick recipe, nothing like throwing together an almond croissant, but it's far more approachable than the traditional method that starts with a separate butter block. Once you've made it once or twice, the process becomes surprisingly straightforward, and you'll start thinking of all the different fillings you can try next.
As for the strawberry filling, I'll be honest: baked strawberries were never high on my list. Fresh strawberries? Absolutely. Baked ones? I could take them or leave them.
Then this Danish happened.
The combination of almond cream, cream cheese, lime zest, and strawberries is one of those happy baking surprises. Everything melts together as it bakes, and the strawberries become soft and jammy without losing their flavor. The first time I pulled this braid from the oven, golden and puffed with the filling bubbling in places, I knew I had completely changed my mind about baked strawberries.
Just like with this strawberry crisp, turns out they're fantastic when paired with the right ingredients.
Testing notes
Paula's baking tips that can make a difference.
Organization: This recipe needs chilling times and is a bit of work, so read the recipe first and ensure you have the ingredients at the correct temperature, utensils and equipment needed, and enough workspace. This will make the process so much easier.
Cold butter and cold dough are everything here. If at any point during laminating the butter feels soft or starts to smear rather than layer, stop and refrigerate. Rushing this step costs you the flakiness.
Resting times: don't skip this step; it's essential for the dough to rest in the refrigerator for the hours stipulated so that it can be rolled easily and be baked puffed and golden brown.
The almond cream needs to be spread in a thin, even layer. Too much and it puffs out aggressively during baking and can break through the braid. A thin layer gives you that soft, fragrant interior without the overflow.
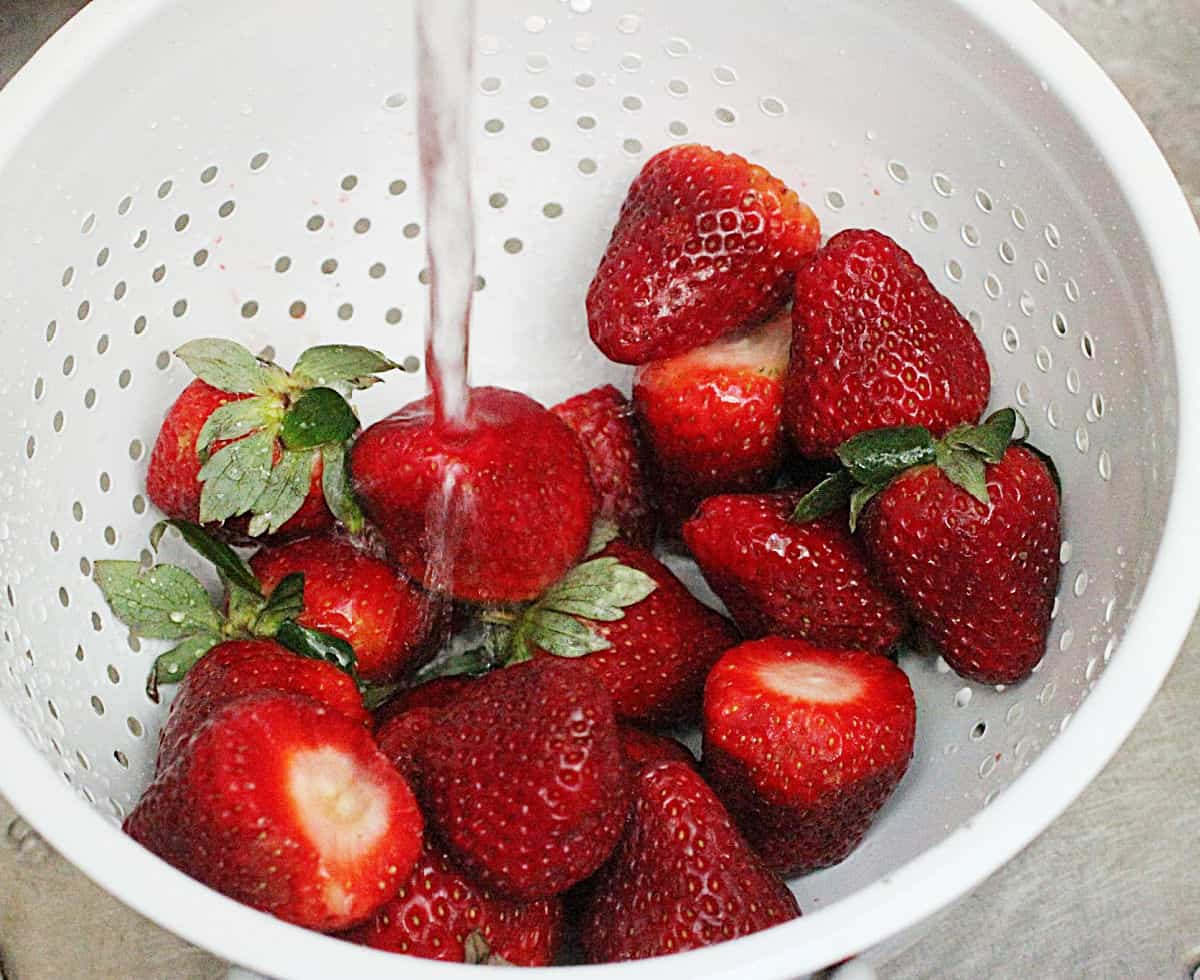
Strawberries release a lot of juice. Pat them dry before adding them to the filling; otherwise, the bottom of the braid might get soggy before it has a chance to set.
Don't skip the full bake time waiting for color. The dough needs to be cooked through, not just golden on top. If it's browning too fast, tent it loosely with foil rather than pulling it early.
Filling alternative: you can use strawberry jam or preserves, or other fresh berries instead of strawberries.
Glaze: You can use lemon juice and zest, orange or even water, milk or a liquor.
The quick Danish dough that I use is a miracle in itself, a recipe from Beatriz Ojakangas, who wrote quite a few books and specializes in Scandinavian baking.
Despite all her credits as a baker and author, I will advocate this single, quick Danish pastry recipe as one of the best things to ever appear in my baking universe. It's gold.
Steps for the dough
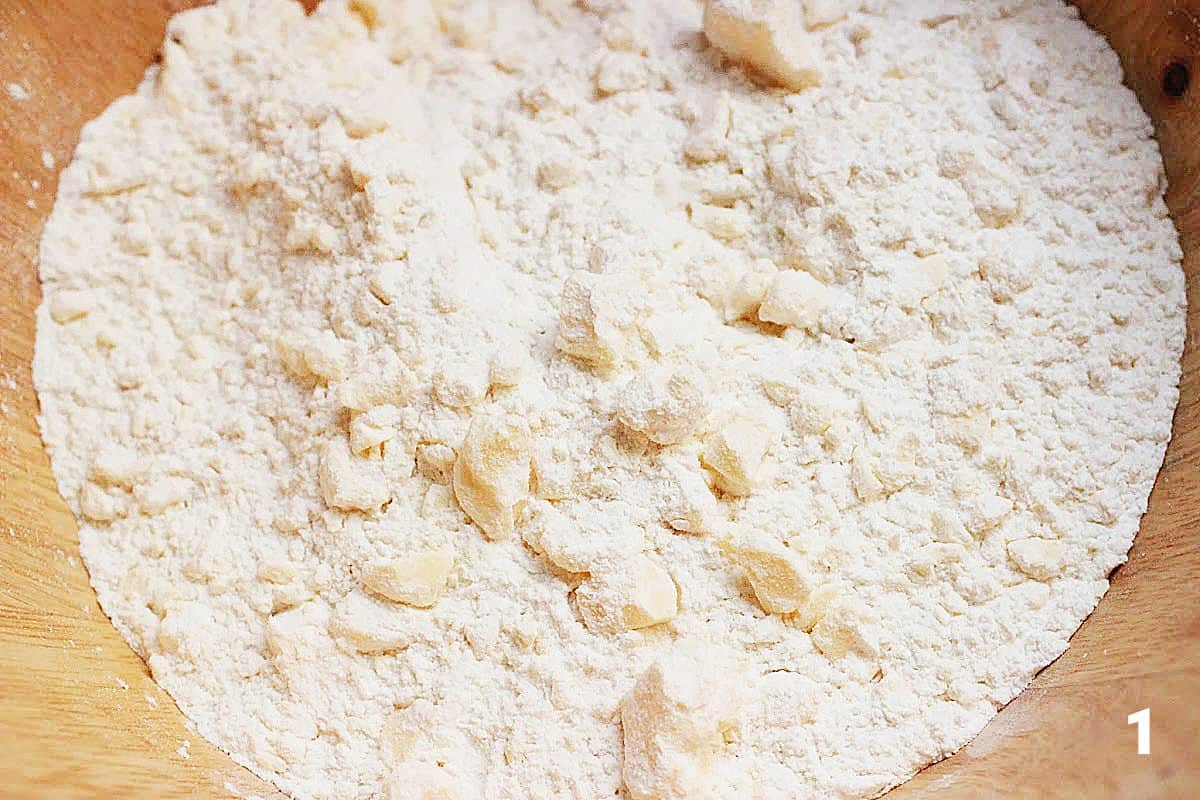
Work the butter
You simply mix part of the dough ingredients together with the butter in the food processor. The crucial step is to leave the butter pieces the size of kidney beans. This is very important to achieve flakiness in the end.
Wet ingredients
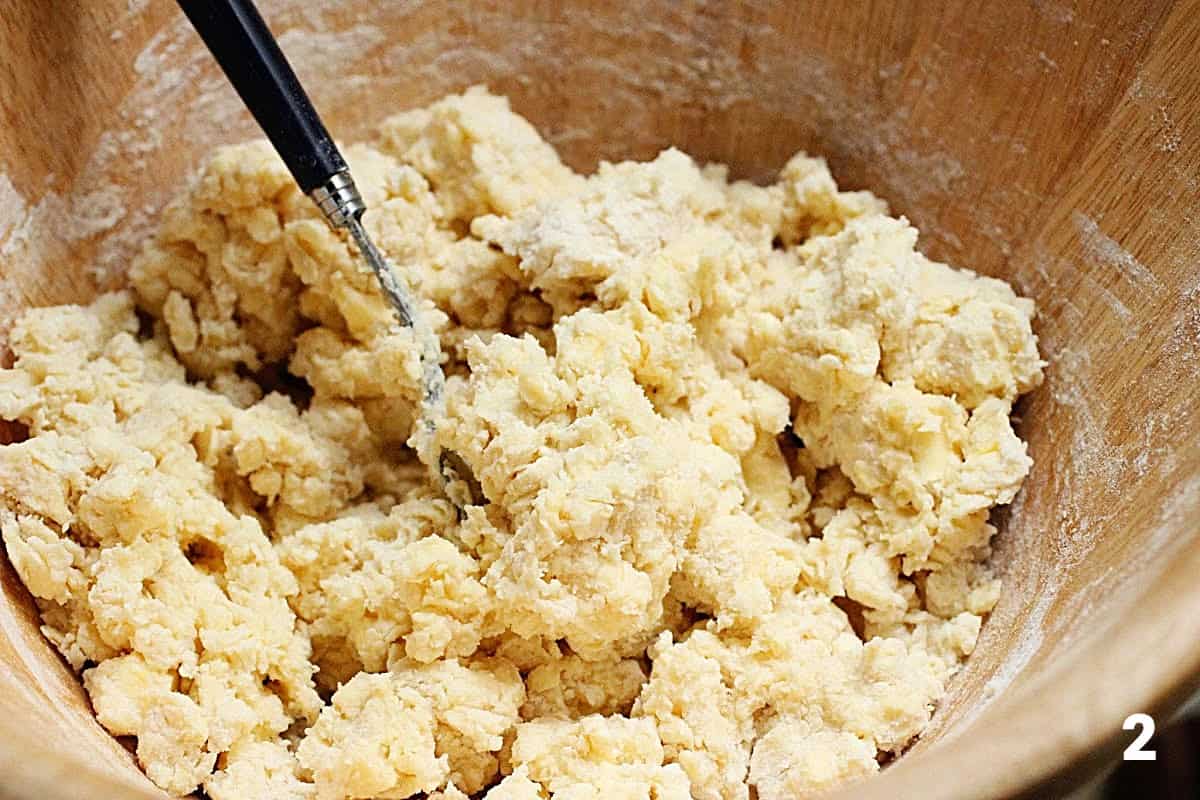
The flour and butter mixture is mixed with the rest of the ingredients, which include the activated yeast.
Before baking
It's a very rough dough at first, very. Bring it together on a lightly floured surface, and use more flour if needed so it doesn't stick, but don't overdo it! You might think you need to knead it more, but you don't. You wrap it, and it goes into the refrigerator for several hours.
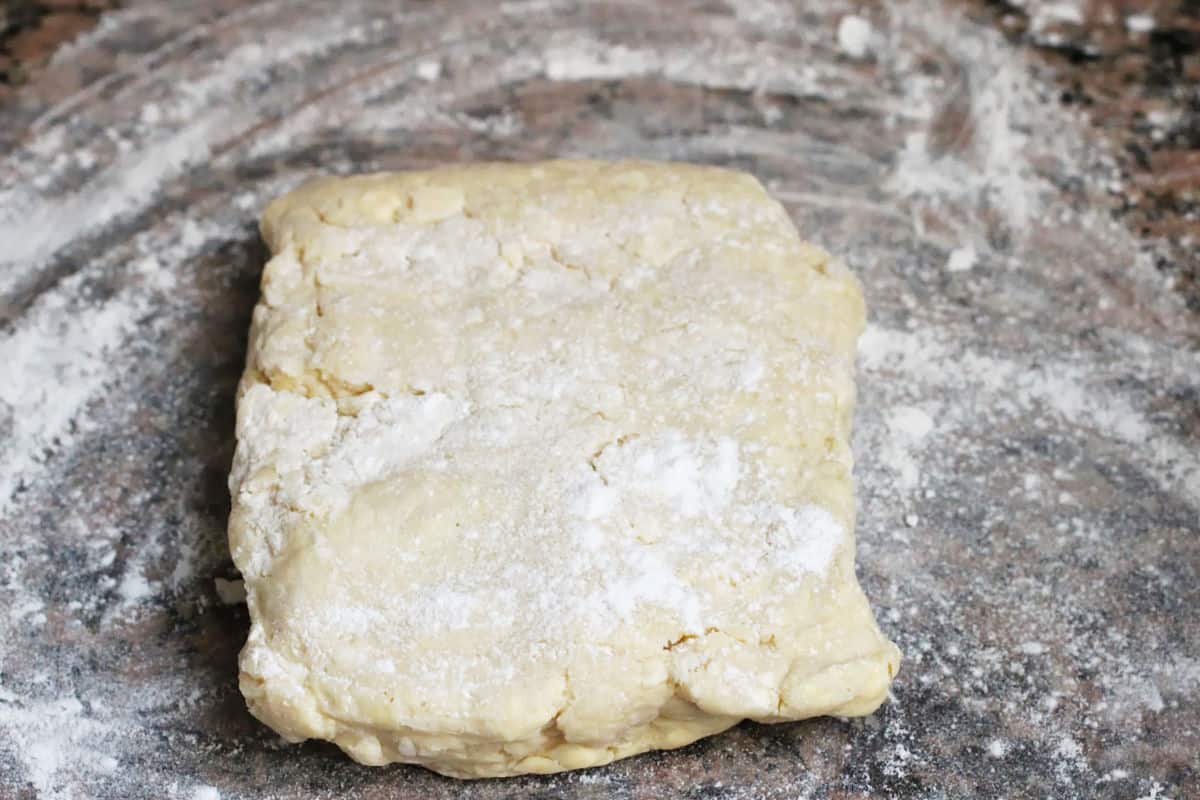
Then comes the folding, or lamination.
This is what makes it flaky. Each fold of the dough onto itself makes another layer of flakiness. This is the way croissants are made. The refrigeration time is essential for the dough to relax so you can roll it and fold it easily, and especially important when you have doughs with yeast.
It is folded a total of 3 times, with resting periods in between. The dough is rolled into a rectangle, short side parallel to the counter, and a third is folded from the bottom up and the other third from the top down. You give it a quarter turn to your right, and that way, you have like a flyer folded in three parts. That's a complete fold.
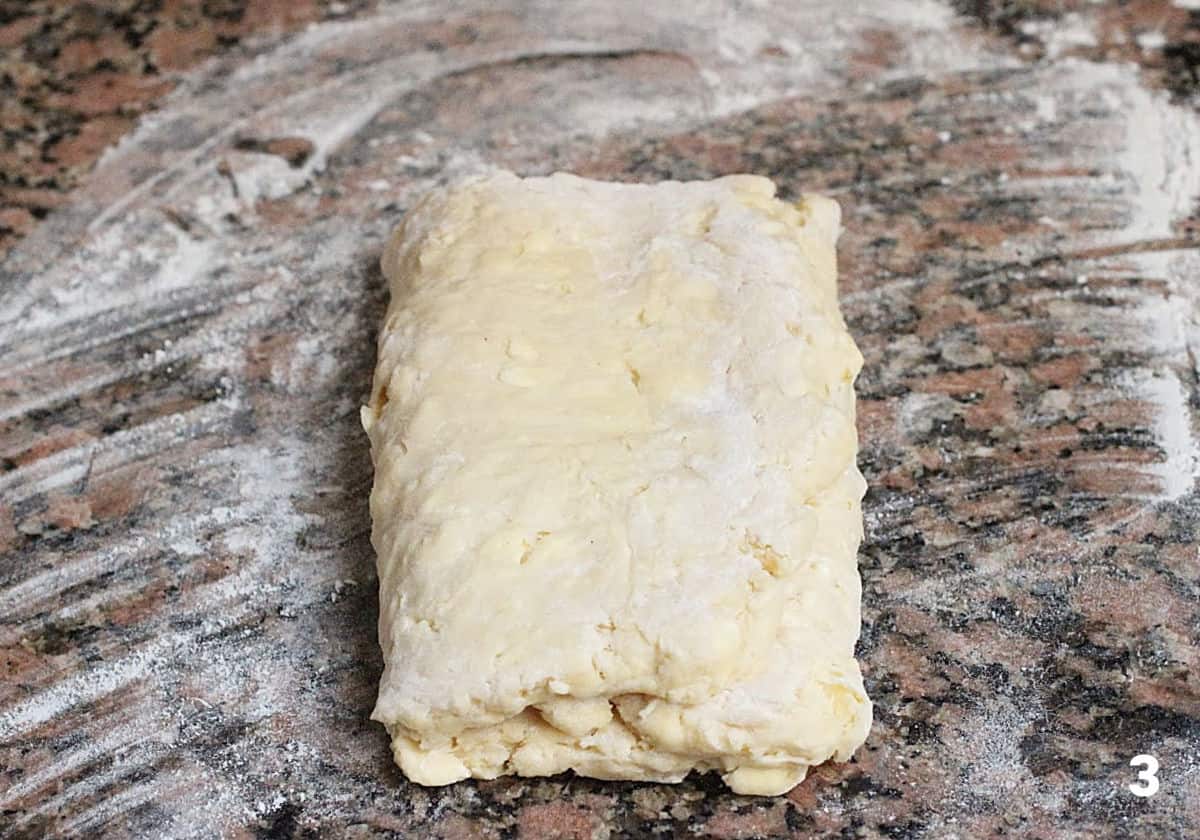
First fold
Below, you can see how rough the dough is after the first fold. It's still very rustic, but you'll find it's more cohesive and easier to fold than before it rested. Wrap it again and chill it.
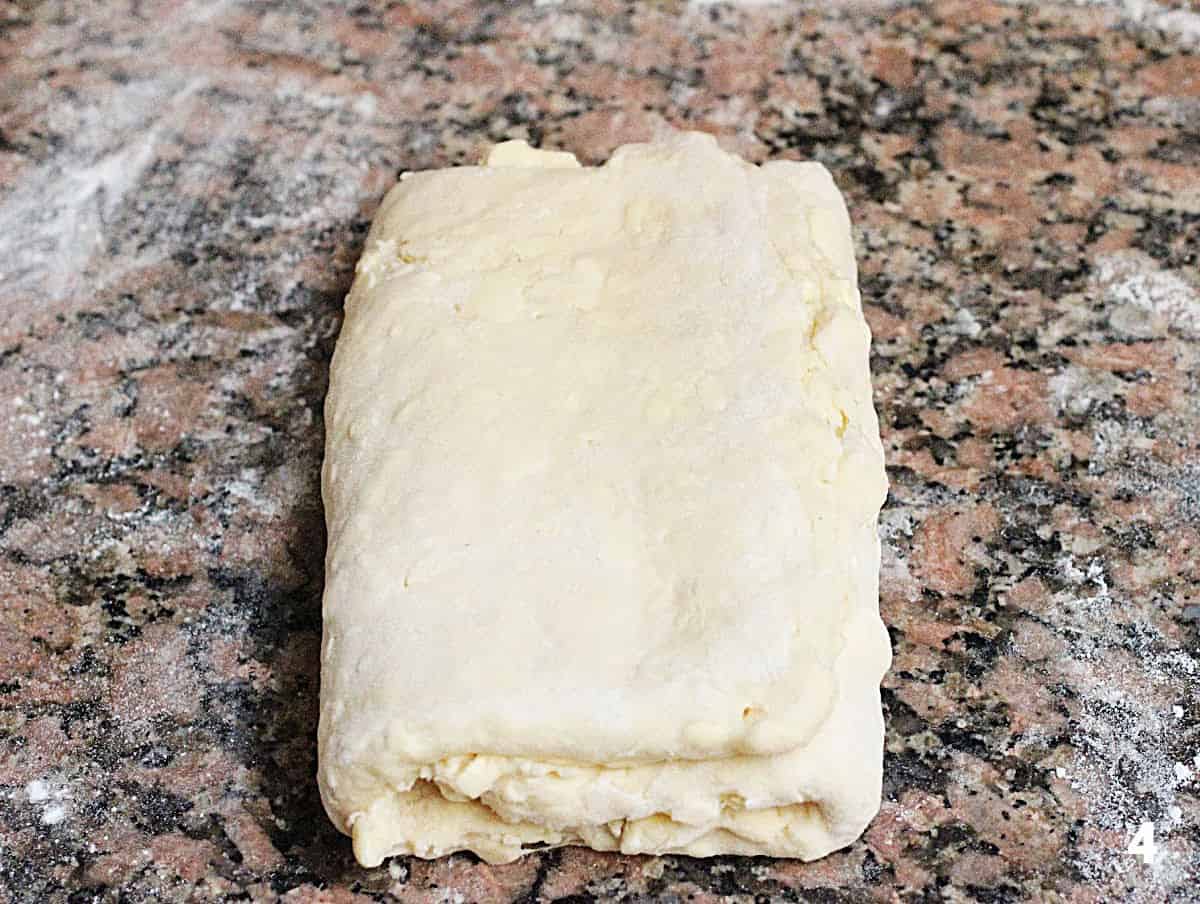
Third fold
After 3 complete folds and resting periods, the dough is much smoother. You can see how it comes together with each fold and becomes less rustic and resembles a classic butter pastry dough.
The cheese berry filling
I choose to use fresh strawberries with almond cream (or frangipane as it's also called) and limes. They are incredibly good together! The creamy almond is soft and a very traditional filling. The strawberries add sweetness and freshness, and the limes add a tang that balances the butter and sugar perfectly.
It's such an amazing mix of flavors, I was completely caught off guard when I took the first bite. I wasn't expecting it to be so good.
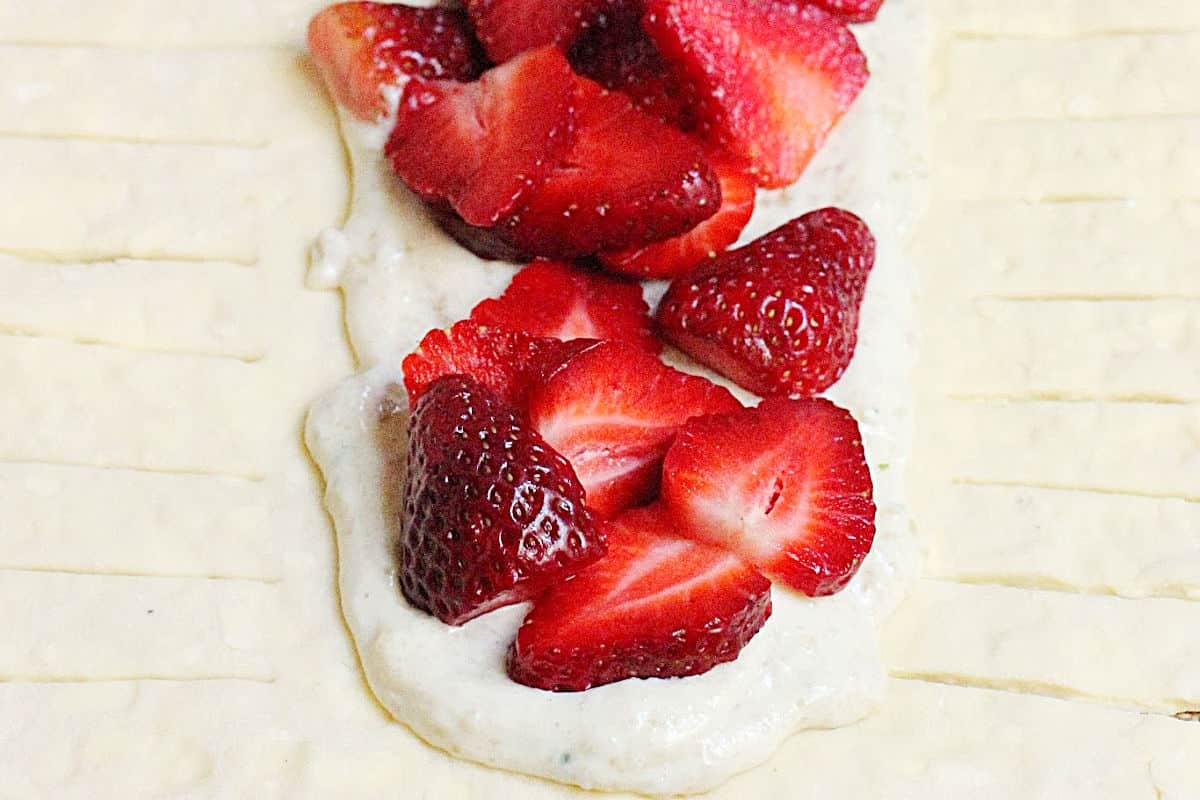
Fill
Transfer the dough to a piece of parchment paper or a Silpat that's oven-safe. Spoon and spread the cream cheese filling, and top with chopped strawberries. Don't overdo it; it might overflow, and also, too much filling is not always a good idea when you bite.
Paula's tip
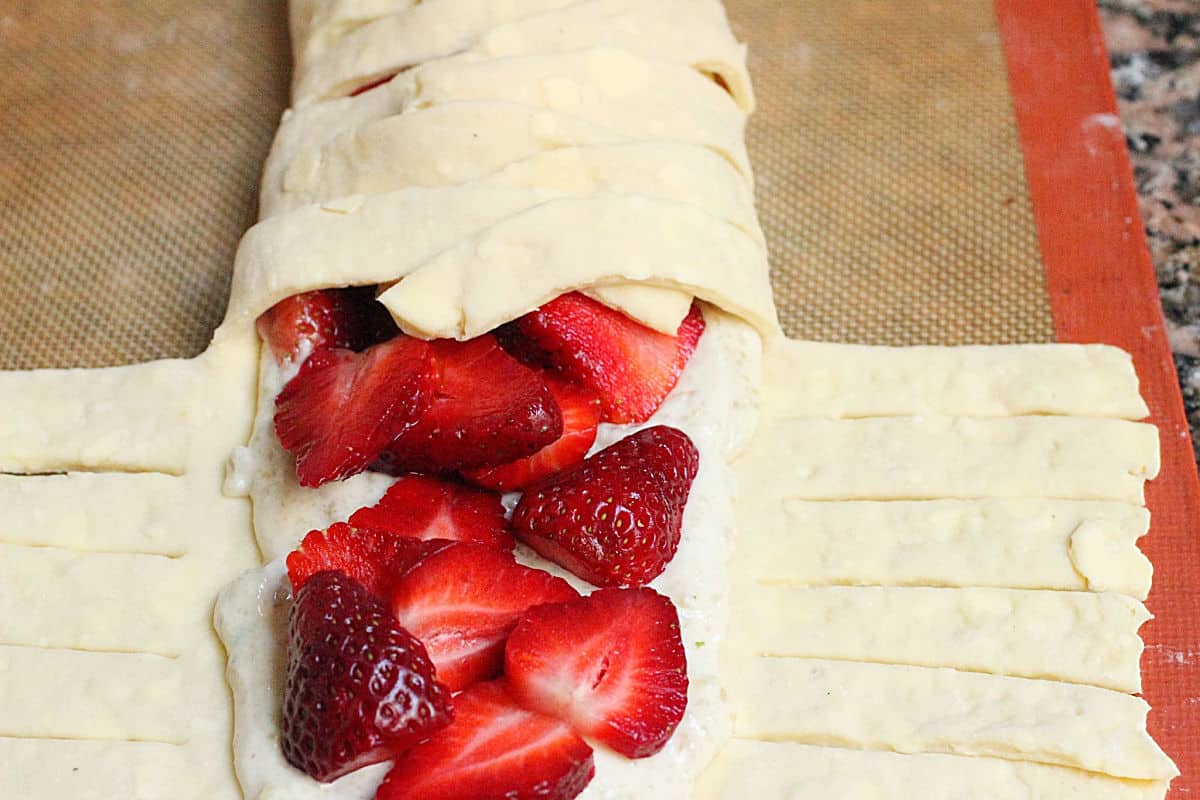
It's important to have enough dough to make the cuts and then fold each strip over to the other side, covering most of the filling and making a crisscross pattern. If the strips are too short, they will puff and open during baking, and the filling will be too exposed. This will make it less creamy as it will be exposed to direct heat.
Braid the dough
When the dough is laminated and ready to be used, it is rolled into a large, wide rectangle. Overlap the strands of dough to make a braided crisscross pattern over the filling. The Silpat (or parchment paper if that's what you use) will go straight on the baking sheet and then into the oven. So make sure it's oven-safe.
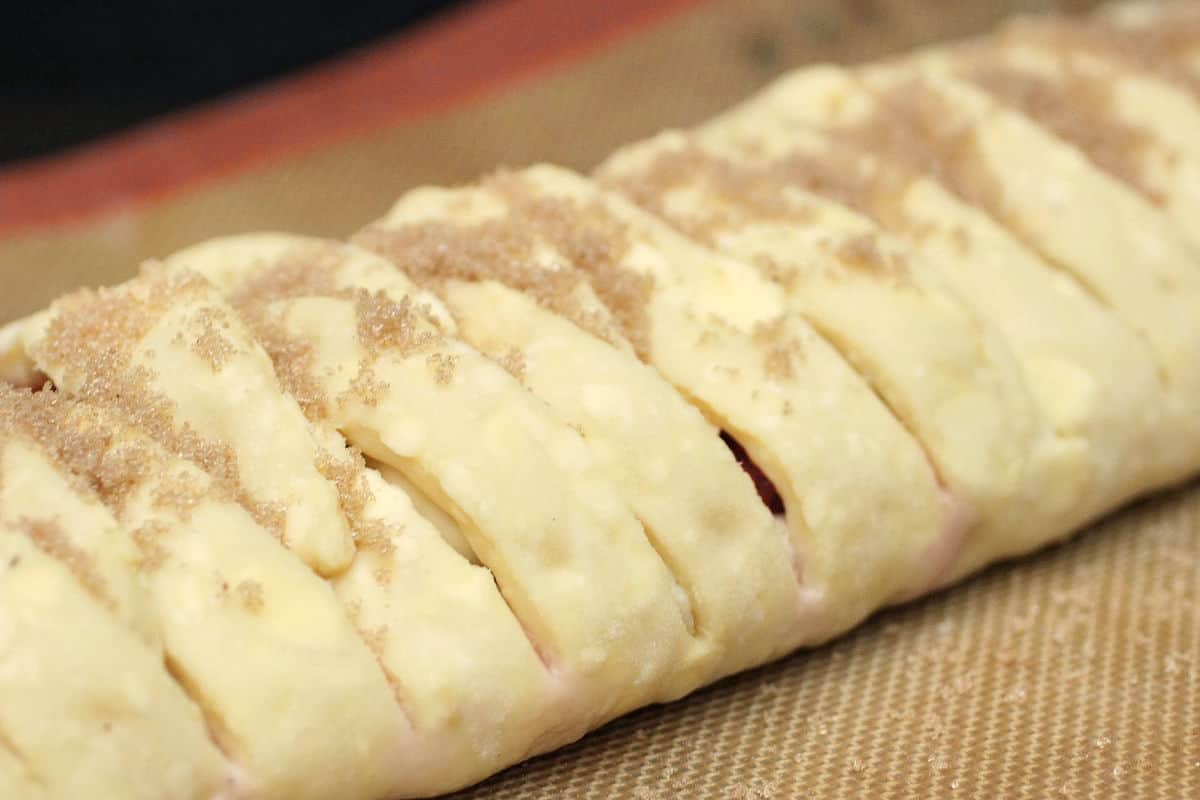
Before baking
Sprinkle the top with sugar to add crunch. You can also brush it with egg wash before sprinkling. I normally don't.

Strawberry Danish Braid (cream cheese filling)
Ingredients
For the danish dough:
- 2 cups all-purpose flour, or up to 2 ½ cups
- large pinch salt
- ¾ cup unsalted butter, cold and cut into medium pieces
- 1 teaspoon active dry yeast
- ¼ cup water , tepid or barely warm, not hot
- ¼ cup heavy cream, tepid or barely warm, not hot
- pinch ground nutmeg
- 1 egg
- 2 tablespoons white sugar
For the filling:
- 1 ½ cups fresh strawberries, sliced
- ⅓ cup cream cheese
- ⅔ cups almond paste, recipe below
- ½ teaspoon lime zest, lemon zest also works
For the almond cream:
- ½ cup almond flour, or ground almonds
- ⅓ cup powdered sugar
- ¼ cup unsalted butter, at room temperature
- 1 egg white
- 1 teaspoon all-purpose flour
- ⅛ teaspoon almond extract
- ⅛ teaspoon vanilla extract
For the glaze:
- 1 cup powdered sugar
- 1 tablespoon lime juice, or lemon juice
- 1 cup fresh strawberries, hulled and sliced, to serve
Instructions
For the quick danish dough:
- Put 2 cups all-purpose flour and large pinch salt in the work bowl of a food processor, fitted with the steel blade.
- Add ¾ cup unsalted butter, cold and cut into chunks, and process until the butter is the size of kidney beans. Don't let it get too small. Medium sized butter pieces is the key to this dough.
- In a bowl, dissolve 1 teaspoon active dry yeast in ¼ cup water . Let stand 5 minutes until foamy, and then stir in ¼ cup heavy cream, pinch ground nutmeg, 1 egg and 2 tablespoons white sugar. Mix very lightly with a fork.
- Transfer the flour and butter mixture to a large bowl; add the yeast mixture and mix lightly with a fork or spatula just until the dry ingredients are moistened. Don't overdo it. Similar to scone mixing.
- Shape into a square, it will be very irregular, transfer to a piece of plastic wrap, cover it completely and refrigerate for 4 hours or up to 4 days.
- Turn the dough out onto a lightly floured surface; dust with a little flour. Flatten with a rolling pin to make a 16 to 20-inch (40x51cm) square. Lightly flour the surface as needed so you can work with the dough, but don't go overboard; add flour only as needed.
- Fold into thirds, top ⅓ down and remaining ⅓ up, making 3 layers. Turn the dough a quarter to your right, as if it were a book, so that the large open part is on your right, and roll again.
- Repeat the three folds two more times for a total of three times. Like puff pastry. This should result in a sort-of square. Wrap and chill the dough 30 minutes or as long as overnight.
- When ready to bake, take the dough out of the refrigerator and transfer to a floured surface.
- Roll into a 12x6-inch (30x15cm) rectangle. Place on a baking sheet that has been covered with lightly buttered and floured parchment paper or Silpat.
- Spread the almond cream cheese filling, down the length of the center of the strip. Top with 1 ½ cups fresh strawberries, sliced.
- Cut slanted or straight strips along both sides towards the center using a dough scraper or a pastry wheel. Be very careful and gentle when doing this; I slashed one of my beloved Silpats. Fold strips over the filling in a crisscross pattern.
- Let rise 1 hour (more or less depending on the temperature), just until the pastry appears puffy. It will not double. Sprinkle with 1 tablespoon sugar.
- Turn on the oven to 375ºF (180ºC) about 20 minutes before baking.
- Bake about 20 to 25 minutes, until golden brown and puffed. Make sure the dough is fully baked. The filling will bubble and might spill in parts.
- Let it cool on a wire rack until it's room temperature.
- Drizzle the lime glaze and top with 1 cup fresh strawberries, cut into small chunks.
Almond cream or frangipane:
- Combine ½ cup almond flour and ⅓ cup powdered sugar.
- Add ¼ cup unsalted butter, 1 egg white and whisk energetically until it's well integrated and creamy.
- Sprinkle 1 teaspoon all-purpose flour, ⅛ teaspoon almond extract and ⅛ teaspoon vanilla extract, and mix just until combined well.
For the strawberry cream cheese mixture:
- Mix room temperature ⅓ cup cream cheese with ⅔ cups almond paste until smooth.
- Add ½ teaspoon lime zest and mix well.
For the lime glaze:
- Mix 1 cup powdered sugar with 1 tablespoon lime juice in a bowl until completely smooth.
- If you want it thicker or thinner add more or less juice.
Notes
Dough barely adapted from The Great Scandinavian Book, by Beatriz Ojakangas
Lisa says
Where are the measurements for the ingredients?
Paula Montenegro says
Hi Lisa, they are posted now. They probably got lost when I switched recipe plugins. Thanks for the heads-up!
Laura Dembowski says
I rarely find strawberries that look that good in the middle of summer even. Oh and this bread is stunning! I would love a piece for breakfast!
mividaenundulce says
Ok, debo confesar que las fresas cocidas no me gustan mucho, pero el danish me encanta, me parece una masa llena de sabor. Creo que podría intentarlo con otro relleno.
Renee says
Stunning danish Paula! The first photo took my breath away. Wow. Pinned. Now I just need to tackle making a danish too.
Elisabeth Foodandthrift says
What a gorgeous strawberry filled Danish bread, Paula! A must try, I'm literally drooling over this. Superb photos, as well! xo
Marissa | Pinch and Swirl says
This looks so fantastic and I'm happy that you re-shared your Danish dough recipe. 🙂
Cher Rockwell says
Paula - gorgeous! Love, love, love this one!
Karen Kerr says
Oh my gosh Paula that looks so delicious and the strawberries look wonderful. The combination of the cream, strawberries, and lime sounds outstanding.
Anne@FromMySweetHeart says
Paula...when I read that you would be making a braid for this challenge I was beside myself with anticipation! It was your beautiful peach challah that grabbed my attention to this group. (What can I say, I get excited at beautiful pieces of fruit poking out of bread!). This braid is just a beautiful masterpiece and one day I will get brave enough to try it! Gorgeous!
Shanna Mallon says
All I can say here is wow. WOW.
cquek says
I pinned this recipe to make it soon.
easyfoodsmith says
Wow! That Danish braid looks so awesome and the flavors heavenly. I have some frozen strawberries...do you think they can be used for this recipe?
wp_vknotes_admin says
Yes, I think they will be fine in the filling. It will be a tad more watery. If that's an issue, you might want to roast them a bit in the oven first to dry them out. And the flavor will be better too!
Amy says
My kids and I are big fans for fresh strawberries and we get them whenever they looks good. Too bad, there's no tastes test before buying. 😛 Your Strawberry Lime Almond Danish Braid is gorgeous! Cant' wait to give it a try!
Mom's Dish says
Wow, Yummy!!! I want to make some
yummychunklet says
What an impressive Danish!