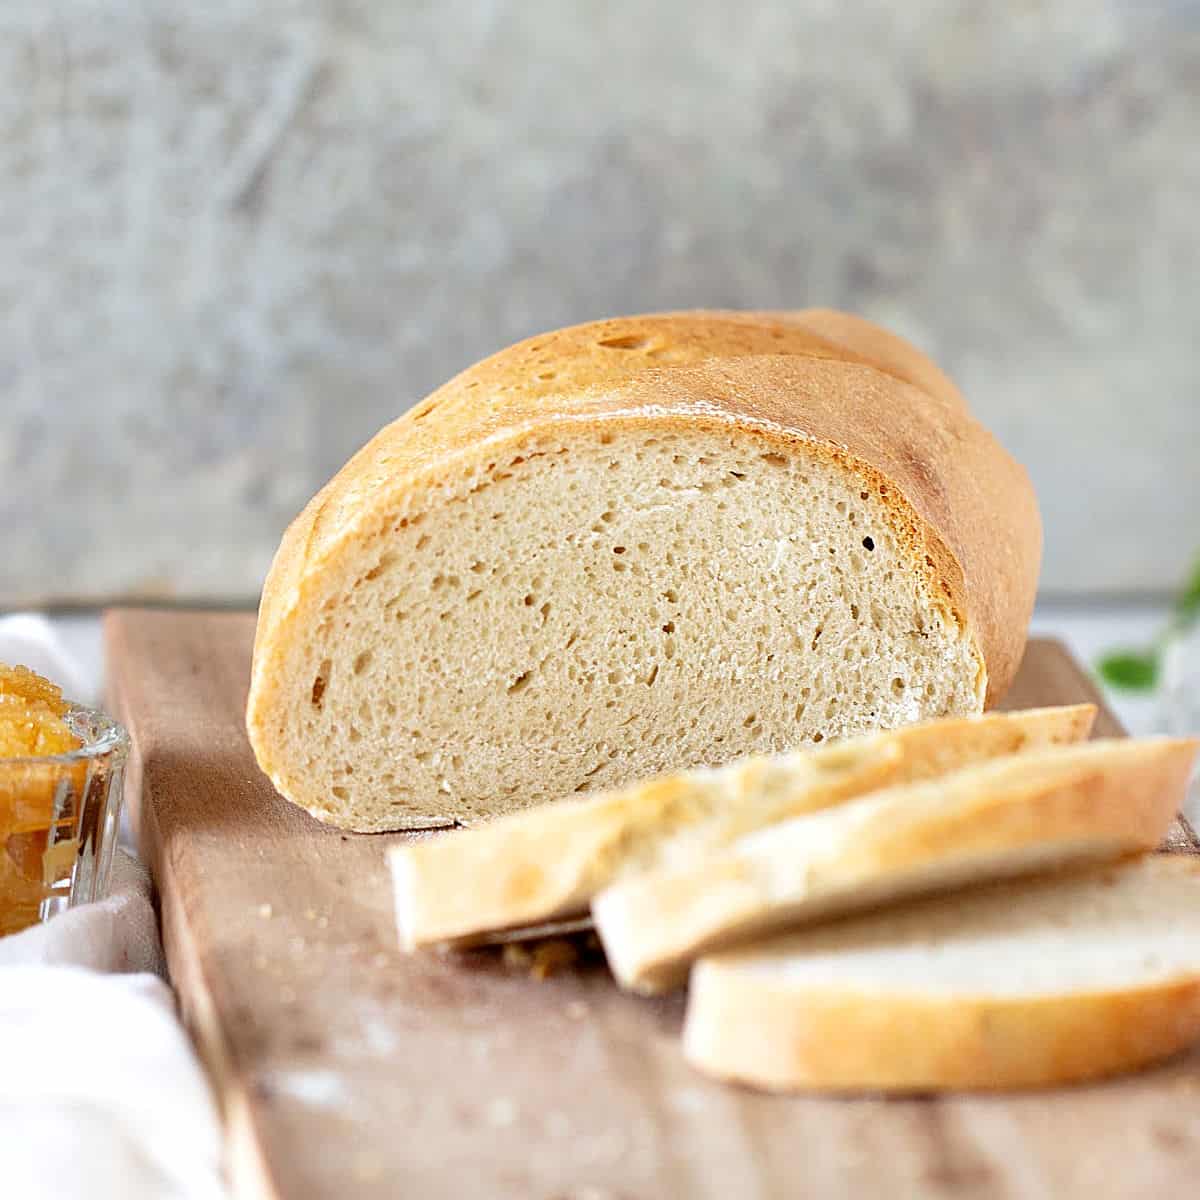
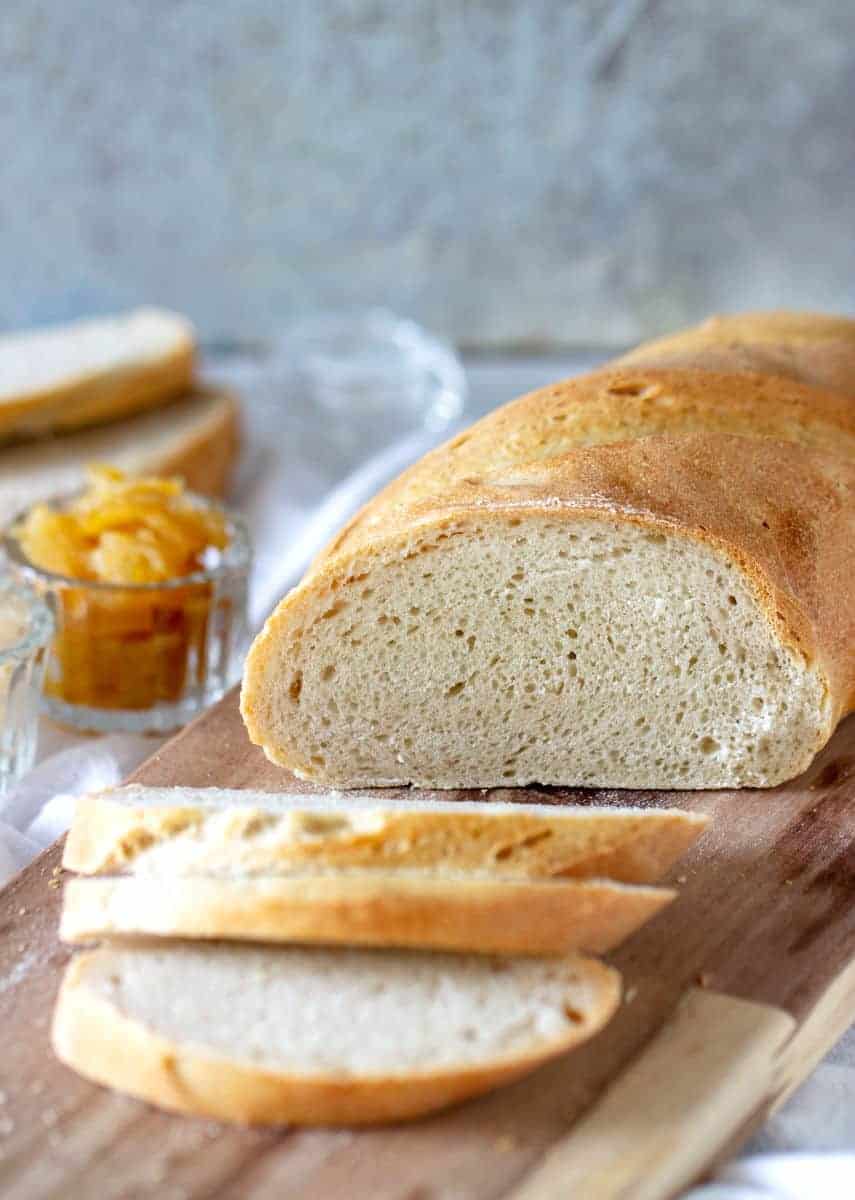
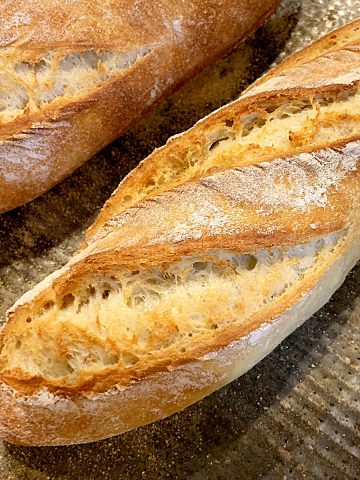
This unique Italian bread is one of our star recipes and everything you want in a crusty bread. Its golden crust, creamy texture and amazing flavor make it irresistible! It's perfect for toast, bruschetta and sandwiches. If you're not an experienced yeast baker, this post has step-by-step images and instructions to guide you.
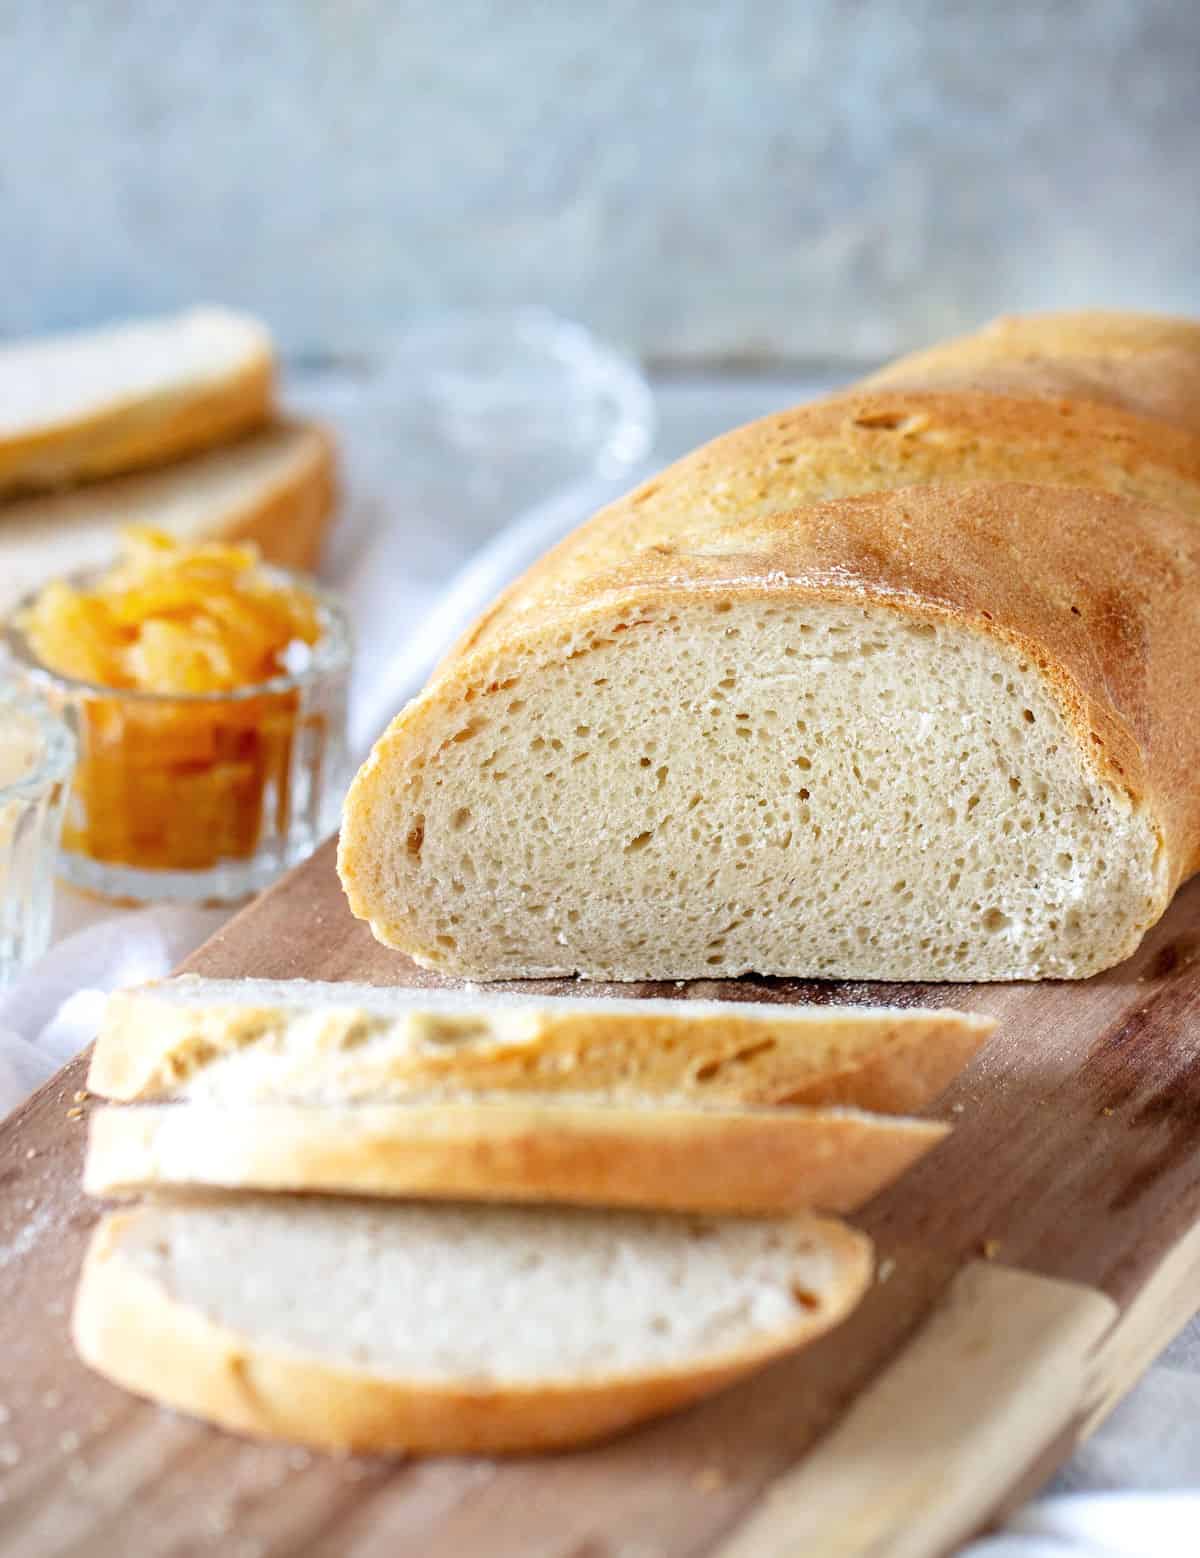
A golden loaf
I must admit this is one of my favorite breads I bake, especially for buttered breakfast toast and for sandwiches.
I love baking with yeast. And though I know it's not everybody's thing, some bread recipes are worth the time and dedication. This is one of them, for sure.
Others include oatmeal bread and 100% whole wheat bread. And let's not forget the easiest French bread, which requires no kneading and takes the complexity out of the bread-baking equation.
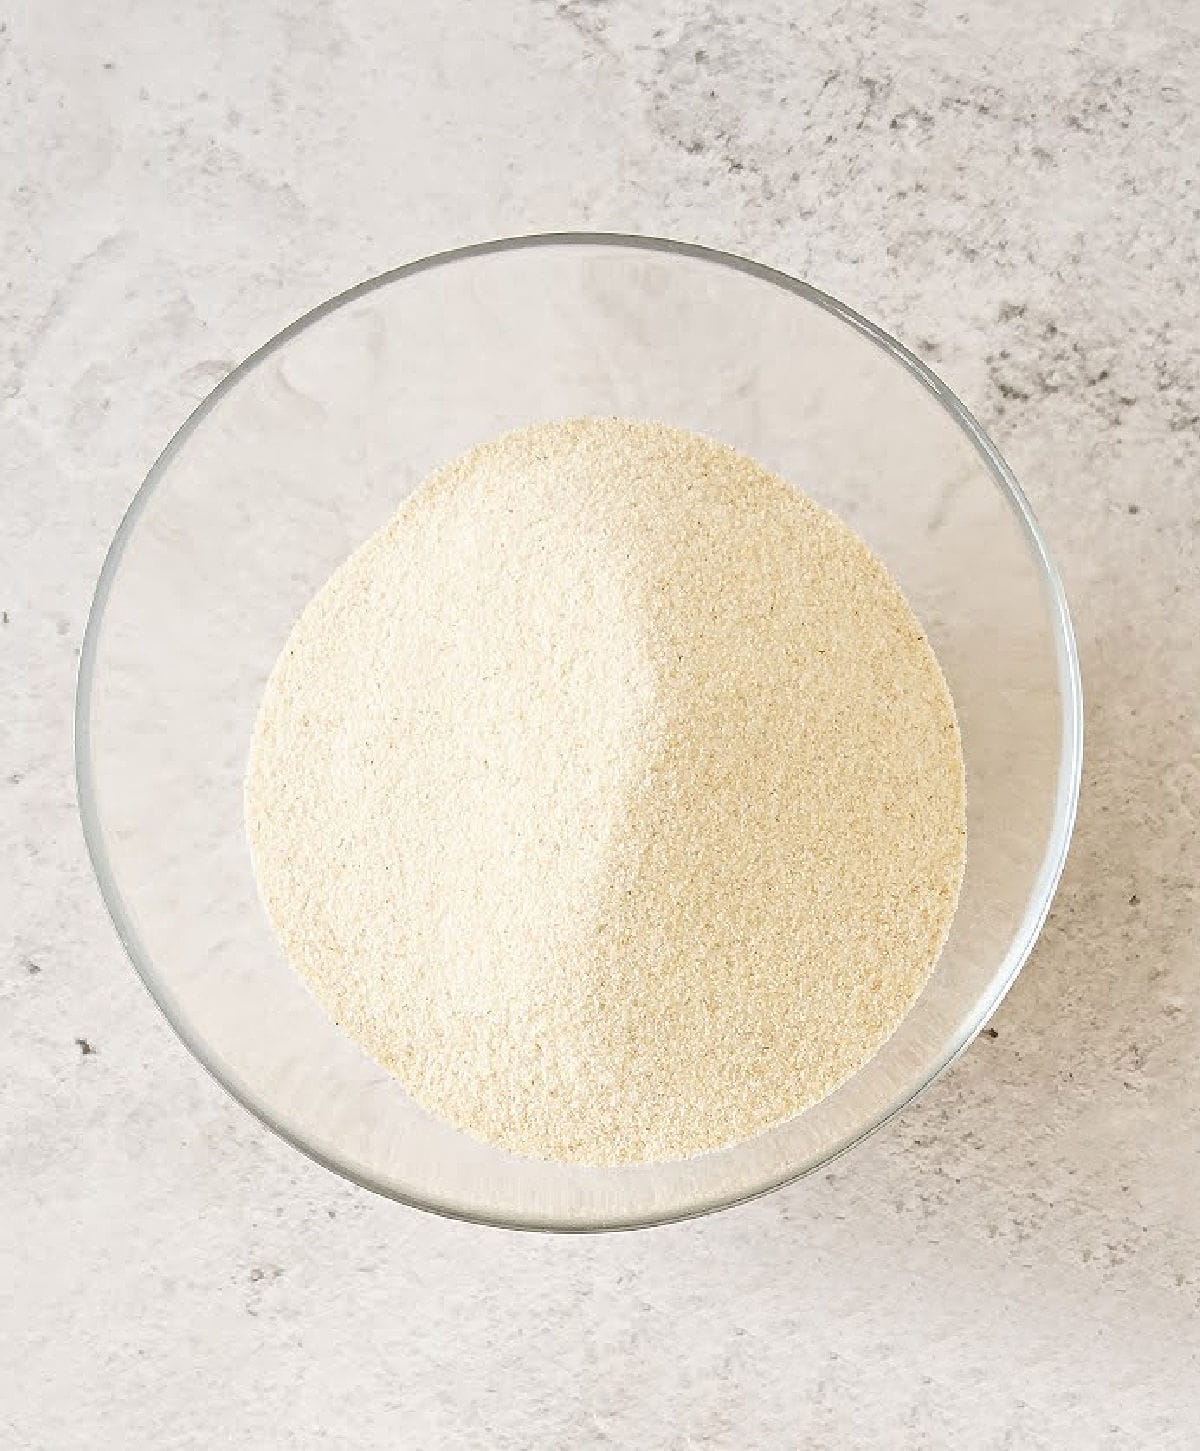
Semolina is a fine-textured flour made from durum wheat (used to make dried pasta). It has a nutty undertone and gives the bread a welcomed golden hue.
It's similar to very fine sand and different and much finer than bread flour.
Bread made with semolina has a crusty crust like no other.
FAQ
Semolina gives the bread a fantastic golden hue and a crusty exterior. Regular bread tends to have a lighter crumb.
This bread is a great appetizer to dip in olive oil or as part of an antipasto platter. It makes amazing toast and the best croutons, and is perfect for a quick bruschetta and some sandwiches.
Tips for kneading bread dough
By hand
- Relax and get into a rhythm. I find it therapeutic.
- Use the base of your palms for effective kneading.
- Avoid adding too much flour; it can make the bread dense and dry. When you add extra flour (a small amount at a time), wait until you have kneaded for a minute or so before adjusting if necessary. Give the dough time to absorb the flour first.
- If the dough repeatedly sticks or if you're having trouble with a sticky dough, consider using a dough scraper to help fold and turn the dough.
With a stand mixer
- Use the dough hook attachment.
- Begin mixing the dough at a low speed. Once the ingredients are roughly combined, increase to a medium setting (often speed 2 or 3 on most mixers). Higher speeds can overwork the dough, leading to breads that are dense and heavy.
- Avoid over-kneading: most bread doughs, with some exceptions like brioche, need about 5-10 minutes of kneading in a stand mixer. You know the dough is well-kneaded when it is smooth and elastic.
- Do not overload your mixer. Check the capacity, as overloading can cause the motor to burn out. As a rule of thumb, if you're kneading dough for more than two loaves of bread, it might be better to divide the dough and knead in batches.
Steps to make semolina bread
This is a fantastic recipe because it's easy to knead by hand. It is even easier with a stand mixer (using the dough hook).
It is supple, soft, and not sticky.
Make the sponge
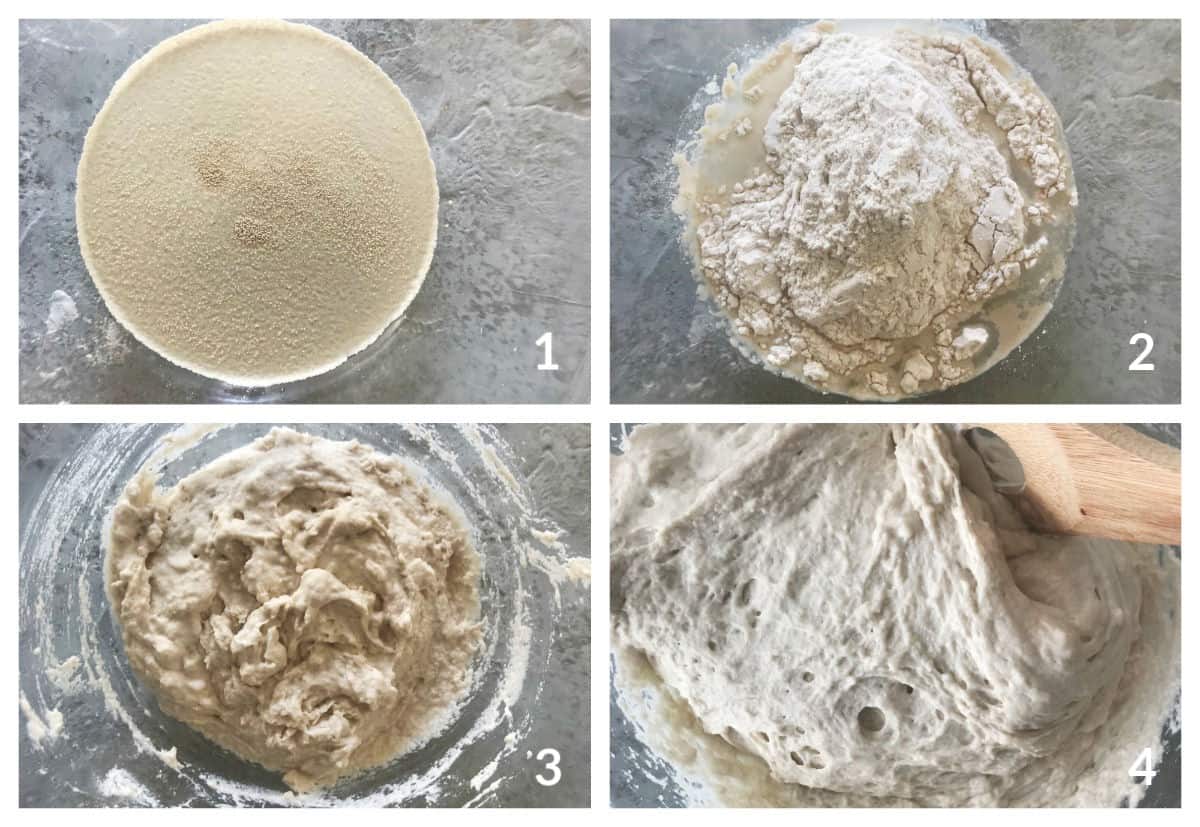
Active-dry yeast (image 1) is mixed with flour and water (images 2 and 3). After resting covered for 1 hour it will have grown, and air pockets like bubbles will have developed (image 4). If this doesn't happen, the yeast is not working. Don't go on. Go buy new yeast.
Adding the rest of the ingredients
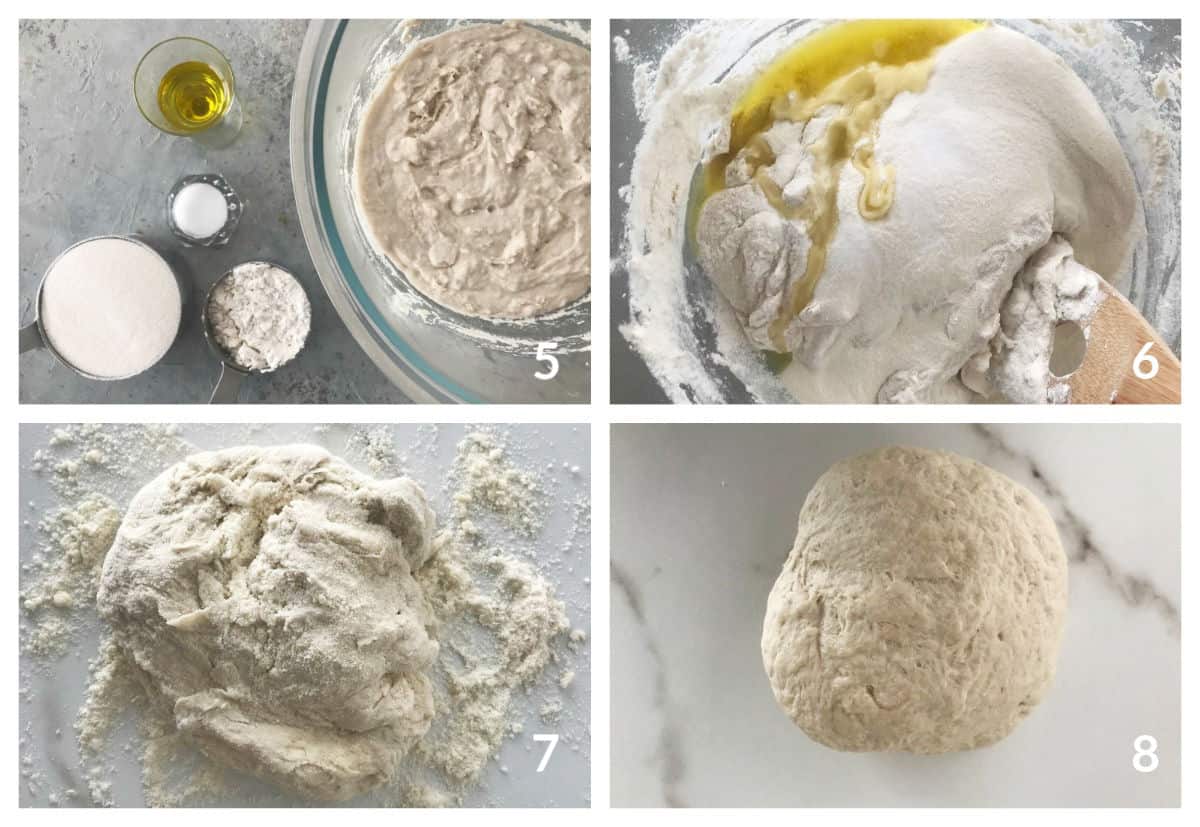
- With the sponge ready, we need to add the rest of the ingredients (images 5 and 6).
- It will look like there are not enough wet ingredients when you turn it out onto the counter (image 7), but the dough starts forming in no time after you start bringing it together and kneading.
- After 1 or 2 minutes, the dough is rough but not sticky, and all the ingredients are combined (image 8).
Kneading and proofing (rising) the dough
- How long does it take? About 7-8 minutes to knead it by hand and about 5 minutes with a stand mixer.
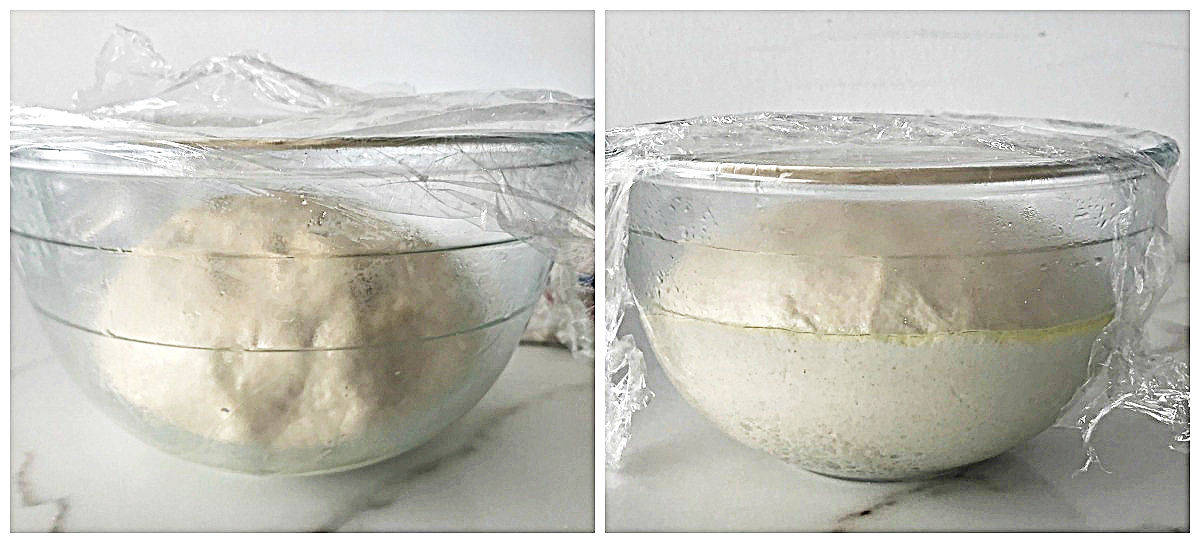
- Letting the dough rest and rise: this is a crucial part of bread making. Bread doughs with yeast need to rise until doubled in size in about 1 hour. So put it in an oiled bowl, turn it around so it's all greased, and cover the bowl with plastic (image below, left).
- Temperature: let rise in a draft-free, warm place. If the room is cold, I wrap it around something that keeps the temperature, like a sweater, blanket, or pashmina.
Forming the loaf
This part is not complicated because the dough is supple and great to work with. It can be shaped differently, and I like the batard, the French name for a plump and short baguette.
Important steps:
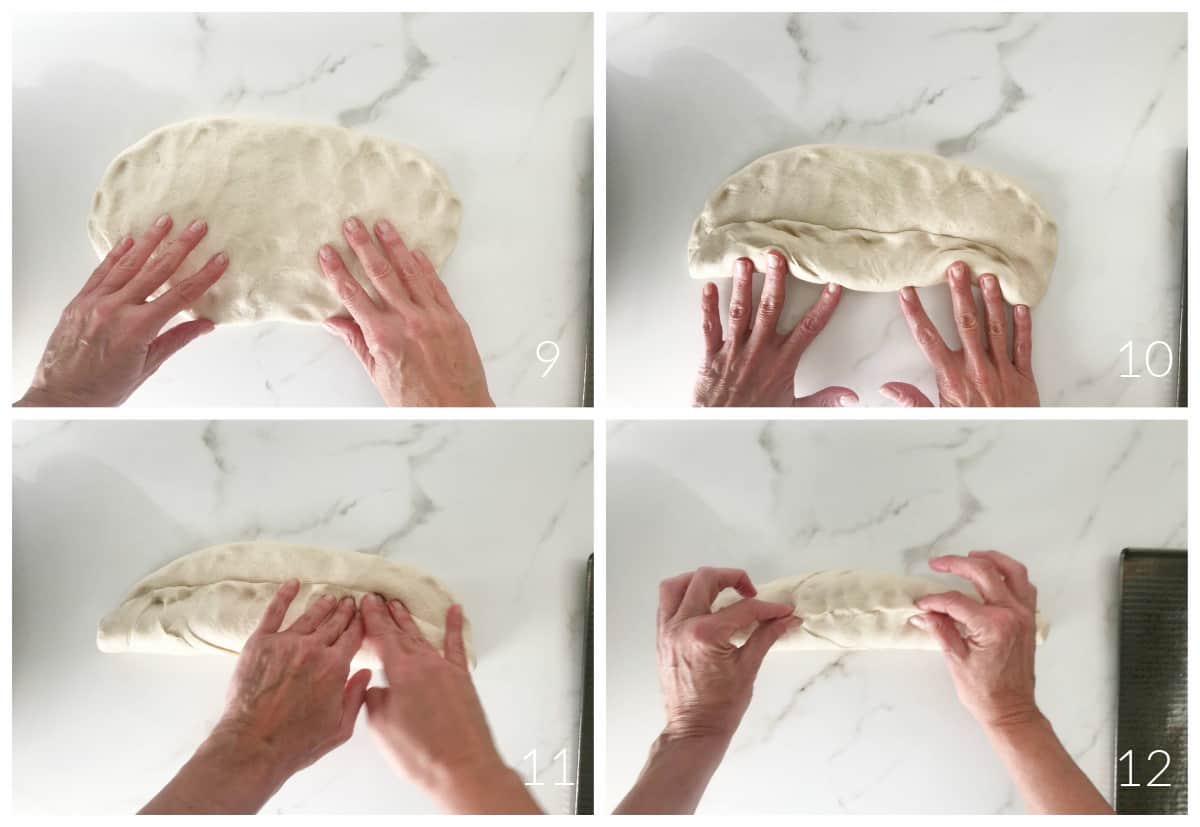
- Flattening the dough with your hands (image 9)
- Folding it like a cinnamon roll, and pinching after each fold (images 10 and 11)
- Pinching and sealing the whole bread (image 12) prevents it from' unfolding or unrolling' during baking.
Second rising and scoring
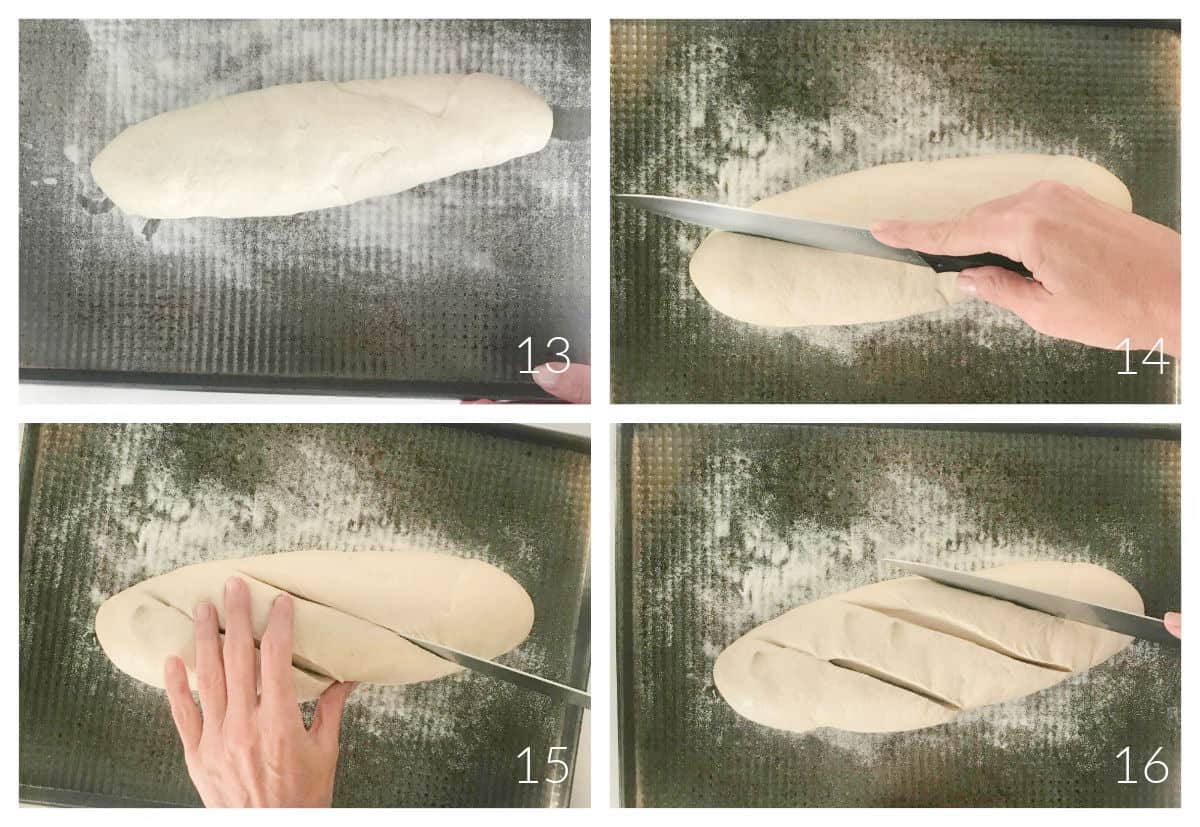
- Second rise: once shaped and on the baking sheet (image 13), the bread needs a second rise. Cover it loosely with a clean kitchen towel and place it in a draft-free, warm place.
- Scoring the bread: these are the cuts or slits you make to the dough right before baking it. They will allow the bread to rise better as it has a place to unfold and grow. You can use a sharp knife (images 14 to 16) or a special tool called a lame. It is a razor blade on a stick. You can lightly aid yourself with your hand (image 15), but it's best to be decisive and go for the 45° angle cut.
Baking
These loaves can have slight differences every time you bake them. If proofed correctly, the flavor will always be fantastic.
But sometimes the crust might be thinner or slightly thicker, the golden hue of the crumb might vary, and so on. Bread uses yeast and it's a living organism. So, it can be temperamental depending on the humidity, warmth of the environment, etc.
Tips to know if the bread is done:
- Size and shape: the loaf should have risen sufficiently and not appear dense. A good rise indicates that the yeast has done its job during the baking process.
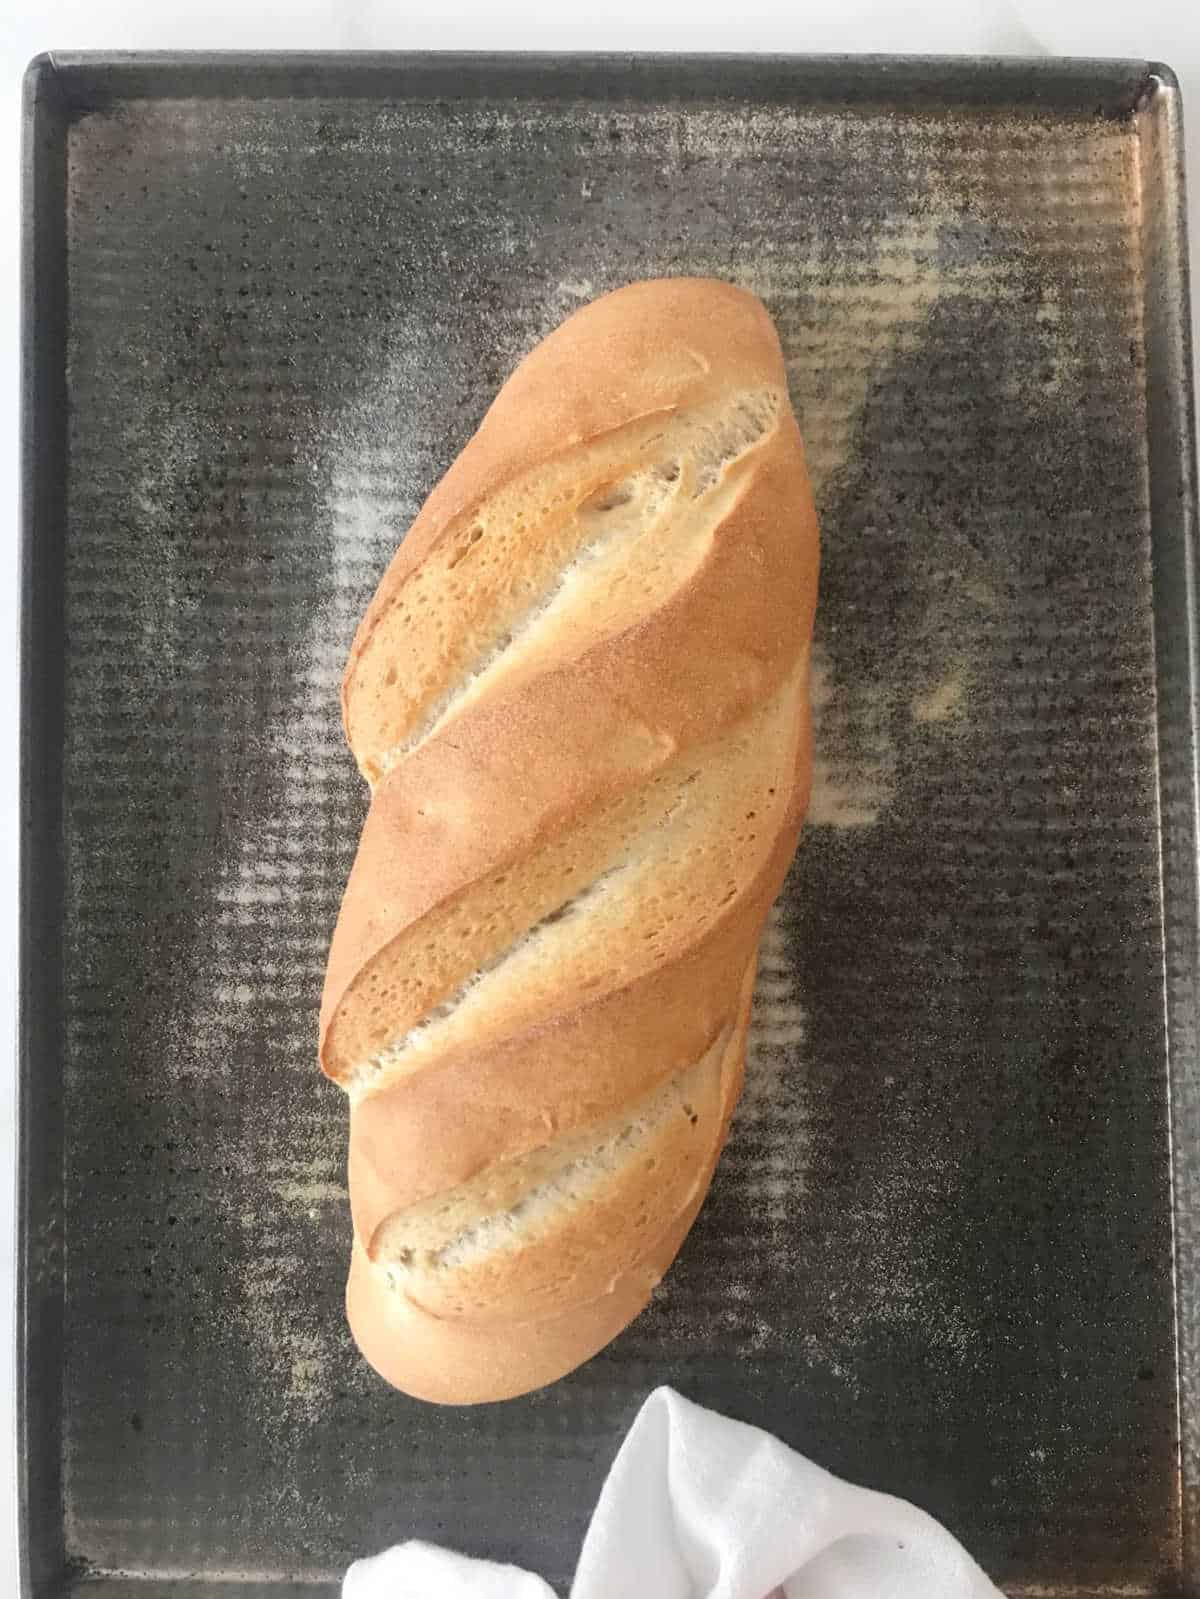
- Color of the crust: the bread should be a deep golden brown.
- Hollow sound: lightly tap the bottom of the loaf with your knuckles or the back of a spoon. It should sound hollow or a spoon if it’s done. This is a traditional method that many bakers (including me) swear by, although it's less precise than using a thermometer.
- Internal temperature: some say it's the most reliable way to check if bread is fully baked. The internal temperature should be between 190°F and 210°F (88°C to 99°C).
Kitchen Notes
- Organization: read the recipe first and ensure you have ingredients at the correct temperature, utensils and equipment needed, and enough workspace. This will make the process so much easier.
- Baking time: consider that all ovens and pans are different, even if they look similar. The baking time in my recipes is as accurate as possible, but it might take you more or less time. You can use a thermometer (like the OXO oven thermometer) to check that your oven is at the right temperature. I recommend tracking how your oven works and what tiny details you might need to adjust.
- Semolina: buy the superfine one. Though it should be labeled differently, semolina comes in different textures and coarseness. Couscous, for example, is also semolina.
- Bread flour: you can buy flour that is specially made for bread. It has more gluten than all-purpose. Gluten is the ingredient that develops during kneading, creating a structure that helps the bread grow. The bread will work with all-purpose flour (but not cake flour), but it's a good idea to use the right one, and you can buy bread flour online.
- Freezing: this is a wonderful bread to freeze in slices and have ready for toast or bruschettas. Slice it and wrap it in plastic or put it in a Ziploc bag. It will last for a month.
Related recipes you might like:
Before you go
If you made this recipe and loved it, you can comment below and leave a five-star ⭐️ review. Also, if you had issues, let me know so we can troubleshoot together.
You can also subscribe to our FREE email series 'Baking the Best' and our regular newsletter. Or follow and save my recipes on Pinterest.
As an Amazon Associate, I earn from qualifying purchases. Read my disclosure policy.
Best Semolina Bread
Ingredients
Sponge:
- 1 cup lukewarm water, tap is fine
- 1 teaspoon dry yeast, use 1 teaspoon active-dry yeast or ¾ teaspoon instant yeast, see Notes below
- 1 ½ cups all-purpose or bread flour, you can buy bread flour online
Dough:
- the sponge, above
- ½ cup all-purpose or bread flour, you can buy bread flour online
- ¾ cup semolina flour
- 1 to 2 teaspoons salt, If you normally don't use much salt go for the 1 teaspoon
- 2 tablespoons olive oil
Instructions
To make the sponge:
- Place 1 cup lukewarm water in a mixing bowl and whisk in 1 teaspoon dry yeast.
- Stir in 1 ½ cups all-purpose or bread flour, mix lightly and cover the bowl with plastic wrap.
- Set the sponge aside to rise at room temperature (draft-free and warm) until the sponge doubles, about 1 hour. I do this directly in the bowl of the standing mixer and then add the dough ingredients.
To make the bread:
- Have ready a baking sheet lightly dusted with semolina.
- Stir the sponge to deflate, and add ½ cup all-purpose or bread flour, ¾ cup semolina flour, 1 to 2 teaspoons salt, and 2 tablespoons olive oil.
- Adjust the bowl in your stand mixer and knead on low speed with the dough hook for about 5 minutes to form a smooth, elastic, and slightly sticky dough. Alternatively, turn the shaggy dough onto a lightly floured surface and knead by hand for about 6-7 minutes. See the post above for images and further details.
- Transfer the dough to an oiled bowl. Turn the dough, so all the sides are oiled. Cover the bowl with plastic wrap and let rise until doubled, about 1 hour.
- Turn the risen dough out on the floured work surface.
- Press with the palms of your hands to deflate.
- Shape the dough into an oval, folding as you would a cinnamon roll, pinching at the seams after each fold, and place tucked side down on the prepared pan and cover with oiled plastic wrap.
- Allow it to rise until doubled in volume, about 1 hour.
- About 20 minutes before baking, turn the oven to 400ºF (200ºC).
- Sesame seeds on top: this is optional. Lightly dampen the dough on top (carefully, as you don't want to tear or deflate it) and sprinkle the seeds.
- Hold a razor blade or sharp kitchen knife at about a 30º to 45° angle to the loaf, and slash 3 lines.
- Bake the loaf for about 35 minutes until well risen, golden brown, and the bottom sounds hollow when tapped. All ovens are different, so if 20 minutes into baking you feel the bread is darkening too much, turn it down to 375°F (190°C) for the rest of the baking.
- Remove from oven and cool on a wire rack until able to lift from the baking sheet with a spatula, and wait until completely cooled to cut.
Notes
Adapted from How to Bake by Nick Malgieri


Alyssa Salwen says
Hi Paula, I'd like to make this recipe using my sourdough starter. Can you tell me how much starter I would need to substitute for the sponge? I recently ordered a fine grind semolina/durum blend, which hasn't arrived yet, but I've made a very happy, healthy starter and am anxious to use it.
Paula Montenegro says
Hi Alyssa, sorry for the delay in answering but your comment went to spam...
I haven't made it with sourdough starter, but use your favorite sourdough white bread recipe and substitute 1/3 of the white dough for semolina flour.
Alyssa Salwen says
Thank you, Paula.
Roxxy says
LOVE this recipe! The whole house smelled like heaven! Can I use this for pizza dough as well?
Paula Montenegro says
Happy to hear that Roxxy! I think it would work for pizza and flatbread.
Roxxy says
AWESOME! Would I follow the same instruction and cooking temp for pizza? Can't wait to give it a try!
Paula Montenegro says
After the first rise, when the dough has doubled, I would follow the instructions for shaping, proofing, and baking pizza dough. You might want to make half the bread recipe and see if it's the type of dough you like for pizza. Let me know how it goes!
Cindy says
Such a delicious recipe. I made this with my family today for lunch! We love to cook as a family and this recipe was delish! My kids ask that we make it again later in the week. They had so much fun with this bread recipe!
Jessica says
I just made/ate this bread, I doubled the recipe. I didn’t want to be bothered to pull out my KitchenAid, so I did it by hand. Delicious Italian Semolina bread! I’m Italian and live in Bayside (queens), NY. I know good bread, and this is pretty freaking good. I will definitely be making this again and probably playing with the rise times. Have you let it rise overnight in the fridge?
Paula Montenegro says
Hi Jessica, glad you loved it! I haven't let it rise overnight but it definitely can. The flavor would be even more amazing.
Anita says
I love bread that incorporate sponge in it. The bread always turns out so much more delicious with better texture and more fluffy compared to the one made without the sponge. 🙂
Denay DeGuzman says
What a timely, helpful recipe! Right now there's no bread at the markets around my home, so I'm heading into the kitchen to start baking my own. Your bread recipe's at the top of my list!
Alison says
This bread is beautiful and so delicious! Now is the perfect time to start making homemade bread!
vincent winkleblech says
Your recipe is great..... but your multiplier conversions are WAAAAAY OFF!!!!!
The cups get doubled and tripled but the grams don not !
Paula Montenegro says
Hi Vincent, I'll look into it. Have a good day.
Paula Montenegro says
I do the grams by hand because the recipe card doesn't come with that function. The multiplier is built into it and takes the first measurement.
Sarah D'Amato says
Can I make rolls with this dough?
Paula Montenegro says
Yes you can!
Carol says
I'm very new to bread baking, and this recipe was super easy and tastes great.
It was the prefect companion to my homemade pasta and bolognese sauce last night. I used a good quality EVOO in the recipe and to oil my bowl, and I can really taste it in the finished product. A few recommendations for other novices (or updates to the recipe.) Where the recipe says warm water, get a digital thermometer and make it between 120 - 130 degrees Fahrenheit. This is the temperature that yeast seems to like and warm to your touch can be too hot or too cool. Also, the recipe doesn't give any dimensions when forming the loaf. Mine ended up about 15-16" long and 2.5-3" wide. I ended only baking for 20 minutes and it came out perfectly. The advice here is watch your bake, regardless of the time. If I had cooked for 35 minutes, it would have been way too long. I'm definitely adding this to my long-term keep recipes.
Jeanette says
I made your recipe yesterday & cut it this morning for breakfast. OMG, beautiful crumb and so tasty. I used all KAF products. Used 70g of organic high gluten flour. I preheated a 4 quart Dutch oven at 450° but tempered it to 400° when Loaf was placed in the oven. It was cooked for 20 minutes covered then 15 minutes uncovered. Internal temperatures was over 200° so I could have cooked it less but that extra time didn’t hurt it at all. I put a picture of it on Instagram and added @vintagekitchenblog in the introduction. (@nonnagates). I’d love to send you pictures of the crumb if you’d like. Thanks for sharing this recipe. Love it!
Paula Montenegro says
Thanks to you!
Marlena says
Hello,
I just wanted to pop in and say I absolutely LOVED how this recipe came out. I made a slight variation by adding 2 tbsps of raisins and about 1 tbsp of fennel seeds. Other than that I followed the recipe exactly. The bread was deliciously crispy on the outside and soft and chewy inside. It slices beautifully and I just cannot stop eating it!! Thank you for making such a perfect, approachable recipe for fresh baked bread.
Paula Montenegro says
SO glad you liked it Marlena! I love it also. And think your add-ins are great btw. Will try them in the future. I love having this bread sliced and frozen so I can make last-minute bruschettas! Thanks for the comment.
Mel says
Your notes say bread flour is better with this recipe, but
your recipe says...all purpose flour!?!?!?!
Which is it?
Paula Montenegro says
Hi Mel, I use bread flour but it can be made with all-purpose also, in case bread flour is hard to get. I will add that note to the recipe. Thanks for the heads up!
Caitlyn says
Thanks for this great recipe! It’s in the oven now and I can’t wait to taste it. By any chance has anyone tried it with Bread flour instead of all purpose flour? Just wondering what the results were like! Thanks!
Paula Montenegro says
I use bread flour and all-purpose. The results are great. It might be a little coarser crumb, but not a big difference.
Mieke says
I tried your recipe last week.
Instead of all-purpose flour I used spelt, as that was the only thing I had and it turned out amazing!
So soft and perfect on the inside, with an incredibly tasty crust.
So delicious, it was finished in no time and I can't wait to make another one.
Also, very easy to knead with hand, which is a plus for me as a novice 🙂
Paula Montenegro says
So glad it turned out great Mieke! It is a very easy dough to work with. And good to know it can work with whole wheat flours too!
Barbara says
I wanted to make a semolina bread for bacon, lettuce and tomato sandwiches using my homegrown heirloom tomatoes. I found your recipe and the second rise is almost finished and the oven is preheating. I can’t wait to taste it! Thank you for this cool recipe!❤️
Paula Montenegro says
Love that you're making it! Let me know how it goes. I always have some in the freezer for bruschettas and sandwiches.
Michele says
Your Semolina bread looks SO perfect! I usually use my bread maker, but now that I see how easy you've made it look, I think I'm going to try this. I love that I can use my Kitchenaid and dough hook to mix the dough. Yum!
Paula Montenegro says
I used to knead it in the bread maker but shape and bake it by hand. That way I could not only make it in different shapes, but the crust turns out different too!
Linda says
I have my favorite yeast bread I make at Christmas time but hardly have the time to do it regularly. I have to say though, that I love fresh baked bread and nothing is as good as homemade. This looks like a delicious bread and now I'm kinda yearning to get my hands in some dough and knead away. Great instructions and I'm so jealous that you get to eat that right now.
Paula Montenegro says
Thanks Linda! I do love to bake for the holidays too. It's my therapy!
Julie says
I bake homemade bread all the time, but never thought to try semolina bread! We always have semolina flour at home to make pasta, so I'm going to try to make a loaf of it this weekend!
Paula Montenegro says
Do add it! It's wonderful. I'm jealous you make your own pasta!
Gloria says
I am a bread fanatic. LOVE the aroma of bread baking. I would devour this all by myself.
Jane says
That's a beautiful loaf. I love using semolina in bread and other baked goods, and I understand what you meant about finding yourself with tons of the stuff lying around!